background image

29

6 Voice over IP

Help 8 · Voice over IP

Internet telephony or Voice over IP means that telephone
calls (and fax transmissions) are no longer made analog
over the telephone network, but as digital packets over the
Internet. The calls between two IP connections are mostly
free. In addition, many providers provide an interface
(gateway) to the analog telephone fixed network. Using
this interface, calls from IP connections are possible to any
telephone connection (fixed network or mobile telephone
numbers) anywhere in the world. Though these calls are
charged, they are usually more economical than fixed net-
work connection.
For connecting two calling parties over the Internet, you
require static IP addresses. For this purpose each subscriber
receives an SIP address (Session Initiation Protocol), with
which he/she can be reached at any time. Data packets of
the calls are be transmitted with the Real-Time Transport
Protocol (RTP), ensuring a fast data flow. Codecs convert
analog voice into digital signals and vice-a-versa. During
the conversion the data is also compressed. Both IP con-
nections must support the same codecs.
Connect your device to the analog telephone fixed net-
work and the router of your network (also see section In-
stallation help, page ). You can then use both Internet te-
lephony and fax transmission over Internet and your con-
ventional analog telephone fixed network connection.

Configuring the device with the 
web interface 

Minimum browser

Functions on web interface

You can carry out some basic settings on the display of the
device. A great many configuration options are available to
you with the web interface of your device. The help-text on
the respective page offers you a detailed description of the
functions. You will find a printed version of the help texts
on the Internet: www.sagem.com

WAN and LAN

Calling the web interface via the WAN 
socket 

You can call the web interface via the

WAN

 socket, with

which the device is connected to the router of your net-
work. The connection via the 

WAN

 socket supports dy-

namic allocation of an IP address with the Dynamic Host
Configuration Protocol (DHCP). The router assigns the
private IP address in the network to the device.

Network report

1

Start an Internet browser on a computer, which is con-
nected to the network. Enter the private IP address of
the device in the network in the address bar of the
browser.

2

Confirm using R

ETURN

.

3

Enter 

USER

 as user name and password.

4

Confirm with OK. The web interface is called.

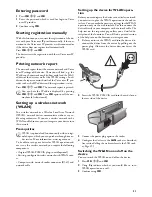
Calling the web interface via the LAN 
socket 

You can connect your device directly to the network con-
nection of a computer via the 

LAN

 socket, in order to

configure the device via the web interface. With this con-
nection, the device uses a fixed IP address (factory setting:
192.168.134.1). For this purpose, you must enter the nec-
essary fixed IP addresses in the network settings of your
computer.

Network report

1

Insert the network cable into the network connection
socket marked with 

LAN

 (RJ-45) on the rear side of

the device.

2

Connect the other end on the network cable of your
computer (RJ-45).

3

Open the window with the properties of the network
card of your computer. For Windows PC: Click on
S

TART

 > S

ETTINGS

 > N

ETWORK


CONNECTIONS

.

Right click on the LAN connection, you will find the
properties of the network connection in the pop-up
menu.

Press 

î

 and 

8

 to print the instructions for Voice

over IP functions.

We recommend the following Internet browser.
Windows PC: Internet Explorer (Version 6.0 or
above), Apple Macintosh: Safari (version 1.3 or
above), Linux: Conquerer (version 3.2.1 or above)

The IP address of the 

WAN

 and 

LAN

 sockets

should not be the same, they will be defined by the
subnet mask. Most routers will give a standard adress
format 192.168.1.X. The IP address of the 

LAN

socket is set to default 192.168.134.1 so as it does
not conflict with standard router settings.

You will find the IP address set and other important
details regarding the device in the network report.
Press 

OK

87

 and 

OK

 to print the network re-

port.

Change the password when you call the web in-
terface for the first time, so that there is no unau-
thorised access to your device. Note down your
password in a safe place. Should you forget your
password, you must reset your device to factory
settings, in order to be able to access it again. All
personal settings will be deleted.

You will find the IP address set and other important
details regarding the device in the network report.
Press 

OK

87

 and 

OK

 to print the network re-

port.

Summary of Contents for IP PHONEFAX 49A

Page 1: ...User Manual...

Page 2: ...our Voice over IP provider you get a separate telephone number under which you are reachable from every tele phone connection To be able to use Voice over IP you require a computer network with a rout...

Page 3: ...d for it behind the paper feed B Papierhalter installieren Inserting paper Paper Format Before you can receive or copy documents you must insert paper Please use only suitable paper in the standard fo...

Page 4: ...d network cables on the rear side of the device R ckseite Detail Connecting the Telephone Cord Connecting the Telephone Cable Connect the telephone cord to the device by inserting it in the socket des...

Page 5: ...allation commences Press Your device prints a help page Selecting the Language 1 Use to select the desired display language 2 Confirm with OK Selecting the Country Setting the Country Correctly Settin...

Page 6: ...t with the positive and negative poles as shown in the pic ture in the battery compartment 2 Place the cover on the battery compartment and slide it upward until it snaps into place 3 Place the cordle...

Page 7: ...eed page 37 4 Miscellaneous 41 Call log page 38 42 Call Waiting page 15 43 Fax templates page 34 44 Contrast page 37 Service 45 Service code page 50 46 Ink film stock page 47 47 Firmware version page...

Page 8: ...e IP address DHCP Line socket LINE socket Connection socket for analog tele phone cord Reset button Reset button Resetting device to factory settings All personal settings will be deleted WLAN PCMCIA...

Page 9: ...one Telephone book button m Press briefly Calling up the telephone book from the device hold pressed Calling the telephone book of the cordless telephone Arrow keys Calling the menu functions navigati...

Page 10: ...ting transmission of messages press and hold Starting fax polling Letter keypad Letter keypad Entering characters Entering capital let ters by pressing and holding button Deleting using Entering a bre...

Page 11: ...s may be retained if placed near or on the handset receiver Power Supply Check whether the power type of your machine indicated on the type plate matches the power type available at the setup location...

Page 12: ...itional functions 21 5 Answering Machine 24 Switching on and off 24 Editing the outgoing message 24 Listening to messages 25 Deleting messages 26 Setting up forwarding and remote access 26 Using the R...

Page 13: ...phones 43 Connecting Additional Devices 44 Using Additional Telephones Easylink 45 13 Service 46 Changing the ink film 46 Checking the Ink Film Reserve 47 Changing the batteries in the cordless telep...

Page 14: ...e for the outside line access code for an extension or sub address or in a long distance number Press R The second part of the number is only dialled once the connection with the main number has been...

Page 15: ...et You will hear a dial tone from the loudspeaker 2 Enter the desired number using the numeric keypad or dial a saved entry The dialling process begins immedi ately Any incorrectly entered numbers can...

Page 16: ...lling a cordless telephone 1 In starting mode lift the handset 2 Press 3 Dial the number of the cordless telephone using the nu meric keypad Calling all cordless telephones 1 In starting mode lift the...

Page 17: ...elephone Missed calls on Dect If you receive calls in your absence a message appears on the display of the cordless telephone 1 Press OK 2 Using you can page through the list of missed calls 3 Press t...

Page 18: ...1 Press OK 16 and OK 2 Use to select the entry you would like to delete 3 Confirm with OK 4 Confirm DELETE YES with OK Groups Groups You can combine several telephone book entries into a group A mess...

Page 19: ...ic key select the short dialling number which you would like to reserve or modify 3 Confirm using OK 4 Using select the telephone book entry which you would like to assign to this short dial entry 5 C...

Page 20: ...OK Changing the ringer tone Changing the ringer tone You can assign a separate ring tone to each entry In this way you can distinguish between business and personal calls CLIP Prerequisite 1 Long pres...

Page 21: ...m using OK 5 Press EDIT ENTRY 6 Using select ACTIVATE to switch on the func tion Using select DEACTIVATE to switch off the function 7 Confirm using OK Emergency call function Modifying the emergency c...

Page 22: ...s Birthday reminder Birthday reminder Using the birthday reminder you can enter the dates for up to ten birthdays The cordless telephone rings at the en tered time on the entered date Press any key to...

Page 23: ...l 8 Using Yes activate the baby phone function on the transmitting unit The cordless telephones are now connected to each other in the monitoring mode Place the transmitting unit in the room which you...

Page 24: ...ding of Messages You can record an outgoing message which the caller hears for which no message can be recorded in reply external memo 1 Press b 2 Dial using EXTERN MEMO 3 Confirm using OK 4 Use to se...

Page 25: ...n cancel the function Listening to messages On the device Listening to Messages Listening to New Messages Indication of New Messages If new messages have been received on the answering ma chine the bu...

Page 26: ...chine forwards messages to a specified telephone number Once the configured number of messages is reached the machine calls the number If the call is an swered a greeting text is played Then the perso...

Page 27: ...ack After that the button starts flashing The voice message is displayed as a new message Recording the outgoing message On the cordless telephone 1 Press and using select VOICE MAIL 2 Confirm using O...

Page 28: ...imit the length of the incoming messages and in ternal memos 1 Press b 2 Use to select RECORD TIME 3 Confirm with OK 4 Use to select the desired recording length or unlim ited time automatic 5 Confirm...

Page 29: ...vate IP address in the network to the device Network report 1 Start an Internet browser on a computer which is con nected to the network Enter the private IP address of the device in the network in th...

Page 30: ...or select manual configura tion 3 Confirm using OK Entering user name Login name and User name In addition to the login name with which you login with your Voice over IP provider you will also receive...

Page 31: ...network you require the following components Original WLAN PCMCIA plug in card optional Existing configured wireless network with WLAN rout er Computer with network socket connector RJ 45 and network...

Page 32: ...o Busy Number Manual dialling Dial the desired telephone number with the number pad Loading a Short Dial Entry Telephone book 1 Press m 2 Use to select an entry Enter the initial letters with the numb...

Page 33: ...y If no paper or no ink film is inserted the machine saves the incoming faxes The button blinks Once paper or a new ink film is in serted the saved faxes are printed out Paper Error Full Message Memor...

Page 34: ...e Press j to eject the document This interrupts the standby mode Using Fax Templates Fax Templates Five fax templates which you can use are stored in your device With these templates you can quickly c...

Page 35: ...O for photos Press RES The configured resolution ap pears on the display Press RES again to change the res olution Creating a Copy Press COPY briefly The copy is created Creating Multiple Copies 1 Hol...

Page 36: ...2 Dial using SUDOKU LAST 3 Confirm using OK 4 Enter how many copies of the Sudoku you would like to print maximum 9 copies 5 Confirm using OK 6 Using select if you would like to print the solution 7 C...

Page 37: ...tory settings Optimized adaptation for text and photo printing CONTR DARK For darker copies and fax transmission for example documents with faint printing 3 Confirm using OK Custom settings default se...

Page 38: ...s as for the day mode see steps 2 to 7 Setting the Timer Timer The timer switches between the modes day and night at the configured times 1 Press OK 53 and OK 2 Enter the time at which the machine sho...

Page 39: ...nfirm with OK Printing Help Pages Help 1 Overview Press and 1 to print an overview of the help pages Help 3 Telephone Book Press and 3 to print an overview of the telephone book and answering machine...

Page 40: ...Use to select the desired contrast level 6 Confirm using OK Setting the ring tone On Colour Dect 1 Press and using select PERSONALIS 2 Confirm with OK 3 Using select RINGER TYPE 4 Confirm with OK 5 Us...

Page 41: ...ng station respectively Switching automatic picking up on off 1 Press and using select SETTINGS 2 Confirm using OK 3 Using select AUTO PICKUP 4 Confirm with OK 5 Switch the function on off using EDIT...

Page 42: ...e to be informed about new events SMSs missed calls with a message on the dis play 1 Press and using select CALLS 2 Confirm with OK 3 Dial using EVENTS 4 Confirm using OK 5 Use to select whether you w...

Page 43: ...can register in all up to five cordless telephones with your device Using only original cordless phones as addi tional cordless phones ensures optimum use of all func tions You can get original cordle...

Page 44: ...ne on the device 20 Confirm using OK Setting the preferred base unit Preferred base unit With this function you can specify which device base station should be used for placing telephone calls if you...

Page 45: ...e receiving a fax message whistle or silence you can start the fax reception by pressing 5 on the additional telephone or the o button on the machine Taking Over the Line If you pick up on an addition...

Page 46: ...The used ink film cannot be reused 5 Pull the used Plug n Print card out of the plug socket on the left hand side next to the ink film tray The Plug n Print card cannot be reused 6 Carefully remove th...

Page 47: ...hone 2 Open the battery compartment on the backside of the cordless telephone by pulling the cover down 3 Remove the old batteries 4 Insert the new batteries in the battery compartment with the positi...

Page 48: ...pen the device by lifting the panel using grip in the centre and folding it down 3 Open the scanner cover and the cover of the automatic document cover by first pushing the support A and then the supp...

Page 49: ...cloth 5 Clean the feed roller A and the underside of the sup port pad of the feeder roller B with a soft lint free cloth moistened with cleaning alcohol 96 percent Rotate the feed roller You must cle...

Page 50: ...from the technical customer service under any cir cumstances see the back page of this user manual for the telephone numbers Our technicians will guide you step by step all through the restarting pro...

Page 51: ...scanner and the document feed slot Problems with the connection The device rings once remains silent for a short while and starts ringing again This is absolutely normal The fax switch checks the cal...

Page 52: ...ce the cordless telephone into the charging station The cordless telephone cannot be switched on after 12 sec onds in the charging station Change the batteries in the cordless telephone also see Chapt...

Page 53: ...ge of fax terminals with Internet access and SMS function multi functional terminals and servers covering the needs of all its customers from home users to multinational organi sations In order to app...

Page 54: ...heir national legislation such in validity or illegality shall not impair or affect the remaining provisions or parts of this guarantee The CE symbol confirms conformity with the EU direc tives that a...

Page 55: ...e statutory regulations of your country regarding telecommunications secrecy and data privacy This product is intended for use on an analogue public tel ecommunications network PSTN and in the country...

Page 56: ...le Our employees are trained ex perts who would be happy to answer your questions We can assist your more quickly if you do not call us from the machine rather an external telephone Keep a printout of...

Reviews: