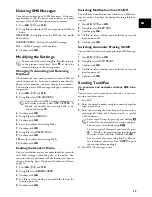
background image

22

EN

5

Next you will be asked to accept the licensing condi-
tions. Click on 

Yes

.

6

The program can now commence with the installation.
Click on 

Install

.

7

At the conclusion of the install process you must restart
your computer. Make your selection as to whether the
computer should restart automatically or whether you
would like to restart the computer yourself at a later
time. Click on 

Finish

.

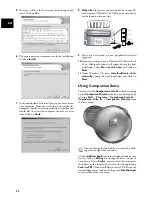
8 Only  after

 the restart, connect the device to your PC

with a typical USB cable. The USB port of your device
can be found on the rear side.

9

Your device is detected as a new peripheral device and
registered.

10

If your operating system is Windows XP (Service Pack
2), an additional window will appear during the final
installation. Select 

No, not this time

, and click on

Next

.

11

Under Windows XP, select 

Install software auto-

matically

 during the final installation and click on

Next

.

Using Companion Suite

Start

You can start the 

Companion Suite LL

 either by clicking

on the 

Companion Director

 icon on your desktop or by

selecting 

Start

Programs

Companion Suite LL

>

Companion Suite LL

Companion Director

 from

the Start menu.

Start

Companion Suite

Click on 

Address book

 to edit the telephone book of your

device. Click on 

Settings

 to change the basic settings of

your device. Under 

Status

, you can select the settings for

the display of the toner level as well as for the application

Scan-to-PDF

. If you would like to create PDF files out of

scanned documents, click on the large icon 

Doc Manager

in the middle of the start menu.

You can change the look of the start menu by click-
ing with the right mouse button.

Summary of Contents for MF 3175

Page 1: ...User Manual ...

Page 2: ... is not supported in all countries and networks Received SMS messages can be managed with the extensive func tions of the SMS menu Text2Fax You can enter text on your device and send as a fax trans mission to another device in countries and networks with out SMS function If you want your device can print Sudoku puzzles in four different difficulty levels with solution PC Connection You can connect...

Page 3: ... must load paper into the device Please use only appropri ate paper in standard format A4 210 297 millimetre preferably80 g m2 Follow the specifications in the tech nical data Paper Preparing Paper 1 Remove the cover from the paper tray 2 Put in only as much paper as will fit under the raised limit markers on the upper edge of the paper tray see also the drawings on the cover of the paper tray You...

Page 4: ...er cartridge is supplied with the device The toner level memory for this starter cartridge was set at the factory The starter cartridge need not be updated with a Plug n Print card For each additional toner cartridge that you insert into your device you must update the toner lev el memory with the Plug n Print card provided 1 Open the cover by taking hold of both document guides and tipping the co...

Page 5: ... transmission header Entering Your Number 1 Enter your number Using or you can enter a plus sign 2 Confirm using OK Entering Name 1 Enter the name using the keys A Z 2 Confirm with OK Entering the Date and Time 1 Enter the date two digits for each field for example 31 05 25 for May 31th 2025 2 Enter the time e g 14 00 for 2 pm 3 Confirm with OK Once you have removed the protection strip do not sha...

Page 6: ...sing Fax Templates 29 Using fax templates page 14 3 SMS Function is not supported in all countries and networks Function is not supported in all countries and networks 31 Sending SMS 31 Sending SMS page 18 32 Reading SMS 32 Reading SMS page 18 33 Deleting SMS 33 Deleting SMS page 19 34 Printing SMS 34 Printing SMS page 18 35 Settings 35 Settings for sending and receiving SMS page 19 36 SMS Access ...

Page 7: ...rd 10 Telephone Handset with Spiral Cable Type 3 Telephone handset with spiral cable LF 3155 LF 3175 Außenansicht nummeriert 1 Toner Cartridge Toner cartridge Außenansicht Tonerkartusche Connections on the Rear Side 1 Telephone Handset Socket Socket Connection socket for the telephone handset LF 3155 LF 3175 2 External Devices ƒ EXT Socket Connection socket for additional de vices 3 Telephone Cabl...

Page 8: ...ansmission or fax reception Copy COPY Press twice making copies automatically Press once adjusting copies Help Print list of functions jobs settings printing fax jour nal or telephone book Sudoku printing a game printing the fax templates SMS _ Calling up the SMS menu function is not support ed in all countries and networks in countries and net works without SMS function calling up Text2Fax sendin...

Page 9: ...o handle the device without super vision The packing materials should be kept out of the hands of children Magnetic telephone handset Caution metallic objects may be retained if placed near or on the telephone handset receiver Power Supply Check whether the power type of your device Check whether the power type of your device indicated on the type plate matches the power type available at the setu...

Page 10: ... 4 SMS 18 SMS Requirements 18 Sending SMS 18 Receiving SMS Messages 18 Reading SMS Messages 18 Printing SMS Messages 18 Deleting SMS Messages 19 Modifying the Settings 19 Sending Text2Fax 19 5 Fun and Games 20 Sudoku 20 6 PC Connection 21 Requirements 21 Installing the Software 21 Using Companion Suite 22 Editing the Telephone Book 23 Modifying the Settings 24 Displaying the Toner Level 24 Printin...

Page 11: ... number Press ú and Rø The second part of the number is dialled only after a short pause Dialling with the Handset Replaced Dialling with the Handset Replaced Press μ to dial without lifting up the handset You will hear the dial tone from the loudspeaker the dialling proc ess will commence immediately Telephone Book Help 4 Telephone book Telephone Book Call the telephone book functions using am Yo...

Page 12: ...m with OK 6 If necessary enter a new name for the group 7 Confirm with OK 8 You can delete or add entries Use C to delete individ ual recipients Press am to add a recipient from the telephone book 9 Confirm with OK 10 If necessary enter a new number for the group 11 Confirm with OK Deleting a Group 1 Press am 2 Using select CANCEL 3 Confirm with OK 4 Select the group that you would like to delete ...

Page 13: ...he last 30 transmissions Do not insert any documents into the machine that are wet have been edited with correction fluid are soiled or have a coated surface are written on with a soft pencil with paint chalk or charcoal originate from newspapers or magazines printing ink are held together with office or notebook staples or with tape or glue are pasted with note papers are creased crumpled or torn...

Page 14: ...e individ ual recipients press À You can enter up to 10 recip ients 5 Press o The device transmits the fax message succes sively to all recipients Sending Fax Later Delayed Fax Transmission If you would like to make use of the lower telephone tariffs or if the recipient can be reached at some specific time on ly you can send the fax at a later time within 24 hours 1 Insert the document 2 Press OK ...

Page 15: ...y after entering a PIN code can you print out these fax transmissions Entering the PIN Code 1 Press OK 27 and OK 2 Using select ANSWER CODE 3 Confirm with OK 4 Enter a four digit PIN code 5 Confirm with OK Switching On and Off 1 Press OK 27 and OK 2 Using select ACTIVATION 3 Confirm with OK 4 Enter the four digit PIN code 5 Confirm with OK 6 Use to select whether you would like to turn the functio...

Page 16: ...C Polling send Jobs 3 POL Time delayed Fax Polling Jobs 4 TR Job in progress Jobs 5 SMS SMS transmission function is not supported in all countries and networks Stop Immediate Job Execution 1 Press OK 51 and OK 2 Using select the job that you would like to execute immediately 3 Confirm with OK The transmission or polling will commence immediately Changing a Job 1 Press OK 52 and OK 2 Using select ...

Page 17: ...eated Adjusting Copies 1 Press COPY 2 Enter the number of times you would like to copy the document maximum of 99 copies 3 Confirm with OK 4 Select the desired resolution using You have a higher resolution available to you for copying than you have for fax transmissions RESOL FAST For documents without drawings or details RESOL QUALITY For documents with small print or drawings RESOL PHOTO For the...

Page 18: ...ht â _ will shine on your device and the _ symbol will appear on the display Received SMS messages are printed out au tomatically If you have turned the automatic printing function off the SMS messages will be stored Your device can store up to 30 SMS messages Reading SMS Messages 1 Press _ 2 Using select READ SMS 3 Confirm with OK 4 Using select the SMS that you would like to read Unread SMS mess...

Page 19: ...tion Tone On Off Switching Notification Tone On Off You will hear a notification tone whenever an SMS mes sage has arrived You have the option of turning this func tion off 1 Press OK 35 and OK 2 Using select BEEP SMS 3 Confirm with OK 4 Use to select whether you would like to turn the function on or off 5 Confirm with OK Switching Automatic Printing On Off Automatic Printing You can deactivate th...

Page 20: ...s of the Sudoku you would like to print maximum 9 copies 5 Confirm using OK 6 Using select if you would like to print the solution 7 Confirm using OK Printing the Solution 1 Press OK 68 and OK 2 Dial using SOLUTION 3 Confirm using OK Sudoku for Every Day You can have a new Sudoku automatically printed each day 1 Press OK 68 and OK 2 Using select AUTO 3 Confirm with OK 4 Enter the time e g 14 00 fo...

Page 21: ...er The program will start automatically 2 The Companion Suite LL window appears on the screen You can install or uninstall Companion Suite LL Click on Install products 3 By selecting Companion Suite LL you will install Companion Suite LL and Scan to PDF as well as the drivers for the printer and scanner By selecting Adobe Acrobat Reader you will install Acrobat Reader Click on Companion Suite LL 4...

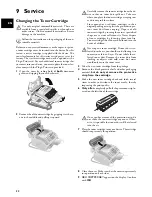
Page 22: ...g the final installation Select No not this time and click on Next 11 Under Windows XP select Install software auto matically during the final installation and click on Next Using Companion Suite Start You can start the Companion Suite LL either by clicking on the Companion Director icon on your desktop or by selecting Start Programs Companion Suite LL Companion Suite LL Companion Director from th...

Page 23: ...he arrow but tons 4 Confirm with OK Edit Group Edit Group 1 Select the group that you would like to edit 2 Choose Select the members to add new entries to the group or remove entries from the group Click on Erase to delete the entire group 3 Confirm with OK Archiving the Telephone Book Introduction With the address book of the Companion Suite LL you can save the telephone book entries of your devi...

Page 24: ... device is also installed as a printer under Win dows In the print menu under Start Settings Print ers you will find your device listed as Laser Printer Scanner Printing from Computer You can access your device from any program and use it to make black and white print outs just as you would use any other printer Simply select the Laser Printer Scanner as your printer Laser Printer Scanner Properti...

Page 25: ... TWAIN Scanner Driver as your scanner The following window appears If you select the controller on the upper right a dialogue appears in which you can select the alignment and filter settings for the scan Using the controls beneath this you can choose whether to scan in the black and white mode also called barcode mode or in the grey tone mode Enter the desired resolution for the scanner under Res...

Page 26: ...rogram or remove it Select Remove Click on Next 3 You will be asked to confirm the uninstall After you have clicked on OK the Companion Suite LL will be removed from your computer 4 At the conclusion of the uninstall process you must re start your computer Make your selection as to whether the computer should restart automatically or whether you would like to restart the computer yourself at a lat...

Page 27: ...n again after each use of the device Entering the PIN Code 1 Press OK 61 and OK 2 Using select LOCKING CODE 3 Confirm with OK 4 Enter a four digit PIN code 5 Confirm with OK 6 Enter the code again for confirmation purposes 7 Confirm with OK Locking the Keyboard 1 Press OK 61 and OK 2 Using select LOCK KEYBD 3 Confirm with OK 4 Enter the four digit PIN code 5 Confirm with OK 6 Use to select whether...

Page 28: ...prints out a transmis sion report Four different settings are available for the transmission report 1 Press OK 25 and OK 2 Use to select from the following settings WITH After every error free fax transfer a transmission report is printed A transmission report is also printed in cases in which a fax transfer is not successfully completed because the recipient s line is busy WITHOUT No transmission...

Page 29: ... transmission Answering Machine If you do not have an answering machine connected or if a connected answering machine does not accept the call the device will take over the call after a predetermined number of rings and automatically receive any possible fax trans mission being sent Fax Switch 1 Automatic Mode Type 3 mit Telefon LF 3155 LF 3175 Automatic Mode If the Automatic Mode is active the de...

Page 30: ...l adapter or the dial up router Connecting Additional Devices Additional Devices You can operate additional devices on a telephone line such as cordless telephones answering machines modems or charge counters Additional Telephone and SMS Connection to the Device Connection to the device You can connect additional devices directly to your device Insert the telephone cable of the additional device i...

Page 31: ...an ual of your additional telephone Starting Fax Reception If you pick up at an additional device and hear that you are receiving a fax whistling tone or silence you can start the fax reception by pressing 5 on the additional tele phone or pressing o on the device Taking Over the Line If you pick up on an additional telephone and the machine continues to ring or attempts to receive a fax you can d...

Page 32: ... device The cartridge should snap securely into position 8 Close the cover Make sure that the cover snaps securely into position on both sides 9 NEW CARTRIDGE appears on the display Confirm with OK Use only original consumable materials These are available from a specialised retailer or through our order service Other consumable materials can cause damage to the machine Follow the instructions on ...

Page 33: ...ard 2 It is possible that you will have to remove the toner car tridge in order to reach the paper Should the error message UNREADABLECARD appear on the display you may have inserted the Plug n Print card incorrectly The contacts must face to the left as you insert the card into the de vice You can interrupt the recharging process at any time by pressing j However the toner level memory must be up...

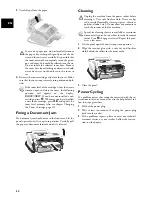
Page 34: ...s on the display In case of a paper jam do not forcefully remove the paper but rather pull it gently out of the de vice and throw it away carefully It is possible that the toner may not be completely set on the print out and toner dust could be released into the air Do not inhale the released toner dust Remove the toner dust from clothing or objects with cold water hot water would only cause the t...

Page 35: ...ive Test the scanner by printing the functions list press 1 and OK If the function list is printed perfectly it is pos sible the scanner is dirty or defective Clean the scanner No fax reception Check whether the manual fax reception mode is set The device will not receive faxes on its own page 29 You hear a whistling tone or silence in the handset The call is a fax Press o on the device Press 5 on...

Page 36: ...nd the Companion Suite LL software is installed on to the PC Check whether the device is installed in the printer menu of the PC as Laser Printer Scanner It is possible that a firewall or anti virus programme in stalled is disrupting the connection to the device Message on the PC Check the printer The toner cartridge is almost empty and must be replaced ...

Page 37: ...ling Before the dialling process begins you can freely combine and edit telephone book entries manually entered digits numbers from the redial list or numbers from the caller list For example if you have saved the telephone number pre fix of an inexpensive telephone service provider see Call by Call as a telephone book entry select this entry and manually enter the desired telephone number or sele...

Page 38: ... modem its features and functions are fixed and thus cannot be changed see Soft Modem see Modem ISDN Integrated Services Digital Network ITU International Telecommunications Union UN organisa tion Journal The journal contains information pertaining to the last tel ephone calls as well as to sent and received faxes and SMS messages The journal can be printed out manually or the machine can be set t...

Page 39: ...has reached you Tone Dialling also Dual Tone Multi Frequency In many countries tone dialling has replaced pulse dial ling in which each number was sent as a corresponding number of pulses With tone dialling a specific tone is as signed to each key referred to as DTMF tones Toner Level Memory Update the toner level memory of your device with the Plug n Print card that is included with each new tone...

Page 40: ...oto low Photo 400 200 dpi Resolution high LF 3170 LF 3175 Resolution Fast high Fast 200 300 dpi Resolution Quality high Quality 400 300 dpi Resolution Photo high Photo 400 300 dpi Speed Speed 16 pages minute Multiple Copies Multiple Copies up to 99 pages Computer Network Connection Type of connection Type of connection USB 1 1 USB 2 0 Full Speed Supported Operating Systems Supported Operating Syst...

Page 41: ...ned in it before returning the equipment to SAGEM The repair and de livery costs will be invoiced to the customer The foregoing shall apply unless otherwise agreed in writ ing with the customer and only for the UK If any provi sion of this guarantee shall be held to be in whole or in part invalid or illegal due to an obligatory rule applicable to consumers pursuant to their national legislation su...

Page 42: ...the statutory regulations of your country regarding telecommunications secrecy and data privacy This product is intended for use on an analogue public tel ecommunications network PSTN and in the country specified on the packaging Use in other countries can re sult in faulty functioning For more information please contact the technical service centre for your country Should problems arise during us...

Page 43: ...43 EN ...

Page 44: ...machine rather an external telephone Keep a printout of the settings as well as the serial number of the machine handy The serial number can be found on the type plate PC Connection Should problems with the PC connection arise have the following in formation to hand when you contact technical customer services hard ware configuration of your computer operating system installed and se curity progra...

Reviews: