background image

MF5482

- 82 -

12 - PC Features

3

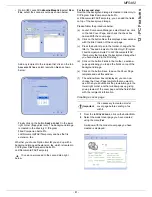
Click on the icon 

 to display the available 

fields.


To add a field, proceed as follows:


- Select the field you want to insert by clicking the 
field palette. A stamp replaces the cursor of your 
mouse.


- Click the location where you want to put the field 
on the model.


- You can move or enlarge the field as you like.

4

As soon as fields are inserted, save the cover 
page.

This cover page can be selected in the tab C

OVER


PAGE

 of 

the fax send window.

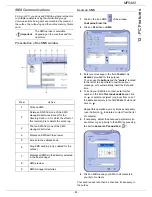
Description of the tab C

OVER


PAGE

Important

Adjust the size of your field so that 
the text is readable.

Field

Description

Name of the cover 
page

Either the name of the page 
selected by default or the page 
you have selected to use.

Sender

You can enter information 
concerning the sender.

Recipient

You can enter information 
concerning the recipient.
If the word Auto is entered in 
one of the fields, the field is 
updated during sending if the 
recipient is listed in the address 
book, favourites, a group or a 
distribution list.

Comments

This is an editing window with 
all the basic functions of a text 
editor so that you can enter a 
text which will be sent in the 
cover page.

Preview of the 
model

The preview enables you to 
see the cover page you are 
going to send.

Summary of Contents for MF 5482

Page 1: ...TELECOM Instruction booklet 253XXXXXXA_ENG SAGEM MF 5482...

Page 2: ...documents through your PC If you have a WLAN adaptor optional you can communicate with a personal computer wirelessly WLAN is an optional working only with a specific adaptor that you can obtain from...

Page 3: ...n in the manual input tray 19 Use of envelopes 19 Copy 20 Simple copy 20 ECO mode copy 20 Advanced copying 20 ID Card Copy mode 21 Special setup for the copying 21 Resolution setup 21 Zoom setup 22 Co...

Page 4: ...ile 44 How to a import a directory 45 Exporting a directory 45 LDAP Server 46 Configuration 46 Accessing server contacts 46 Adding LDAP entries in the local directory 46 Saving Restoring the directory...

Page 5: ...on the multifunction machine 73 Printing in duplex mode with the multifunction machine 73 Address book 75 Add a contact to the terminal address book 75 Add a group to the terminal address book 75 Mana...

Page 6: ...ia LAN WLAN connection 92 GDI XPS or PCL printing 92 PostScript printing 92 Firmware update 92 Specifications 93 Physical specifications 93 Electrical specifications 93 Environmental specifications 93...

Page 7: ...nce in a residential installation This equipment generates uses and can radiate radio frequency energy and if not installed and used in accordance with the instructions may cause harmful interference...

Page 8: ...ll phases of customer operation and maintenance For Europe Asia This machine complies with IEC 60825 1 1993 A1 1997 A2 2001 standard is classified as laser class 1 product and is safe for office EDP u...

Page 9: ...ning labels at the positions shown below For your safety you must never touch these surfaces when you remove a paper jam or when you replace the Toner cartridge Symbols for the main power switch In ac...

Page 10: ...he dates indicated December 12 2006 Council Directive 2006 95 EC as amended Approximation of the laws of the member states related to low voltage equipment December 15 2004 Council Directive 2004 108...

Page 11: ...on the product indicates that it belongs to the electric and electronic equipment family Therefore according to European regulations you are requested to dispose of it at the selected collection areas...

Page 12: ...them This license will automatically be canceled in case you do not respect the terms of this license If the license is rendered invalid you agree to destroy all copies of the program and the associat...

Page 13: ...der to give additional information are registered trademarks of their respective owners The informations contents of this user manual are subject to change without notice Machine Firmware The Machine...

Page 14: ...by law Copying or printing the following items is generally prohibited by local law bank notes checks bonds stock certificates bank drafts passports driver s licenses The preceding list is meant as a...

Page 15: ...ion below describes the precautions to be taken when using the machine Never turn the machine off and never open the lids while printing Never use gas or flammable liquids or objects generating magnet...

Page 16: ...hing into the product You suspect that your product needs service or repair Your product s cover has been damaged Do not incinerate spilled toner or used toner Toner dust might ignite when exposed to...

Page 17: ...paper format to avoid feed failure skewing and paper jams Amount of loaded paper must not exceed the loading mark If the loading mark is exceeded this may cause feed failure skewing and paper jams Add...

Page 18: ...these notes could result in moderate or minor injury or damage to the machine or to property Be sure to read these notes They can be found in the Safety information section of this manual Important I...

Page 19: ...itch 6 LINE socket telephone cable connection 7 EXT socket connection for external telephone devices 8 Slave USB connection for PC 9 LAN connection 10 Master USB connection USB key 11 Manual paper fee...

Page 20: ...the left of the cursor 5 Key input or line feed 6 Key access to special characters 7 Key Shift 8 Key document analysis to the PC or a media USB key 9 Key local copy 10 Key stops the current PC print j...

Page 21: ...ing of this booklet 3 Remove all stickers from the machine 4 Remove the plastic protection film from the screen Installing the document feeder 1 Secure the document feeder by fitting the two clips B i...

Page 22: ...tack in the feed cassette 200 sheets of 80 g m paper for instance 6 Put the feed cassette back in its location Cartridge installation 1 Stand in front of the machine 2 Push the left and right sides of...

Page 23: ...vice Plug the power cord to outlet on the wall 5 Press the On Off button to turn on the device I position Device initial setup After a few seconds when the machine has warmed up the Easy Install funct...

Page 24: ...function press the OK button 11 Enter the minimal size of the company s outside numbers 1 to 30 using the numerical keypad This setting is used to differentiate internal telephone numbers from extern...

Page 25: ...should be the area which excludes 15 mm from the leading edge 10 mm from both the left and right edges and the rear edge A few lines may be given in solid print at the part of being overlapped Envelop...

Page 26: ...respecting the indications around the glass 2 Press the button 3 Press the button Advanced copying The sophisticated copy allows to do custom setups for the current copy 1 Place the document to be cop...

Page 27: ...firm with the OK button For optimal results with ID documents select the PHOTO resolution 7 Adjust the contrast level with the buttons or then confirm with the OK button 8 Adjust the desired brightnes...

Page 28: ...the OK button 5 Quit this menu by pressing the button Contrast setup The CONTRAST parameter allows to choose the photocopy contrast 845 ADVANCED FCT COPY CONTRAST 1 Press enter 845 using the keypad 2...

Page 29: ...during printing 855 ADVANCED FCT SCAN PRINT PRINTER MARG 1 Press enter 855 using the keypad 2 Setup the left right margins offsets by 0 5 mm steps with the buttons and 3 Confirm by pressing the OK but...

Page 30: ...ows you to transmit a document at a later time To program a postponed transmission you need to identify the subscriber number transmission time feeder type and number of pages To delay the transmissio...

Page 31: ...ys Default tray set to Manual Default tray set to Automatic Relay broadcast Your fax machine initiator can relay a document in other words transmit a document to your subscribers via a remote fax and...

Page 32: ...r deactivating the fax answering machine Saving an access code 383 FAX FAX ANSW ANSWER CODE 1 Press enter 383 using the keypad 2 Enter the code 4 digits and confirm with OK 3 Quit this menu by pressin...

Page 33: ...eypad 2 Using the keys and select the option ON to print all rerouted documents automatically 3 Confirm your choice with OK 4 Quit this menu by pressing the button Transmission waiting queue This func...

Page 34: ...MBX code to all subscribers equipped with a fax compatible to yours MBX 00 is public It is handled directly by the terminal to record the messages of the fax TAD as soon as this is put into service MB...

Page 35: ...ed MBX out of the 31 MBX s or enter the number of the MBX directly and press OK The document is placed in the feeder and saved in the selected MBX MBX deposit in a remote fax 1 Insert the document in...

Page 36: ...nt in deposit 1 Insert the document to deposit in the feeder 2 Select 34 FAX POLLING TX 3 Choose the deposit type according to the table below 4 Confirm deposit by pressing OK Polling a deposited docu...

Page 37: ...use the key to move inside the data entry field use and to move in the text from one word to another press CTRL and one of the navigator keys or to go to the next line use to delete a character by mo...

Page 38: ...mmer time Winter time setting This menu lets you choose to change to summer winter time automatically or not The 21 DATE TIME menu includes 2 submenus Manual mode 211 SETUP DATE TIME MODIFY Your multi...

Page 39: ...eypad 2 Select the required option and press the OK key to confirm 3 To exit this menu press Telecommuncation Network This setting enables you to manually set the type of public telephone network PSTN...

Page 40: ...andoned but there is only one report per request OFF no transmission report however your fax will note all transmissions that took place in its log ALWAYS a report is printed with each transmission ON...

Page 41: ...eception of fax messages automatically the external device handles reception of telephone communications automatically Press the 0 buttons on your telephone to cancel fax detection To set the receptio...

Page 42: ...of the fax server to obtain this address and press OK to confirm 835 ADVANCED FCT FAX SERVER IP ADDRESS 2 Enter the IP address of the fax server and press OK to confirm 836 ADVANCED FCT FAX SERVER DOM...

Page 43: ...ceived documents regardless of the used paper format To set the manual mode 246 SETUP RECEPTION REDUCTION 1 Press enter 246 using the keypad 2 Select FIXED and confirm with OK 3 Enter the reduction va...

Page 44: ...calls made on disturbed telephone lines It is used when the lines are weak or too noisy Transmission times may be longer Parameter Signification 25 TEL Impedance This parameter lets you choose between...

Page 45: ...en 4 00 and 999 75 by step of 0 25 The default value is 12 00 85 Line termin This parameter lets you define line breaks conversion CR LF and FF The possible values are included between 0 and 3 The def...

Page 46: ...SG Script fonts 50 PRINT SGScript FONTS Lock the machine This function prevents non authorized people from accessing the machine An access code will be required every time someone wants to use the dev...

Page 47: ...m with OK 5 Quit this menu by pressing the button Lock the Media service This function prevents access to the Media service The access code will be required every time someone wants to use the USB key...

Page 48: ...n the cartridge This level appears in percentage 86 ADVANCED FCT CONSUMABLES 1 Press enter 86 using the keypad 2 The available toner percentage appears on the screen 3 Quit this menu by pressing the b...

Page 49: ...t format Image or PDF then confirm with OK Refer to step 5 Or to associate a shared address SMB address Do not enter the e mail address and confirm with OK Do not enter the FTP address and confirm wit...

Page 50: ...and must not comprise more than 500 entries The process of importing a directory uses electronic mail as the transfer mechanism The electronic file containing the directory is received and processed...

Page 51: ...o prevent users from importing a directory 3 Press OK to confirm Exporting a directory You may also export a directory from your machine as a text file and send it to any mail client be it PC or fax b...

Page 52: ...AP entries in the local directory You can add a remote contact or list to the multifunction machine s local directory To add a remote contact or list to the local directory 1 Press enter 13 using the...

Page 53: ...ress enter 5 using the keypad Confirm with OK 2 Select SUDOKU using the or button 3 Confirm with OK 4 Select PRT SOLUTION using the or button 5 Select the level of difficulty EASY MEDIUM HARD EVIL usi...

Page 54: ...uld carry out a manual configuration see below Manual configuration To configure your terminal manually you should obtain the usual information used to set a peripheral device IP address sub network m...

Page 55: ...me when connecting to an SNTP server SNTP server address 2731 SETUP LAN ETHER SNTP SERVER ADDRESS 1 Enter the name of the SNTP server then validate with OK This name can be in the form of an IP addres...

Page 56: ...arameters for your machine so that it can function in a network 3 Having set up the parameters for your device install the Companion Suite Pro software onto your PC with the necessary printer drivers...

Page 57: ...ESS SUBNET MASK and GATEWAY 7 When you press OK the machine reboots to take into account the new WLAN parameters Once the network has been set up the LED of the WLAN USB key should be on Create a new...

Page 58: ...hine in the format displayed and confirm with OK 6 Exit this menu by pressing the key 2823 SETUP WLAN PARAMETERS SUBNET MASK 1 Type in select the menu SETUP using the keys or and confirm with OK 2 Sel...

Page 59: ...m with OK 3 Select PARAMETERS using the keys or and confirm with OK 4 Select HOSTNAME using the keys or and confirm with OK 5 Type in the desired name 15 characters maximum and confirm with OK 6 Exit...

Page 60: ...he multifunction printer may be randomly disconnected from the wireless network The reasons can be the influence of other local devices using wireless networks or technologies like Bluetooth phones WL...

Page 61: ...ifications SNMP browser configuration The multifunction machine comes with the following embedded Management Information Base MIBs Common Printer Host Printer Printer Port Monitor The following traps...

Page 62: ...RD 1 Enter the PASSWORD then validate with OK key Sending an E mail text You can send a typed message to an E mail mailbox 95 E MAIL SEND EMAIL 1 Enter the addressee s E mail address or choose your di...

Page 63: ...er select NEXT and confirm with OK Select DONE when all pages have been scanned 12 Press OK to confirm The document is scanned and will be put on the FTP server at the next connection to the local net...

Page 64: ...3 59 and validate with the OK key Selecting the print mode for the deposit notice 944 E MAIL SETTINGS DEPOSIT NOTICE 1 Select one of the deposit notice options ON OFF ALWAYS or ON ERROR 2 Press OK to...

Page 65: ...er the E Mail address of the computer you wish to transfer your E Mail and press OK to confirm 3 Select your option from the table below and press OK to confirm To use the fax as an E Mail printer 1 S...

Page 66: ...t FILE with the or buttons and confirm with OK 4 You have three possibilities to print your files ALL to print all the files located in the USB memory key Select ALL with the or buttons and confirm wi...

Page 67: ...o the previous menu 5 Quit this menu by pressing the button Analyse the USB memory key content After a period of inactivity your machine will return to the main menu To view the USB memory key again p...

Page 68: ...the picture will be saved in TIFF format COLOUR the picture will be saved in JPEG format You can choose the image resolution that will be digitized to the USB memory key the default resolution is AUTO...

Page 69: ...ollowing installation procedures full installation of the Companion Suite Pro software installation of the drivers only using the Companion Suite Pro software manual installation of the drivers only I...

Page 70: ...NION SUITE PRO LL2 COMPANION DIRECTOR or by clicking on the icon COMPANION DIRECTOR located on your desktop Installing the drivers using the Companion Suite Pro software Turn your PC on Open an accoun...

Page 71: ...ick on the NEXT button to launch the installation of the Companion Suite Pro kit on your PC 8 To continue you need to accept the proposed license agreement 9 Click on the NEXT button 10 Select INSTALL...

Page 72: ...as shown below on the picture 2 Power on your multifunction machine The PC detects the device 3 Click on LOCATE AND INSTALL DRIVER SOFTWARE RECOMMENDED The following screen appears 4 Open the CD ROM...

Page 73: ...n Terminal s Supervision The software that you have installed contains two multifunction machine management applications COMPANION DIRECTOR and COMPANION MONITOR which allow you to check whether the m...

Page 74: ...ded cable no more than 3 meters long 1 Locate your USB cable connectors and connect as shown below on the picture 2 Power on your multifunction machine The PC detects the device and the drivers are au...

Page 75: ...ADD button 3 Click ADD MANUALLY 4 Type the IP address or the NetBIOS name of the device that you wish to add You can test the connection between the PC and the device by clicking TEST THE CONNECTION...

Page 76: ...it is not possible to get both LAN and WLAN connections working at the same time for a single device Status of the connection The status of the connection between the current device and the PC is indi...

Page 77: ...r connected USB devices The LINKS tab lets you access the machine parameters and address book To access the machine s parameters click on PARAMETERS refer to paragraph Parameters Setup page 32 for a d...

Page 78: ...window or from the SCAN button on the machine or directly from a standard compatible application Analysis with Scan To Run the application by clicking on the COMPANION DIRECTOR icon located on your d...

Page 79: ...e the possibility to print your documents via the USB connection or the network LAN WLAN connection During the installation of the Companion Suite Pro software the LASER PRO LL2 printer driver will be...

Page 80: ...he selected binding mode Long sides Short sides 8 Press OK on the command panel to resume printing 9 Even pages are printed on the other side of the sheets Once all pages are printed remove the explan...

Page 81: ...quick dial key Click on OK The new contact is added to the list Add a group to the terminal address book 1 Click the link DIRECTORY of the window COMPANION DIRECTOR 2 Select the terminal address book...

Page 82: ...ring export 1 Select IMPORT in the menu FILE of the window ADDRESS BOOK 2 Select the file to import click on OPEN Fax communications The fax communication enables you to send documents as faxes from o...

Page 83: ...k OK to send your fax to all contacts in your list of contacts Your send request can then be checked if necessary in the outbox Send a fax from an application This method is used to directly send a do...

Page 84: ...The requests are classed in the order in which they are executed The rejected requests are filed at the end of the list so that they are more accessible if you want to work with them request a new sen...

Page 85: ...is printed after each fax is sent Printing of the outbox log The log is automatically printed when its contents fill a page Option Description Transmission speed Fax default transmission speed Line nu...

Page 86: ...ng on the information provided for each recipient of a document To create this cover page template there are two major steps First step Create a background image with the logos and the layout that you...

Page 87: ...Cover Page and check the check box named With the cover page b Click on the button New this displays a new window with the title Creation of the cover page c Press the button Open in the toolbar chan...

Page 88: ...st the size of your field so that the text is readable Field Description Name of the cover page Either the name of the page selected by default or the page you have selected to use Sender You can ente...

Page 89: ...ess directory in the field CONTACT LIST and click on Repeat this operation as many times as necessary use the button to delete a contact from the list of contacts 5 If necessary adjust the advanced pa...

Page 90: ...contents fill a page The information held in the log is the SMS recipient the date of sending of the SMS the status sent rejected The sent item memory items sent The sent item memory is used to keep a...

Page 91: ...re see paragraph Uninstall the drivers using the Companion Suite Pro software If you have installed the drivers manually see paragraph Uninstall the drivers manually Uninstall the drivers using the Co...

Page 92: ...E DEVICE MANAGER or START CONTROL PANEL HARDWARE AND SOUND DEVICE MANAGER depending on the operating system 2 In the OTHER DEVICES sub menu select the MFPRINTER LASER PRO LL2 4 item and click on the r...

Page 93: ...toner cartridge at any time before it reaches its end of cycle To replace the toner cartridge proceed as shown below 1 Insert the smart card provided with the new toner cartridge as shown on the pictu...

Page 94: ...r when one or more vertical lines appear on the copies of documents placed on the document feeder presence of debris ink glue etc in the paper transport mechanism the message YOU SHOULD CLEAN THE ROLL...

Page 95: ...ssage displayed when starting the machine CLOSE COVER PRINTER The printer front cover is open close it TONER EMPTY REPLACE OK Replace the toner cartridge PAPER JAM REMOVE TONER A sheet of paper is jam...

Page 96: ...rom the feeder You have the choice between waiting until the transmission takes place at the given time restarting the transmission immediately by pressing abandoning transmission by pressing To eject...

Page 97: ...from a remote fax which does not have the relay broadcast function Code 19 Subscriber has stopped The communication has been stopped by your subscriber Example a fax wanted to poll your fax but there...

Page 98: ...non printed page Exception If the document was to be printed in manual duplex mode the printing of the document is cancelled Paper jam Paper format problem Toner empty The printing of the active docu...

Page 99: ...s software applications connection modes LAN USB or WLAN paper formats as well as file types and sizes Preheating time 21 sec First page out time 13 sec Type Autonomous Black and White Copy speed 20 p...

Page 100: ...intenance Consumable specifications Reference paper Toner cartridge Specifications are subject to changes for improvement without notice Scanner Inapa tecno SPEED A4 Printer Ricoh T6200 A4 Reference C...

Page 101: ...MF5482 95 13 Maintenance...

Page 102: ...ade with ease of use and reliability in mind If after consulting your user manual you still require assistance you should contact our Call Centre Our personnel are highly trained specialists who can e...

Reviews: