background image

28

9 Service

Disruptions

Changing the ink film

Original Consumable Materials

Instructions on the Packaging

Introduction to plug'n'print card

For receiving or copying documents, an ink film must be
inserted in your device. Your device is delivered with an al-
ready inserted free ink film for a few test pages. For this
film, you do not require any Plug’n’Print card (= chip card
with information regarding ink film capacity). For every
next film that you insert, you must load the capacity mem-
ory with the included Plug’n’Print card.

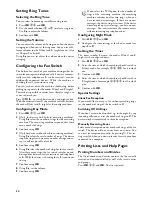
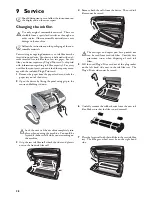
1

Remove the paper from the paper feeder and take the
paper tray out of the device.

2

Open the device by lifting the panel using grip in the
centre and folding it down.

3

Grip the rear ink film roll at both the sides and place it
next to the front ink film roll.

4

Remove both the rolls from the device. The used ink
film cannot be reused.

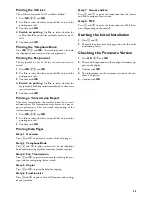
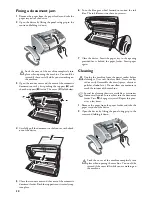
5

Pull the used Plug’n’Print card out of the plug socket
on the left hand side next to the ink film tray. The
Plug’n’Print card cannot be reused.

6

Carefully remove the rubber bands from the new ink
film. Make sure that the film is not damaged!

7

Place the larger roll with the ink film in the rear ink film
tray. The blue gear wheel must be on the right hand
side.

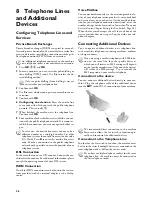
Should disruptions occur, follow the instructions on
the display and on the error report.

Use only original consumable materials. These are
available from a specialised retailer or through our
order service. Other consumable materials can cause
damage to the machine.

Follow the instructions on the packaging of the con-
sumable materials.

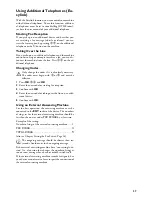
Lock the cover of the machine completely into
place when opening the machine. You could be
injured if the cover falls while you are working on
the machine.

The messages and copies you have printed out
can  be  read  from  used  ink  films.  Consider  data
protection issues when disposing of used ink
films.

Summary of Contents for PHONEFAX 47TS

Page 1: ...User Manual...

Page 2: ...lti ple copies You can send SMS messages from your machine if this service is activated for your telephone line this function is not supported in all countries and networks model specif ic Received SM...

Page 3: ...behind the paper feed B Papierhalter installieren Inserting paper Paper Format Before you can receive or copy documents you must insert paper Please use only suitable paper in the standard format A4...

Page 4: ...one line Entering Your Number Header Your name and number are added together with date time and page number at the top edge of each fax transmission header Entering Your Number 1 Enter your number Usi...

Page 5: ...ge 17 34 Sending to multiple recipients broadcast page 17 35 Fax journal page 25 36 Transmission report page 25 37 Print reduced in size page 23 38 Transmission speed page 23 4 Miscellaneous 41 Call l...

Page 6: ...t for telephone cord SPFX 4x Internal Description Scanner Rollers of the automatic document feeder Rests of the intake rollers Document guide scanner film Cover for scanner and automatic document feed...

Page 7: ...sages press and hold Starting fax polling Speed dial buttons model dependent Speed dial buttons model dependent Press briefly Recalling speed dial entry press and hold Editing speed dial entry Letter...

Page 8: ...n or the telephone socket with wet hands Do not allow liquids to enter into the machine Discon nect the machine from the power socket if liquids or for eign objects have entered the machine and have y...

Page 9: ...nding a Fax 16 Broadcasting 17 Delayed Fax Transmission 17 Receiving Faxes 17 Polling Faxes 17 Using Fax Templates 18 4 Copier 19 Inserting the document 19 Creating a Copy 19 Creating Multiple Copies...

Page 10: ...r dial a saved entry The dialling process begins immedi ately Any incorrectly entered numbers can no longer be changed now Handset near the device Secret Mode Switch the telephone handset into secret...

Page 11: ...LETE YES with OK Groups Groups You can combine several telephone book entries into a group A message is sent to all members of this group in succession Adding Group Entries 1 Press OK 13 and OK 2 Use...

Page 12: ...the Country Missed Calls Missed Calls If you received a call while away the button flashes 1 Press 2 Using you can page through the list of missed calls 3 To call back pick up the handset Displaying T...

Page 13: ...nfirma tion tone before you say your text 7 Press OK to end the recording The recording is played back Recording the outgoing message Listening to Messages Listening to Messages Listening to New Messa...

Page 14: ...Wait until hearing the confir mation tone before starting the text 11 Press OK to end the recording The recording is played back Using the Remote Control Remote Control With a telephone call you can...

Page 15: ...5 Press OK to end the recording The recording is played back After that the button starts flashing The voice message is displayed as a new message Recording the outgoing message Changing Settings Ente...

Page 16: ...site Manually Sending a Fax 1 Insert the document 2 Press l 3 Enter the desired telephone number with the number pad or select a saved entry 4 Press o Press and 4 to print the instructions for sending...

Page 17: ...f no paper or no ink film is inserted the machine saves the incoming faxes The button blinks Once paper or a new ink film is in serted the saved faxes are printed out Paper Error Full Message Memory I...

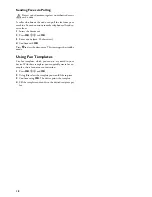
Page 18: ...e Press j to eject the document This interrupts the standby mode Using Fax Templates Fax Templates Five fax templates which you can use are stored in your device With these templates you can quickly c...

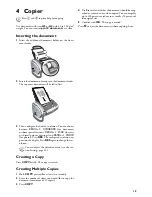
Page 19: ...O for photos Press RES The configured resolution ap pears on the display Press RES again to change the res olution Creating a Copy Press COPY briefly The copy is created Creating Multiple Copies 1 Hol...

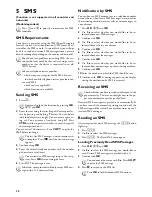
Page 20: ...w messages on the answering machine 9 Confirm with OK 10 Enter the number to which the SMS should be sent 11 Confirm with OK A message appears on the display stating the notification by SMS is activat...

Page 21: ...er the number for receiving SMSs 7 Confirm using OK 8 Use to select the SMS service provider through which you would like to send SMSs 9 Confirm using OK Switching Off Automatic Printing Automatic Pri...

Page 22: ...2 Dial using SUDOKU LAST 3 Confirm using OK 4 Enter how many copies of the Sudoku you would like to print maximum 9 copies 5 Confirm using OK 6 Using select if you would like to print the solution 7 C...

Page 23: ...ttings Optimized adaptation for text and photo printing CONTR DARK For darker copies and fax transmission for example documents with faint printing 3 Confirm using OK Custom settings default settings...

Page 24: ...many rings the fax switch switches on and distinguishes between fax transmissions and telephone calls While the device is checking the call it continues to ring 7 Confirm using OK 8 Using set the volu...

Page 25: ...You can switch off printing of the transmission report 1 Press OK 36 and OK 2 Use to select whether you would like to switch the printing on or off 3 Confirm with OK Printing Help Pages Help 1 Overvie...

Page 26: ...ch accepts the call the mail box of the service provider does not step in Enquire with your tele phone company Connecting Additional Devices Additional Devices You can operate additional devices on a...

Page 27: ...Enter the new code for taking over the line on an addi tional device 5 Confirm with OK Using an External Answering Machine For the best operation the answering machine must be connected to the EXT so...

Page 28: ...The used ink film cannot be reused 5 Pull the used Plug n Print card out of the plug socket on the left hand side next to the ink film tray The Plug n Print card cannot be reused 6 Carefully remove th...

Page 29: ...pages that can still be printed with the ink film is shown on the display 3 Press j to return to the starting mode If the ink film used up or if there is no ink film in the ma chine a message appears...

Page 30: ...t paper again Cleaning Cleaning Fax Cleaning Sheets 1 Remove the paper from the paper feeder and take the paper tray out of the device 2 Open the device by lifting the panel using grip in the centre a...

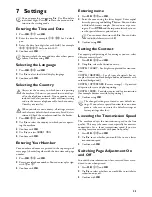
Page 31: ...factory settings It may be possible that the device with the changed settings reacts differently than ex pected Using the Service Code 1 Press OK 45 and OK 2 Enter a service code 7117 Deletes all cha...

Page 32: ...scanner and the document feed slot Problems with the connection The device rings once remains silent for a short while and starts ringing again This is absolutely normal The fax switch checks the cal...

Page 33: ...MS function multi functional terminals and servers covering the needs of all its customers from home users to multinational organi sations In order to apply the guarantee you should contact your deale...

Page 34: ...tional legislation such in validity or illegality shall not impair or affect the remaining provisions or parts of this guarantee The CE symbol confirms conformity with the EU direc tives that apply to...

Page 35: ...e statutory regulations of your country regarding telecommunications secrecy and data privacy This product is intended for use on an analogue public tel ecommunications network PSTN and in the country...

Page 36: ...ailable Our employees are trained ex perts who would be happy to answer your questions We can assist your more quickly if you do not call us from the machine rather an external telephone Keep a printo...

Reviews: