background image

28

5. Program Guide, Search and Select Video (VoD)

To help you find programs you are interested in, the following features are available to you:

Program Guide

: the electronic program guide lets you find out at a glance what’s next on all

channels.

Search

: search for programs based on their genre and other criteria.

Select Video

: access the Select Video feature to watch movies and TV shows from a huge library.

Please check if SELECT VIDEO is available in your region. In addition you need to set up an Internet
connection to your digital receiver to use this feature.

5.1 Program Guide 

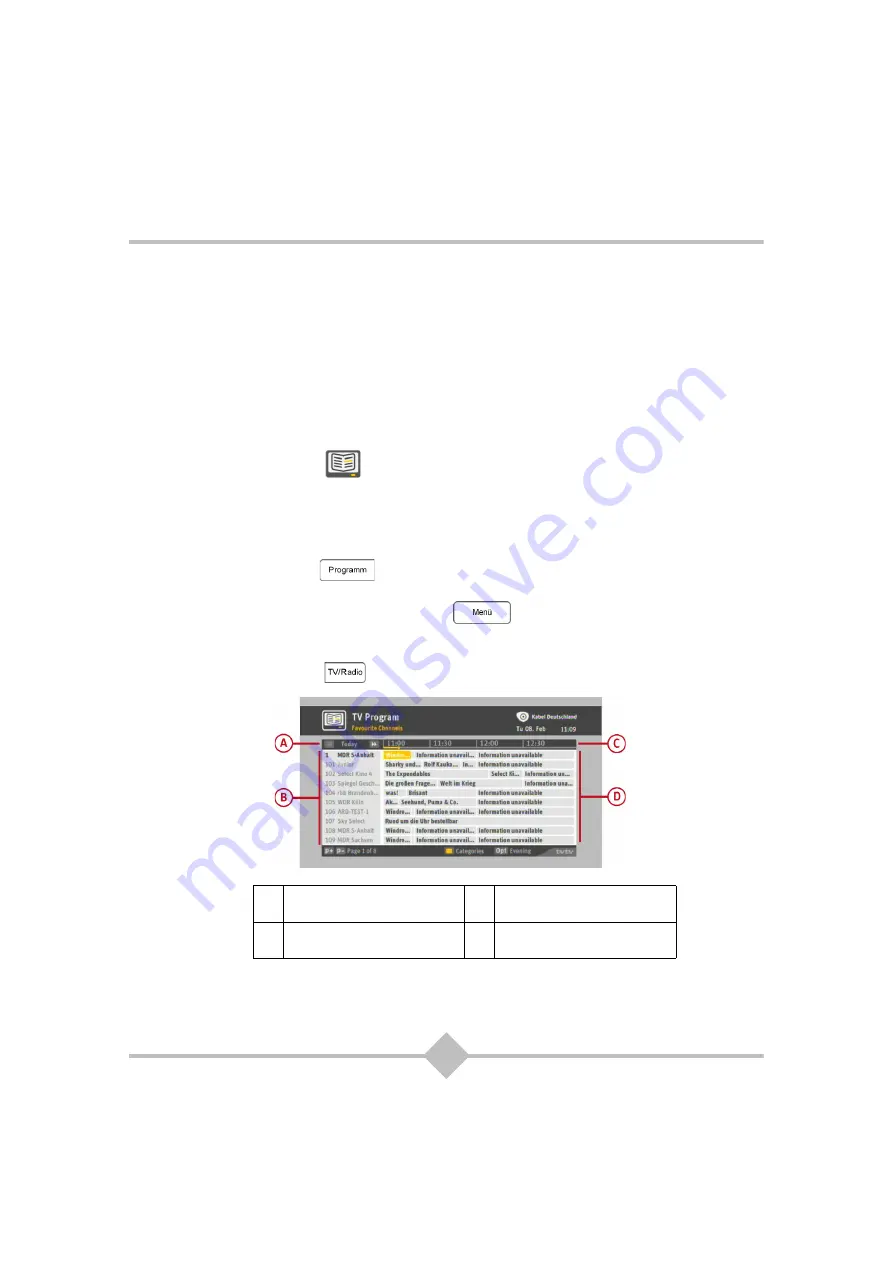
The Program guide is an electronic program guide that displays program information for all the channels
installed (TV and RADIO).

You can also record programs from the electronic program guide (see 

Video recordings

, page 32

).

Press the 

PROGRAMM


 key to access the electronic program guide.

You can also access the guide by pressing 

MENÜ


, and selecting PROGRAM GUIDE.

You can display the TV program guide or the RADIO program guide. To switch between these two modes,

just press the 

TV/RADIO


key.

Depending on the channels, program information can cover the next 14 days.

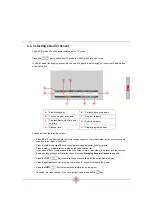
To help you navigate in the electronic program guide, a yellow line shows the current time.

A

Current day or following day 
when browsing future programs

C

Program time grid

B

Available channels

D

Programs scheduled on the 
corresponding channel

Summary of Contents for RCI88-1000

Page 1: ...Digitaler HD Video Recorder Festplattenrecorder f r Kabelempfang RCI88 320 RCI88 1000 Digital HD Video Recorder Bedienungsanleitung User manual...

Page 2: ......

Page 3: ...Bedienungsanleitung Digitaler HD Video Recorder Festplattenrecorder f r Kabelempfang RCI88 320 RCI88 1000...

Page 4: ......

Page 5: ...ierung von elektromagnetischen Interferenzen zur Sicherheit der Anwender und ihrer Ger te und zum Schutz der Gesundheit sowie zur Minimierung der Auswirkungen von Produkten auf die Umwelt festgelegt w...

Page 6: ...ch Sie finden sie im Abschnitt Sicherheit dieser Bedienungsanleitung WARNUNG Gibt wichtige Sicherheitsinformationen an Wenn diese Hinweise nicht ber cksichtigt werden kann dies zu leichten oder mittel...

Page 7: ...E NIEMALS DEN RECEIVER ES BESTEHT DAS RISIKO EINES ELEKTRISCHEN SCHLAGS Verwenden Sie nur das im Lieferumfang des Receivers enthaltene Stromkabel f r die Verbindung mit dem Stromnetz Eine andere Verfa...

Page 8: ...elieferten Akkus sind nicht wieder aufladbar Interferenz Platzieren Sie den Receiver nicht in der N he von Ger ten die elektromagnetische Interferenzen verursachen k nnen beispielsweise Lautsprecher D...

Page 9: ...und Entsorgung des Produkts Beachten Sie zur einfacheren Wiederverwertung die rtlich geltenden Sortiervorschriften f r diese Abfallart Wenn Ihr Produkt Batterien enth lt m ssen diese an geeigneten Sam...

Page 10: ...ken f r das Personal der Recycling Stellen Die Batterien der Fernbedienung lassen sich leicht herausnehmen Hinweis Wenn die Batterien der Fernbedienung ersch pft sind entsorgen Sie sie bitte bei einer...

Page 11: ...ntertitel und Auswahl von Optionskan len 23 Sprachauswahl f r Tonwiedergabe 23 Ausw hlen von Untertitel Sprachen 23 Ausw hlen von Optionskan len 24 4 4 Ausw hlen eines Radiosenders 25 4 5 Teletext 26...

Page 12: ...Favoritensender 58 Favoriten hinzuf gen 58 Favoriten sortieren 59 Favoriten l schen 59 7 7 Service Men 60 Systeminformationen 60 Smartcardinformationen 60 Telefon Hotline 60 Service Infos 61 Netzwerki...

Page 13: ...ne Freischaltung besitzen 1 1 Packungsinhalt Zum Lieferumfang Ihres neuen Ger ts geh ren Element Beschreibung 1 Digitaler HD Videorecorder 2 Netzkabel 3 Fernbedienung mit 2 Batterien AAA 4 HDMI Kabel...

Page 14: ...DERGABE PAUSE Taste Zugriff auf Receiver Men s Wiedergeben Anhalten einer Aufnahme Wechsel in den zeitversetzten Modus Gr n Wiedergabe l uft ohne zeitversetzten Modus Gr n blinkend Pausenmodus aktiv 4...

Page 15: ...ss 21 Digitaler Audio Anschluss Optischer S PDIF 15 Netzwerk Anschluss RJ45 22 SCART Anschluss zum TV 16 USB Anschluss Dieser Anschluss liefert die Stromversorgung f r angeschlossene Ger te 23 SCART A...

Page 16: ...Optionen Men Teletext Seiten 12 0 9 Zugriff auf Sender und verschiedene OSD Optionen 13 OPT Anzeige der Optionen f r die laufende Sendung Sprache f r Ton Untertitel Optionskan le Anzeige der Programm...

Page 17: ...iver alle TV und Radio Sender empfangen kann die frei erreichbar sind oder f r die Sie eine Freischaltung besitzen m ssen Sie zun chst berpr fen ob Ihr Haus Ihre Wohnung ber eine Verbindung zum Kabeln...

Page 18: ...nsehger ts anschlie en 2 Informationen zum Anschlie en von anderen Ger ten an den Receiver VCR Heimkino usw finden Sie in den folgenden Abschnitten 2 2 2 Verbindung zu einem Standard Definition Fernse...

Page 19: ...DEO Anschluss Ihres Fernsehers zu verbinden 2 Verbinden Sie die linken und rechten Audioausg nge ANALOG AUDIO L R des Receivers mit den Audioeing ngen des Fernsehger ts 2 3 Verbindung zum VCR DVD Reko...

Page 20: ...verbinden Verwenden Sie ein optisches S PDIF Kabel nicht im Lieferumfang enthalten um den DIGITAL AUDIO Ausgang des Receivers mit dem Eingang der Heimkino Anlage zu verbinden 2 5 Verbindung zur Stereo...

Page 21: ...n Schalter Ein Aus um den Receiver anzuschalten Position I Sie k nnen jetzt mit dem der Erstinstallation Ihres Receivers fortfahren Wenn Sie den Receiver ausschalten m ssen beispielsweise vor einem la...

Page 22: ...Der goldene Chip auf der Smartcard muss nach unten zeigen 4 Der Startbildschirm wird angezeigt 3 1 Sprachauswahl 5 W hlen Sie die gew nschte Sprache mithilfe der Taste auf oder ab der Fernbedienung u...

Page 23: ...einer Internetverbindung angezeigt der Sie durch die Konfiguration der Netzwerkverbindung f hrt deren Parameter in Abh ngigkeit vom Typ Ihres Heimnetzwerkes eingestellt werden m ssen 13 W hlen Sie je...

Page 24: ...endung auch durch Dr cken von OK oder einer der Navigationstasten eingeblendet werden Die Programm Informationsleiste zeigt Ihnen auf einen Blick die aktuelle Sendung und die Sendungen der nachfolgend...

Page 25: ...nsehen k nnen Sie diese in Ihre TV Favoritenliste aufnehmen In der Programm Informationsleiste werden Ihre Favoriten zur schnelleren Auswahl zuerst aufgef hrt Speicherplatz 1 bis 99 je nach Anzahl der...

Page 26: ...erade auf einem Sender ausgestrahlt wird Aufnehmen Aufnahme abbrechen Aufnahme der Sendung starten Aufnahme abbrechen Serie aufnehmen Serie l schen Startet die Aufnahme der Sendung und programmiert di...

Page 27: ...Ton mit oder und dr cken Sie OK 4 3 2 Ausw hlen von Untertitel Sprachen 1 Dr cken Sie die Taste OPT um die Optionsleiste einzublenden 2 W hlen Sie UNTERTITELSPRACHE mit oder und dr cken Sie OK oder di...

Page 28: ...ie den gew nschten Optionskanal mit oder und dr cken Sie OK Hinweis Wenn Sie einen bestimmten Optionskanal aufnehmen wollen w hlen Sie ihn in der Optionsleiste und starten Sie dann die Aufnahme durch...

Page 29: ...um die Radiosenderliste anzuzeigen Wenn Sie bestimmte Lieblingssender besonders oft h ren nehmen Sie sie in die Radio Favoritenliste auf Sie werden dann in der Senderliste zuerst angezeigt siehe Verw...

Page 30: ...Receiver speichert automatisch vor bergehend die Fernseh oder Radiosendung die Sie gerade ansehen anh ren je nach Signaleigenschaft die zur ckliegenden 60 bis 120 Minuten Mit Hilfe dieser Funktion k...

Page 31: ...dungen dazu mindestens 2 Stunden lang angesehen bzw angeh rt worden sein m ssen 4 6 3 Vorspulen Sie k nnen durch Dr cken der Taste VORSPULEN schnell vorspulen Der Abstand zwischen zeitversetzt live ve...

Page 32: ...mm Die elektronische Programmzeitschrift bietet Ihnen eine Programmvorschau f r alle gespeicherten Sender TV und RADIO Sie k nnen aus der elektronischen Programmzeitschrift auch Sendungen aufnehmen si...

Page 33: ...e sie aus und dr cken OK Um zu sehen was am Abend l uft dr cken Sie die Taste OPT Um Programminformationen von Sendern einer bestimmten Kategorie anzuzeigen z B Filme dr cken Sie die gelbe Taste W hle...

Page 34: ...t oder und dr cken Sie OK oder die Taste rechts 2 Geben Sie den gew nschten Titel ber die virtuelle Tastatur ein W hlen Sie die einzugebenden Zeichen mit und und dr cken Sie OK Um den eingegebenen Tit...

Page 35: ...ag zu springen 24 Std dr cken Sie die Taste oder Um die Suchergebnisse f r den Abend anzuzeigen dr cken Sie die Taste OPT Um die Ergebnisanzeige in chronologischer oder alphabetischer Reihenfolge anzu...

Page 36: ...nn der Service an Ihrem Anschluss verf gbar ist und Sie daf r freigeschaltet sind Dar ber hinaus m ssen Sie den Receiver ber Ihren Router mit dem Internet verbinden um alle Funktionen von SELECT VIDEO...

Page 37: ...bestimmte Zeit max 2 Stunden ohne Senderwechsel angesehen haben nimmt der Receiver sie von Beginn bzw vom Einschaltzeitpunkt bis zur angek ndigten Endzeit auf Wird die Sendung sp ter oder an einem an...

Page 38: ...n siehe Manuelle Aufnahme Seite 55 Danach k nnen Sie die Aufnahmeoptionen f r den gew nschten Sender manuell festlegen 1 W hlen Sie erforderlichenfalls den aufzunehmenden Sender 2 Geben Sie erforderli...

Page 39: ...Aufnahmeeigenschaften erkennen Symbol Bedeutung Der Ordner enth lt eine Serie deren zuk nftige Episoden automatisch aufgenommen werden Der Ordner enth lt eine Serie deren zuk nftigen Episoden aus eine...

Page 40: ...nahme l uft Die Sendung wird gerade aufgenommen Programmiert Die Aufnahme der Sendung ist programmiert Serie programmiert Die Aufnahme der Serie ist programmiert und gilt auch f r alle zuk nftigen Epi...

Page 41: ...en Sie den eingegebenen Namen durch Auswahl von SPEICHERN und Dr cken von OK 6 3 4 Verschieben von Aufnahmen Mit dieser Aktion k nnen Sie Aufnahmen und Programmierungen in einen pers nlichen Ordner ve...

Page 42: ...dnern 1 W hlen Sie die Aufnahme oder den Ordner die bzw den Sie l schen m chten und dr cken Sie INFO 2 W hlen Sie die gew nschte Aktion L SCHEN DIESE EPISODE L SCHEN ALLE EPISODEN L SCHEN oder ORDNER...

Page 43: ...rwenden Sie die Taste ZUR CK oder links Zum Verlassen des Men bildschirms dr cken Sie die Taste MEN oder EXIT 7 1 1 Art Software Update Standardm ig fragt der Receiver ob Sie die Aktualisierung sofort...

Page 44: ...ualisierung finden Sie im Abschnitt Software Aktualisierung Seite 69 7 1 3 Art Sendersuchlauf Standardm ig pr ft der Receiver automatisch ob neue Sender verf gbar sind und speichert sie wenn er sich i...

Page 45: ...Suchlaufs k nnen Sie die neuen Sender durch Dr cken von OK speichern 7 1 5 Zusatzsender suchen ber dieses Men k nnen Sie nach Programmen suchen indem Sie eine bestimmte Kabelfrequenz eingeben So star...

Page 46: ...um das L schen der gew hlten Sender zu best tigen 7 1 7 Lieferzustand wiederherstellen Mit diesem Men k nnen Sie den Receiver auf den urspr nglichen Lieferzustand zur cksetzen 1 Dr cken Sie die Taste...

Page 47: ...ierter Einstellung werden Sender mit Untertiteln in der gew hlten Men sprache angezeigt sofern diese verf gbar ist So ffnen Sie die Spracheinstellungen 1 Dr cken Sie die Taste MEN 2 W hlen Sie EINSTEL...

Page 48: ...nd dr cken Sie OK 3 W hlen Sie EINSTELLUNGEN mit oder und dr cken Sie OK oder die Taste rechts 4 W hlen Sie TON mit oder und dr cken Sie OK oder die Taste rechts Audio Ausgang So legen Sie den standar...

Page 49: ...standard f r die TV Ausgabe festlegen der sich besten f r das mit dem TV SCART Anschluss verbundenen Fernsehger t eignet 1 W hlen Sie TV SCART mit oder und dr cken Sie OK oder die Taste rechts 2 W hle...

Page 50: ...1080i mit oder Wenn Sie ein Standard Fernsehger t besitzen belassen Sie die Einstellung auf 720p 3 Dr cken Sie OK zum Best tigen 4 Der Receiver schaltet vor bergehend auf die ausgew hlte Aufl sung um...

Page 51: ...angesehenen Sender an oder AN zeigt den Startsender an mit oder 3 Dr cken Sie OK um die neue Einstellung zu best tigen 7 2 4 Energiesparmodus Aktivieren Sie den Energiesparmodus wenn Sie m chten dass...

Page 52: ...einem freien USB Anschluss des Receivers 2 Wenn die Internetverbindung nicht bereits bei der Erstinstallation des Receivers eingerichtet wurde dr cken Sie die Taste MEN und w hlen Sie EINSTELLUNGEN E...

Page 53: ...en Sie OK 5 Sie werden anschlie end schrittweise durch die Konfiguration der kabelgebundenen Internetverbindung geleitet 7 3 3 Internet Einstellungen anzeigen Mit diesem Men k nnen Sie die auf dem Rec...

Page 54: ...ungesichert WEP WPA PSK oder WPA2 PSK 4 Um die Einstellung einer Option zu ndern w hlen Sie die gew schnte Option aus und dr cken Sie OK 5 Best tigen Sie die nderung indem Sie auf SPEICHERN und dann O...

Page 55: ...e die IP Adresse des Receivers ein und dr cken Sie OK 4 Wiederholen Sie Vorgang um die Einstellungen f r Teilnetzmaske Gateway und DNS Serveradressen anzugeben 5 Best tigen Sie die nderung indem Sie a...

Page 56: ...wird erst wiedergegeben nachdem die Jugendschutz PIN richtig eingegeben wurde Bitte beachten Sie Folgendes wenn Sie die Jugendschutz PIN ndern Die PIN ist ein vierstelliger Code Sie m ssen vor dem nd...

Page 57: ...neue PIN muss sich von der Jugendschutz PIN unterscheiden Die neue PIN darf nicht aus vier gleichen Ziffern bestehen Wenn Sie drei Mal hintereinander eine falsche PIN eingeben wird der Zugang f r 10 M...

Page 58: ...en k nnen Sie die Bestellung entgeltpflichtiger Programme des Abrufdienstes SELECT VIDEO durch vorherige Eingabe der Jugendschutz PIN sch tzen Bei aktivierter Einstellung fordert Sie der Receiver zur...

Page 59: ...ahmen Seite 33 7 5 2 Festplattenverwaltung Mit diesem Men k nnen Sie die automatische Verwaltung der Receiver Festplatte aktivieren oder deaktivieren Sie k nnen die Festplattenverwaltung auf folgende...

Page 60: ...der die Taste rechts 4 W hlen Sie ALLE L SCHEN mit oder und dr cken Sie OK 5 Eine Warnmeldung wird angezeigt 6 Formatieren Sie die Festplatte des Receivers Um den Vorgang abzubrechen w hlen Sie NEIN m...

Page 61: ...Standardm ig ist der Receiver auf den automatischen Modus eingestellt 1 Dr cken Sie die Taste MEN 2 W hlen Sie EINSTELLUNGEN mit oder und dr cken Sie OK 3 W hlen Sie AUFNAHMEN mit oder und dr cken Si...

Page 62: ...oder die Taste rechts 4 W hlen Sie HINZUF GEN mit oder und dr cken Sie OK oder die Taste rechts Je nach dem ausgew hlten Modus wird die Liste der TV oder Radiosender angezeigt 5 Dr cken Sie die Taste...

Page 63: ...wird angezeigt 10 Dr cken Sie OK um Ihre nderungen zu best tigen 7 6 3 Favoriten l schen Mit diesem Men k nnen Sie Sender aus Ihren Favoriten entfernen 1 Dr cken Sie die Taste MEN 2 W hlen Sie EINSTEL...

Page 64: ...eses Men enth lt Informationen ber Ihre Smartcard Um diese Informationen abzurufen und anzuzeigen muss die Smartcard in den Receiver eingesteckt sein 1 Dr cken Sie die Taste MEN 2 W hlen Sie EINSTELLU...

Page 65: ...ach aus und dr cken OK 7 Sie k nnen dann die Mitteilung behalten Aktion Schlie en oder l schen Aktion L schen 7 7 5 Netzwerkinformationen Dieses Men enth lt Informationen ber Ihren Kabelanschluss und...

Page 66: ...oder die Taste rechts 4 W hlen Sie GER TE INFO mit oder 7 8 2 Smartcardinformationen Dieses Men enth lt Informationen ber Ihre Smartcard Um diese Informationen abzurufen und anzuzeigen muss die Smartc...

Page 67: ...hlen Sie SYSTEM DIAGNOSE mit oder und dr cken Sie OK oder die Taste rechts 4 W hlen Sie BILDSCHIRM mit oder 7 8 6 Audioinformationen Dieses Men stellt Informationen zum Audioausgang bereit 1 Dr cken S...

Page 68: ...en Sie R CKKANAL mit oder 5 Dr cken Sie die Taste OK um den R ckkanal zu pr fen 7 8 9 IP Verbindung pr fen ber dieses Men k nnen Sie die Geschwindigkeit der Internetverbindung pr fen 1 Dr cken Sie die...

Page 69: ...Manuell S 39 Neue Software suchen S 40 Art Sendersuchlauf Automatisch Manuell S 40 Zusatzsender l schen S 41 Zusatzsender suchen S 41 Sendersuchlauf starten S 42 Zum Lieferzustand S 42 Einstellungen S...

Page 70: ...verl ngerung Anfang 1 Min Aufnahmeverl ngerung Ende 14 Min S 57 Favoriten S 58 Hinzuf gen S 58 L schen S 59 Sortieren S 59 Service S 60 System Info S 60 Ger tehersteller Modell Ger teseriennummer Soft...

Page 71: ...ummer Hardwareversion Softwareversion Letztes Software Update Status letztes Software Update Provisionierungscode Freier Speicher Smartcard S 62 Smartcard Serien Nr Smartcard Version Smartcard Status...

Page 72: ...T AV SCART Steuerung DVI Ton S 63 Men sprache Untertitel Audio Ausgang Dolby Digital ber HDMI Dolby Digital ber SPDIF LAN WLAN S 63 LAN IP Adresse Teilnetzmaske Default Gateway DNS Server LAN MAC Adre...

Page 73: ...hlen Sie JA JETZT AKTUALISIEREN mit oder und dr cken Sie OK Der Receiver beginnt mit der Aktualisierung Sie k nnen den Receiver erst nach erfolgreichem Abschluss der Aktualisierung wieder benutzen De...

Page 74: ...hren Fernseher ein 2 Halten Sie die Taste TV und die Taste PROGRAMM gleichzeitig f r mindestens 3 Sekunden gedr ckt bis die LED zweimal blinkt 3 Lassen Sie nun die Tasten wieder los und geben Sie den...

Page 75: ...uslesen des gespeicherten 4 stelligen Codes Mit diesem Verfahren k nnen Sie den in der Fernbedienung zur Steuerung des TV Ger ts abgelegten 4 stelligen Code optisch auslesen 1 Dr cken Sie auf der Fern...

Page 76: ...Mito 1612 1847 ASA 0132 0373 0097 0114 Asberg 0064 0583 Asora 0036 Astro 0667 Atec 1633 Atlantic 0064 0583 Atori 0036 Audiosonic 0064 0583 0136 0741 0742 0397 0291 0245 0513 2010 Audioton 0513 0397 02...

Page 77: ...526 1936 1822 0064 0651 2302 0741 0583 0036 0907 1334 0903 0892 1639 0245 1164 2064 Dainichi 0245 TV Marke Marken Code TV Code s Dantax 0397 0513 0741 0633 0742 Daytek 1403 Daytron 0036 0064 0583 de G...

Page 78: ...3 Geloso 0274 0036 0579 General Electric 0370 0314 General Technic 0036 TV Marke Marken Code TV Code s Genexxa 0245 0064 0583 0036 Gericom 1244 1633 0892 1325 1233 0907 0835 1748 Goldfunk 0695 GoldSta...

Page 79: ...5 0613 0637 ITT Nokia 0388 0575 0500 0507 0376 0373 0235 0613 0633 0637 0658 ITV 0291 Jean 1540 JEC 0062 JGC 1704 1736 Jubilee 0583 TV Marke Marken Code TV Code s JVC 0680 1845 1680 0398 2145 0633 075...

Page 80: ...1 0562 0222 0097 0561 0218 0135 Minoka 0064 0583 Mirai 1693 2099 1879 Mitsubishi 0135 0064 0562 0539 1064 0583 0114 0235 TV Marke Marken Code TV Code s Mivar 0397 Monaco 0036 Morgan s 0064 0583 MTC 03...

Page 81: ...7 0064 0388 0136 0513 0539 0397 0370 0314 Pionier 0397 0513 Plantron 0583 0291 0036 0064 TV Marke Marken Code TV Code s Playsonic 0741 0064 0742 1827 1679 Polaroid 1768 2152 1672 1550 1747 Policom 013...

Page 82: ...0036 2088 0514 0661 0291 0245 0376 0274 SEI 0114 1532 1037 0579 0571 0376 0321 0064 0583 TV Marke Marken Code TV Code s Sei Sinudyne 0321 1532 1037 0579 0571 0064 0583 0114 Seleco 0438 0398 0291 0373...

Page 83: ...0742 1064 Tenson 0036 Tesla 0064 TV Marke Marken Code TV Code s Tevion 1275 1164 0741 0583 1583 1064 2050 0695 0835 1768 0675 2268 1316 1827 2117 1612 0892 1286 0064 Texet 0036 0245 Thomson 0652 0587...

Page 84: ...Wegavox 0036 0064 0583 Welltech 1679 Weltblick 0064 0583 Weltstar 1064 Weston 0064 0583 White Westinghouse 0064 0583 0651 1936 Wilson 0583 Windy Sam 0583 World of Vision 0907 1759 2028 0917 0892 1316...

Page 85: ...fen Sie ob Ihr Fernseher mit dem TV SCART Anschluss verbunden ist siehe Verbindung zu einem Standard Definition Fernseher mit SCART Anschluss Seite 14 W hlen Sie den SCART Eingang ggfs direkt am Fern...

Page 86: ...ider Erwarten einmal Schwierigkeit mit dem Produkt haben und Beratung oder Unterst tzung ben tigen k nnen Sie sich auf bestm gliche Hilfe verlassen Bei technischen Problemen mit dem Produkt k nnen Sie...

Page 87: ...platznummer mit den Zifferntasten der Fernbedienung zu erreichen ist k nnen die weiteren Optionskan le nur ber die Taste Opt aufgerufen werden Auf Optionskan len k nnen z B ein Formel 1 Rennen aus ver...

Page 88: ...n Wiedergabetreue Erweiterungen 8x8 Transformationen 8x8 r umlicher Vorhersagemodus dynamische Quantisierungsmatrix AUDIO DECODIERUNG Stereo 2 0 MPEG 1 Layer I II Musicam MPEG 2 Layer II Modus Mono St...

Page 89: ...00 Voll Halbduplex Adaptiver Equalizer Baseline Wander Korrektur ZUGANGSBERECHTIGUNG 1 x Smartcard Leser ISO IEC 7816 DATEN ANSCHLUSS 1 x RS232 durch AUX Scart 1 x USB 2 0 Host High Speed 1 x RJ45 Eth...

Page 90: ...86 MEMO...

Page 91: ...User manual Digital HD Video Recorder RCI88 320 RCI88 1000...

Page 92: ......

Page 93: ...ensure the safety of users and their equipment and protect their health and minimize the impact of products on the environment The CE declaration of conformity can be viewed in the support section of...

Page 94: ...ese notes carefully You will find them in the Safety section of this manual WARNING Indicates important safety information Failure to respect these notes may lead to minor to moderate injury or damage...

Page 95: ...cations mentioned on the identification label voltage current frequency of electricity network As a precaution in case of danger the mains adapters act as a disconnecting mechanism for the 230V power...

Page 96: ...and distort the picture or sound Hard disk This unit contains a hard disk Before unplugging and moving the receiver please wait for the unit to go into standby mode and make sure that there are no rec...

Page 97: ...l To facilitate recycling please respect the sorting rules set up locally for this kind of waste If your product contains batteries they must be disposed of at appropriate collection points European r...

Page 98: ...e health of personnel at the recycling centres The batteries of the remote control can be removed simply Note When the batteries of the remote control are worn out please dispose of them at a collecti...

Page 99: ...eo sub channels 23 Selecting audio languages 23 Selecting subtitle languages 23 Selecting subchannels 24 4 4 Selecting a Radio channel 25 4 5 Teletext 26 4 6 Live mode Deferred mode 26 Pause Play 26 R...

Page 100: ...es 57 Delete Favorites 57 7 7 Service menu 58 System Information 58 Smartcard Information 58 Hotline List 58 Service Messages 59 Network Information 59 7 8 System Check 60 7 9 Overview of the Settings...

Page 101: ...ot scrambled and those you are entitled to 1 1 Package contents Your new equipment includes Item Description 1 Digital HD Video Recorder 2 Power cord 3 Remote control with 2 batteries AAA 4 HDMI lead...

Page 102: ...receiver menus Play Pause a recording enter the timeshift mode Green playback in progress timeshift mode excluded Flashing green pause mode active 4 ZUR CK button 10 FORWARD button Go back to the pre...

Page 103: ...pply unit connector 21 Digital audio connector Optical S PDIF 15 Ethernet port RJ45 22 SCART connector to TV 16 USB port This port supplies power to connected devices 23 SCART connector to VCR or DVD...

Page 104: ...en options menu Teletext pages 12 0 9 Access channels and various on screen options 13 OPT Display current program options audio language subtitle language video subchannels display prime time event i...

Page 105: ...le network To make sure that your receiver can receive all the cable TV and Radio channels which are not scrambled and you are entitled to you must check first of all that your home is connected to ca...

Page 106: ...the HDMI connector on your television set 2 To connect other devices to the receiver VCR home cinema refer to the following sections 2 2 2 Connection to a Standard Definition television using a SCART...

Page 107: ...our receiver to the VIDEO connector on your television set 2 Connect the right and left audio outputs of your receiver to the audio inputs on your television set 2 3 Connection to the VCR DVD recorder...

Page 108: ...DIF optical input Use a S PDIF optical cable cable not provided to connect the DIGITAL AUDIO output on the receiver to the input of your home cinema amplifier 2 5 Connection to a hi fi unit To make th...

Page 109: ...ff switch to switch the receiver on position I You can now proceed to the initial setup of your receiver If you need to power off the receiver for maintenance before a long period of no use proceed as...

Page 110: ...Pull the flap to access the reader slot The chip must be facing downwards 4 The first installation screen should appear 3 1 Language Settings 5 Select your preferred language using the up or down key...

Page 111: ...e 12 If the SELECT VIDEO service is available in your home the Internet setup wizard appears and lets you configure a connection to the Internet according to your domestic network 13 Depending on your...

Page 112: ...also display it by pressing once the OK key or any of the navigation keys while watching a program The zapping banner lets you see at a glance what s playing on the current channel and what s next Us...

Page 113: ...than others add them into the favorite TV list the program information banner will first display your favorites for quick access channels 1 to 99 depending on the number of favorite channels followed...

Page 114: ...rogram if it is currently broadcast on a channel Record Cancel Recording Start recording the program Cancel its recording Record Series Cancel Series Start recording the program and schedule the recor...

Page 115: ...t the desired audio with or and press OK 4 3 2 Selecting subtitle languages 1 Press the OPT key to display the options banner 2 Select SUBTITLE LANGUAGE with or and press OK or the right key 3 Select...

Page 116: ...right key 3 Select the desired subchannel with or and press OK Note If you want to record a specific subchannel select it from the options banner then start recording by pressing the REC key If you sw...

Page 117: ...up or down key to display the radio channel list If you have a set of radio channels that you listen to more than others add them into the favorite Radio list they will appear first in the channel lis...

Page 118: ...ically saves the previous minutes of the channel that is watched or the radio channel that is listened to last 60 to 120 minutes depending on the signal characteristics This sliding recording mode mak...

Page 119: ...rogram must have been watched or listened to for at least 2 hours 4 6 3 Fast forward You can fast forward by pressing the FORWARD key You will then see the Deferred Live delay decrease By pressing the...

Page 120: ...m guide is an electronic program guide that displays program information for all the channels installed TV and RADIO You can also record programs from the electronic program guide see Video recordings...

Page 121: ...and press OK To record a current program or schedule the recording of a future program select it and press the key for more information on this feature see Video recordings page 32 To exit the electro...

Page 122: ...ith and and press OK To confirm the title entered select LIST and press OK 5 2 4 Search results The Search result screen lists all programs that match your search criteria with schedule information fo...

Page 123: ...of movies and TV shows to order and view on demand independent of program schedules 5 3 1 Pre requisites to the Select Video service This feature is only available if you subscribed to SELECT VIDEO se...

Page 124: ...r a certain time 2 hours maximum without changing channels the receiver will record it from the moment it started or you started watching it until its announced end time If the program is to be broadc...

Page 125: ...ings menu see Manual Recording page 53 You can then manually set the recording options for the desired program 1 If required select the channel to record 2 If required enter the recording date 3 Enter...

Page 126: ...s are used to quickly identify folder and recording properties Icon Meaning The folder contains a series for which future episodes will automatically be recorded The folder contains a series for which...

Page 127: ...INFO 3 Select the desired action and press OK Status Meaning Recording The program is currently being recorded Booked The recording of the program is scheduled Series Booked The recording of the serie...

Page 128: ...ess OK 6 3 5 Renaming recordings 1 Select the recording or folder you want to rename and press INFO 2 Select the relevant action RENAME EVENT or RENAME FOLDER and press OK 3 Enter the desired name usi...

Page 129: ...or the left key To exit the menu screen press the MEN or EXIT key 7 1 1 Software Update Mode By default your receiver automatically checks if new software is available and asks you if you want to perf...

Page 130: ...re details on the Software update process refer to Software Update page 68 7 1 3 Network Scan Mode By default your receiver automatically checks if new channels are available and installs them when in...

Page 131: ...ssing ZUR CK or the left key 6 Once the search is complete press OK to save the new channels 7 1 5 Search for Additional Channels This menu lets you manually search for channels by entering a specific...

Page 132: ...key a confirmation message appears 8 Press OK to confirm the deletion of the selected channels 7 1 7 Factory Reset This menu lets you restore the factory settings of the receiver 1 Press the MEN key 2...

Page 133: ...the automatic display of subtitles If enabled programs will be broadcast with subtitles in the selected on screen language provided it is available To access the language settings 1 Press the MEN key...

Page 134: ...ress the MEN key 2 Select SETTINGS with or and press OK 3 Select SYSTEM SETUP with or and press OK or the right key 4 Select AUDIO with or and press OK or the right key Audio Output To set the default...

Page 135: ...ettings This menu lets you set the video standard for TV output best suited for the TV set connected on the TV SCART 1 Select TV SCART with or and press OK or the right key 2 Select the video standard...

Page 136: ...output resolution for your HD TV set 576p 576i 720p or 1080i with or If you have a standard TV leave the setting at 720p 3 Press OK to confirm 4 The receiver switches temporarily to the selected resol...

Page 137: ...CHANNEL with or and press OK or the right key 2 Select the desired state OFF display the last channel watched or ON display the start channel with or 3 Press OK to confirm the new setting 7 2 4 Energ...

Page 138: ...connect the receiver to the wireless network 1 Connect the optional USB WLAN stick on a free USB port of the receiver 2 If you have not set up an Internet connection during first installation press th...

Page 139: ...INGS SYSTEM SETUP INTERNET INTERNET SETUP WIRED 4 Thereafter you will get an assistant helping you to set up the wired Internet connection step by step 7 3 3 View Internet Settings Use this menu to vi...

Page 140: ...ation name of the network found SSID security set on the network none unsecured WEP WPA PSK or WPA2 PSK 4 To modify the value of a setting select it and press OK 5 Confirm your modifications by select...

Page 141: ...field and press OK 3 Enter the IP address of the receiver and press OK 4 Repeat the operation to fill in the subnet mask gateway and DNS server addresses 5 Confirm your modifications by selecting SAV...

Page 142: ...l control PIN is correctly entered Please consider the following when changing the Parental Control PIN the PIN is a four digit code you must enter the current PIN before you can change it the current...

Page 143: ...from the current PIN the new PIN must be different from the Parental Control PIN the new PIN cannot consist of four identical digits if you enter an incorrect PIN three consecutive times access will b...

Page 144: ...tate ON enable or OFF disable with or 6 Press OK to confirm the new setting 7 4 4 Purchase Restricted Access This menu lets you PIN lock the SELECT VIDEO purchase process When activated the receiver w...

Page 145: ...ge 32 7 5 2 Disk Management This menu lets you enable or disable the automatic management of the receiver hard disk You can set disk management to be Manual when disk space is insufficient for new rec...

Page 146: ...ey 4 Select FORMAT DISK with or and press OK 5 A warning message appears 6 Format the receiver s hard disk To cancel the operation select NO with or and press OK or press ZUR CK To confirm select YES...

Page 147: ...tically adds guard times to recordings By default the receiver is set to automatic mode 1 Press the MEN key 2 Select SETTINGS with or and press OK 3 Select RECORDINGS with or and press OK or the right...

Page 148: ...TINGS with or and press OK 3 Select FAVORITES with or and press OK or the right key 4 Select ADD with or and press OK or the right key The list of TV or Radio channels appear depending on the selected...

Page 149: ...ons are made press ZUR CK or the left key a confirmation message appears 10 Press OK to confirm your modifications 7 6 3 Delete Favorites Use this menu if you want to remove channels from your favorit...

Page 150: ...SYSTEM INFO with or 7 7 2 Smartcard Information This menu provides information on your smartcard Make sure the smartcard is inserted into the receiver to retrieve and display this information 1 Press...

Page 151: ...d press OK 7 You can then keep the message action Close or delete it action Delete 7 7 5 Network Information This menu provides information on the cable network and lets you find out the signal level...

Page 152: ...8 2 Smartcard Information This menu provides information on your smartcard Make sure the smartcard is inserted into the receiver to retrieve and display this information 1 Press the MEN key 2 Select S...

Page 153: ...ey 2 Select SETTINGS with or and press OK 3 Select SYSTEM CHECK with or and press OK or the right key 4 Select TV PICTURE with or 7 8 6 Audio information This menu provides audio output information 1...

Page 154: ...right key 4 Select BACK CHANNEL with or 5 To start the back channel test press the OK key 7 8 9 Test IP Connection This menu lets you test the speed of your Internet connection 1 Press the MEN key 2...

Page 155: ...al p 37 Search for New Software p 38 Network Scan Mode Automatic Manual p 38 Delete Additional Channels p 40 Search for Additional Channels p 39 Automatic Channel Scan p 39 Factory Reset p 40 System S...

Page 156: ...anage Disk Automatic Manual p 53 Format Disk p 54 Guard Time Auto Manual If set to Auto Start guard time 1 min End guard time 14 min p 55 Favorites p 56 Add p 56 Delete p 57 Rearrange p 57 Service p 5...

Page 157: ...st Network Scan TV Channels Radio Channels Signal Level BER Network System Check p 60 Device Info p 60 Manufacturer Model Name Serial Number Hardware Version Software Version Last software update Last...

Page 158: ...I Screen Resolution HDMI Status HDCP Status TV Manufacturer TV Model TV SW Version TV Picture p 61 Selected Channel Picture Mode TV SCART VCR SCART AV SCART Switching DVI Audio p 61 On screen Language...

Page 159: ...Address Subnet Mask Default Gateway DNS Server LAN MAC Address Connection Uptime WLAN Encryption WLAN MAC Address WLAN IP Address WLAN Signal Strength Back Channel p 62 Test IP Connection p 62 Menu S...

Page 160: ...the download select YES UPGRADE NOW with or and press OK The receiver will start downloading You should not disconnect or use the receiver until it has finished downloading A status screen informs you...

Page 161: ...and You will need it during the programming procedure 1 Turn on the TV 2 Press and hold key TV and key PROGRAMM together for a minimum of 3 seconds until the LED blinks twice 3 Release the keys and en...

Page 162: ...trieve the 4 digit code stored on the remote control to control your TV set 1 On the remote control press simultaneously the 1 and INFO keys the LED blinks as many times as the first number stored For...

Page 163: ...t Mito 1612 1847 ASA 0132 0373 0097 0114 Asberg 0064 0583 Asora 0036 Astro 0667 Atec 1633 Atlantic 0064 0583 Atori 0036 Audiosonic 0064 0583 0136 0741 0742 0397 0291 0245 0513 2010 Audioton 0513 0397...

Page 164: ...26 1936 1822 0064 0651 2302 0741 0583 0036 0907 1334 0903 0892 1639 0245 1164 2064 Dainichi 0245 TV Brand Brand code TV code s Dantax 0397 0513 0741 0633 0742 Daytek 1403 Daytron 0036 0064 0583 de Gra...

Page 165: ...0583 Geloso 0274 0036 0579 General Electric 0370 0314 General Technic 0036 TV Brand Brand code TV code s Genexxa 0245 0064 0583 0036 Gericom 1244 1633 0892 1325 1233 0907 0835 1748 Goldfunk 0695 GoldS...

Page 166: ...0613 0637 ITT Nokia 0388 0575 0500 0507 0376 0373 0235 0613 0633 0637 0658 ITV 0291 Jean 1540 JEC 0062 JGC 1704 1736 Jubilee 0583 TV Brand Brand code TV code s JVC 0680 1845 1680 0398 2145 0633 0758...

Page 167: ...0581 0562 0222 0097 0561 0218 0135 Minoka 0064 0583 Mirai 1693 2099 1879 Mitsubishi 0135 0064 0562 0539 1064 0583 0114 0235 TV Brand Brand code TV code s Mivar 0397 Monaco 0036 Morgan s 0064 0583 MTC...

Page 168: ...0064 0388 0136 0513 0539 0397 0370 0314 Pionier 0397 0513 Plantron 0583 0291 0036 0064 TV Brand Brand code TV code s Playsonic 0741 0064 0742 1827 1679 Polaroid 1768 2152 1672 1550 1747 Policom 0136...

Page 169: ...94 0036 2088 0514 0661 0291 0245 0376 0274 SEI 0114 1532 1037 0579 0571 0376 0321 0064 0583 TV Brand Brand code TV code s Sei Sinudyne 0321 1532 1037 0579 0571 0064 0583 0114 Seleco 0438 0398 0291 037...

Page 170: ...0742 1064 Tenson 0036 Tesla 0064 TV Brand Brand code TV code s Tevion 1275 1164 0741 0583 1583 1064 2050 0695 0835 1768 0675 2268 1316 1827 2117 1612 0892 1286 0064 Texet 0036 0245 Thomson 0652 0587 0...

Page 171: ...114 Wegavox 0036 0064 0583 Welltech 1679 Weltblick 0064 0583 Weltstar 1064 Weston 0064 0583 White Westinghouse 0064 0583 0651 1936 Wilson 0583 Windy Sam 0583 World of Vision 0907 1759 2028 0917 0892 1...

Page 172: ...that your TV set is connected to the TV SCART socket see Connection to a Standard Definition television using a SCART lead page 14 If necessary select the SCART input directly on your TV set There is...

Page 173: ...wever in the rare event that you have any problems with the product and need advice or support you can be confident that we will do our best to help you If you experience technical problems with the p...

Page 174: ...rt the smartcard into the receiver s smartcard reader with the chip face down to descramble services to which you are entitled Start Channel Channel on which the receiver systematically tunes to whene...

Page 175: ...elity range extensions 8x8 Transforms 8x8 Spatial Prediction Mode Dynamic Quantization Matrix AUDIO DECODING Stereo 2 0 MPEG 1 layer I II Musicam MPEG 2 layer II Mode Mono stereo joint stereo Sampling...

Page 176: ...Full Half Duplex Adaptive equaliser Baseline wander correction CONDITIONAL ACCESS 1 x Smart card reader ISO IEC 7816 DATA PORT 1 x RS232 through AUX Scart 1 x USB 2 0 Host High Speed 1 x RJ45 Etherne...

Page 177: ...85 ENG MEMO...

Page 178: ......

Page 179: ...h_ ji h i hl Z J _d ehcWj_ed WdZ if Y_ YWj_edi _dYbkZ Z Wh ikX Yj je Y Wd m_j ekj fh_eh dej_Y IW cYec 8heWZXWdZ I7I jh_ i je dikh j Wj Wbb _d ehcWj_ed _d j _i ZeYkc dj _i Yehh Yj Xkj Ze i dej WYY fj...

Page 180: ...Programmieren der Fernbedienung k nnen Sie mit der TV Taste zwischen dem HD Video Recorder bzw HD Receiver und Ihrem Fernsehger t umschalten Bei jedem Umschalten blinkt die LED Leuchte kurz auf Sie bl...

Page 181: ...3 Arena 0064 Aristona 0583 0064 0039 Art Mito 1612 1847 ASA 0132 0373 0097 0114 Asberg 0064 0583 Asora 0036 Astro 0667 Atec 1633 Atlantic 0064 0583 Atori 0036 Audiosonic 0064 0583 0136 0741 0742 0397...

Page 182: ...74 Cybertron 0245 Cytronix 1325 D Boss 1501 0064 Daewoo 0661 0688 0526 1936 1822 0064 0651 2302 0741 0583 0036 0907 1334 0903 0892 1639 0245 1164 2064 Dantax 0397 0513 0741 0633 0742 Daytek 1403 Daytr...

Page 183: ...ai 1844 1421 1064 1693 1622 0695 0741 0291 0321 Future 0064 0583 Galaxi 0064 0583 0388 Galaxis 0397 0064 0445 0583 Galeria 0036 GBC 0579 0036 0245 GE 0370 GEC 0388 0376 0064 0583 Geloso 0274 0036 0579...

Page 184: ...0354 0388 0397 0136 0438 Interbuy 0036 0064 0291 0274 0539 0583 Interfunk 0064 0583 0039 0114 0539 0354 0388 0397 0136 0376 0274 0227 Internal 0064 0583 0651 0526 1936 Intervision 0064 0398 0546 0513...

Page 185: ...Medion 0835 1275 0741 1768 0583 1176 1229 1583 0064 0907 1064 1612 1694 0272 1164 1464 0695 1943 2028 0539 1248 1233 Megas 0637 MEI 1064 0064 0583 Melectronic 0373 0064 0539 0136 0370 0274 0222 0688...

Page 186: ...cific 0064 0583 1164 1264 0741 1064 0470 1399 Palladium 0397 0438 0376 0682 0741 0546 0064 0445 0218 1532 1164 0561 0227 0581 0354 0114 0274 0579 0583 1037 2009 Panama 0036 0291 0064 0583 0274 Panason...

Page 187: ...583 0064 Saba 0652 0362 0136 0587 0370 0114 0223 0498 0314 1064 0388 0575 0525 1615 0741 0583 Sagem 0637 0857 1340 0645 Saivod 0064 0583 0695 1064 Salora 0376 0388 0575 0235 0579 0507 2152 1264 0658 1...

Page 188: ...wood 0036 0064 0583 SuperTech 0036 0064 0583 0245 Supra 0036 Susumu 0362 0245 0314 Sutron 0036 Swedx 1633 Swissline 0274 Swisstec 1531 Sysline 0064 0583 T A 0474 Tandberg 0394 0438 0136 0223 0388 Tand...

Page 189: ...0445 0448 0197 0136 0101 0227 2201 0376 0222 1532 0321 1037 Univox 0064 0583 0114 V7 Videoseven 1244 1693 2281 0907 1403 1294 Vestel 1064 1190 1612 1694 0064 0695 0579 0583 Vexa 0036 0064 0583 Videolo...

Reviews: