background image

ENGLISH

24/25

OK

Open the product regulator

 until the appropriate 

amount of product comes out. Now you have the 

maximum spraying width (spraying pattern).  You can 

reduce this according to your needs by closing the 

spray width regulator.

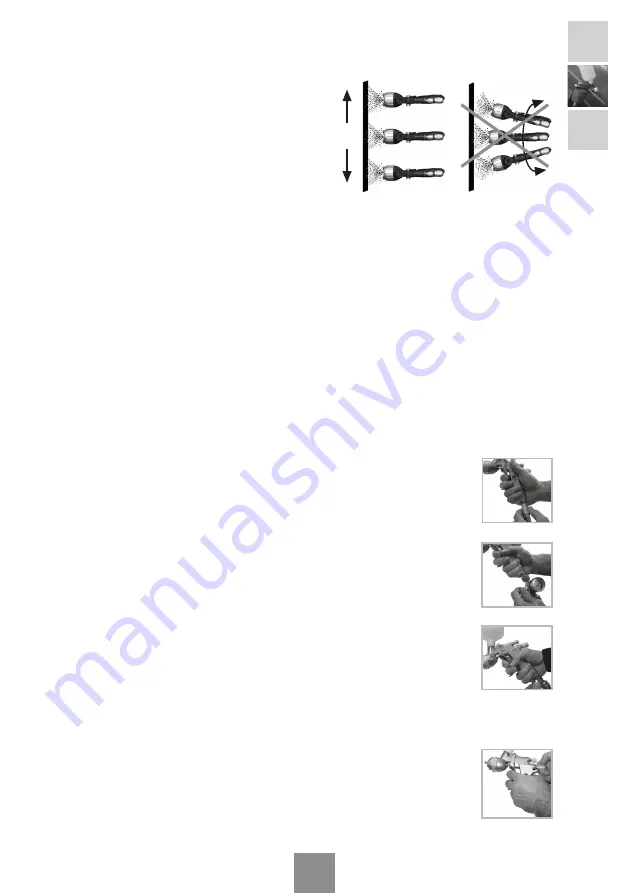
Please be sure that you 

put the spray gun properly 

by keeping its perpendicularity to the piece to be 

painted in order to achieve the maximum transfer 

of the sprayed product and obtain the best finishing 

quality

 (Ver Fig.9).

11.1.- Clean Air

The air used for spraying must reach the gun 

free of impurities, aerosols, oil, silicone and solid 

particles

.  To do this you must eliminate these with coalescent filter units.

The use of 

air treatment equipment

 with built-in pressure regulators is recommended (Models 

SAGOLA 5200, 5300 or 5300 Plus).

11.2. Sufficient volume of air

A sufficient volume of air can be supplied to the gun by means of an air compressor of adequate 

power

 (1HP equals 110 L/min approximately), a good compressed air network and by avoiding 

pressure drops through the use of 

antistatic

, silicon-free 

air hoses 

with a minimum inside 

diameter of 8 mm. and resistant to the spraying air pressure 

(minimum 20 bar) and to the aggres-

sive effects of paint solvents

. Before assembling the air network, you must check on the air 

tightness of the hose. 

Use antistatic air hoses. Should an antistatic air hose not be available, you must attach the unit 

to a ground connection

 in order to eliminate any static electricity.

The total derivative resistance


must be <100 million ohms

11.3. Adjusting Air Pressure

11.3.1.- 

Digital Pressure Gauge Version

The gun leaves the factory ready to work at an input pressure of 2 bar. In 

order to change this adjustment, turn the flow regulator

 clockwise until the 

pressure indicated in the internal pressure gauge coincides with the required 

working pressure.

11.3.2.-

 Analogue Pressure Gauge Version

The gun leaves the factory ready to work at an input pressure of 2 bar. In 

order to change this adjustment, turn the regulator control

, clockwise in 

order to reduce the pressure and anticlockwise to increase this, until the 

pressure indicated in the pressure gauge coincides with the required working 

pressure.

11.3.3.-

 Version without Pressure Gauge

The gun leaves the factory with the internal flow regulator fully open. In 

order to adjust this to the required pressure

, turn the regulator clockwise to 

reduce the inlet pressure and anticlockwise to increase this.

11.4. Amount of Product to be applied

Once the product to be applied has 

been adequately diluted

, turn the Product 

Regulator clockwise to reduce the amount of product and anticlockwise to 

increase this.

During application, 

the amount of product applicable

 in areas that are small 

or difficult to access can be reduced 

by reducing the pressure applied with 

one's finger

.

Fig.9

Summary of Contents for 4600 Xtreme

Page 1: ...l d e i n s t r u c c i o n e s i n s t r u c t i o n m a n u a l m a n u a l d e i n s t r u e s g e b r a u c h s a n l e i t u n g l i b r e t t o d i i s t r u z i o n i m a n u e l d u t i l i s...

Page 2: ...ge 24 11 1 Clean Air 11 2 Sufficient volume of air 11 3 Adjusting Air Pressure 11 3 1 Digital Pressure Gauge Version 11 3 2 Analogue Pressure Gauge Version 11 3 3 Version without Pressure Gauge 11 4 A...

Page 3: ...ipment consists of the following _ Spray gun _ Accessory wrench _ Cleaning brush _ Instruction manual _ Case 3 Technical details Unit with product feed by gravity hereinafter the Gun with Tip and Air...

Page 4: ...onents these come into contact with aluminium stainless steel polythene and acetylene resin Do not use corrosive or abrasive products The gun has been designed for long service and can be used with th...

Page 5: ...ted Increase the amount of product correct its viscosity or use a larger fluid tip in the gun If the thickness of the layer is very thin this is due to the fact that the air pressure is excessive for...

Page 6: ...the pressure inside the pistol while there is a power supply through the battery WARNING The battery cannot be replaced in hazardous areas See Atex regulations about explosion risk areas The digital p...

Page 7: ...rning these anticlockwise See Fig 1 and Fig 2 Place the pistol on a support so that the axis of the tank is vertical Pour the product to apply into the tank Until the level is a maximum of 20 25 mm be...

Page 8: ...air hoses Should an antistatic air hose not be available you must attach the unit to a ground connection in order to eliminate any static electricity The total derivative resistance must be 100 millio...

Page 9: ...t condition IN ORDER TO OBTAIN THE BEST POSSIBLE RESULTS ALWAYS USE ORIGINAL SPARES ENSURE TOTAL INTERCHANGEABILITY SAFETY AND OPERATION 12 1 Changing the self adjusting Packing gland The needle gaske...

Page 10: ...er 12 3 Cleaning or replacement of the product filter If there is any cleaning liquid or product remaining in the tank return it to its corresponding containers To avoid any spillage keep the pistol i...

Page 11: ...U V A 02 03 18 16 28 15 13 14 12 19 20 22 10 24 23 25 11 21 21 26 10 06 08 06 07 09 29 04 17 1 2 ESP U V A 1 DVR TITANIA 2 DVR HVLP 3 DVR AQUA 4 DVR CLEAR 1 BAR 2 PSI 05 27 1 1 20 2 1 20 XL 3 1 30 4 1...

Page 12: ...ning of the gun tools and accessories used in the mixing and preparation of the product to be applied we recommend the use of SAGOLA washing machines IMPORTANT The gun can be cleaned with thinners or...

Page 13: ...eing done at that time After work has been completed thinners and the product to be applied must be returned to their corresponding storage location Keep the working area clean and free of potentially...

Page 14: ...y to use personal protective equipment such as gloves to thermally insulate your hands from the unit The use of solvents and or detergents that contain halogenated hydrocarbons trichloroe thane methyl...

Page 15: ...the case of any breakdown during the guarantee period please attach the completed warranty certificate to the unit and deliver this to the nearest Technical Assistance Service or get in touch with th...

Page 16: ...pray width regulator Dirty or damaged Tip Nozzle joint Blockages or dents in the air nozzle or fluid tip Dirty air nozzle Inadequate air pressure Inadequate amount of product Inadequate viscosity Spra...

Page 17: ...e 2014 34 UE UNE EN 60079 0 2013 A11 2014 Electric material for explosive gas environments Part 0 General requirements UNE EN 60079 11 2013 Explosive environments Part 11 Protection of the equipment f...

Page 18: ...at Kaufdatum Data de Compra Data di aacquisto E mail Sello Stamp Cachet Stempel Selo Timbro Tel Fax GUARANTEE C0NDITIONS CONDITIONS DE GARANTIE CONDICIONES DE GARANT A CONDI ES DA GARANTIA CONDIZIONI...

Page 19: ...ELLE TECHNISCHER DIENST PROFESSIONNELLE REPARATURGARANTIE SERVI O DE ASSIST NCIA T CNICA GARANT A DE REPARA AO PROFISSIONAL SERVIZIO DI ASSISTENZA TECNICA GARANZIA DI RIPARAZIONE PROFESSIONALE SAGOLA...

Reviews: