background image

7.3. Replacing the locking seal
Before disassembling any gun component, 

make sure that it is not pressuarised.
1.- Clean the gun correctly.
2.- Follow the decompression procedure 

explained on page 1.
3.- Separate the gun from the product hose. 

Remove the product tip.
4.- Remove the diffuser head. While 

unthreading, keep the gun openning switched 

in order not to damage the sealing ball and seat.
5.- Loosen the rear nut with the female tube 

accessory wrench. Remove the rear 

piston-cover.
6.- Remove the gun needle assembly from the 

body.

7.- Grease the new O ring again and install it in 

the corresponding channel.
8.- Insert the needle assembly in its housing 

(gun body) with care in order not to damage the 

seal during assembly. Place the needle in the 

correct position, so that the two surfaces it has 

at the rear (outside the gun body) are horizontal.
9.- Assemble the piston-cover, insert in the 

horizontal planes of the needle. 
10.- Tighten the rear nut with the female tube 

accessory wrench. 
11.- Place the diffuser head and tighten this 

while puling the piston in order to prevent 

damage to the sealing ball and seat. 
Note: check that the copper seal is placed 

before inserting the diffuser head.

-  20  -

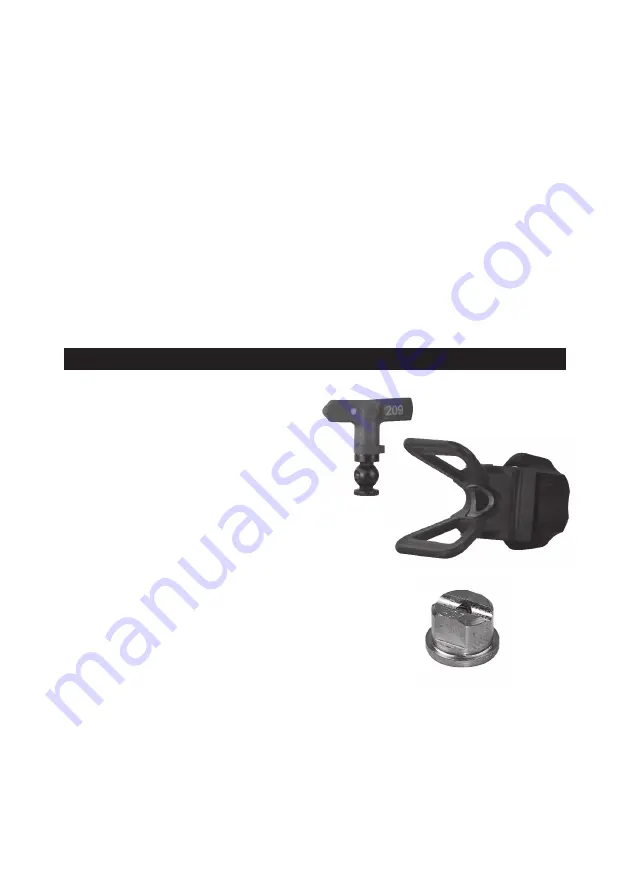
Swivel head (without tip)

Ref. 814 611 01
These tips are defined by the product tip size 

and the spray width. Choose the right tip size 

and spray width in accordance with the product 

to be sprayed and working surface. Each tip 

size defines a specific size and spray width.

Fixed tip

Ref. 814 606 XX
These tips are defined by the product orifice 

and the spray width. Choose the right tip size 

and spray width in accordance with the product 

to be sprayed and working surface. Each tip 

size defines a specific size and spray width.

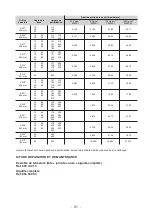
Table of fixed / swivel tips
The table below serves as a guide for the flows 

generated by fixed caps at certain pressures. 
It also provides details of the spray width 

developed by these tips at a distance of 30 

centimetres from the surface on which it is to 

be supplied. 


The spray width obtained is based on paint with 

a viscosity of 20 seconds in FORD CUP No. 4, 

at a pressure of 112 Kg/cm2.

8. ACCESSORIES

Swivel tip

Ref. 914 611 XX  Tip for swivel head

Ref. 914 611 01  Swivel head (without nozzle)

Swivel 

head

Fixed tip

Summary of Contents for PSAA 108

Page 1: ...e s l i s t a d e r e p u e s t o s i n s t r u c t i o n m a n u a l s p a r e p a r t s l i s t m a n u e l d i n s t r u c t i o n s l i s t e d e p i c e s d t a c h s Pistola Airless Autom tica...

Page 2: ......

Page 3: ...Advertencias de seguridad p g 4 4 Datos t cnicos p g 7 5 Lista de despiece p g 8 6 Instalaci n y funcionamiento p g 8 7 Limpieza de la pistola y accesorios p g 9 8 Accesorios p g 10 9 Condiciones de...

Page 4: ...ar la ruptura de un elemento y ser la causa de una inyecci n de producto de otras heridas graves de incendio o de deterioro del material circundante NUNCA modificar parte alguna del equipo al realizar...

Page 5: ...n el valor m s bajo posible Dirigir la pistola hacia un cubo met lico puesto a tierra Retirar el cerrojo de la pistola y accionar el gatillo El chorro debe ser inestable y remolinante Si el chorro sal...

Page 6: ...ver el equipo Mantener la manguera lejos de las piezas m viles y de las superficies de la bomba y del motor que est n calientes No utilizar productos ni disolventes incompatibles con el revestimiento...

Page 7: ...Contenedor del producto Seg n las normativas locales vigentes g Todos los cubos de disolvente utilizados al pulverizar seg n las normativas locales vigentes Utilizar solamente cubos de metal que sean...

Page 8: ...ptima 7 Accionar el pilotaje de manera que este completamente abierto o completamente cerrado Mantener la pistola a una distancia de 200 300 mil metros de la superficie de trabajo Desplazar la pistol...

Page 9: ...ontinuaci n operar seg n el siguiente procedimiento Boquilla fija 1 Abrir v lvula de descompresi n del equipo 2 Desmontar protector y tuerca de boquilla 3 Extraer boquilla de pulverizaci n 4 Eliminar...

Page 10: ...bra 11 Colocar el cabezal difusor y apretarlo teniendo accionado el accionador de la pistola para no da ar el asiento y bola de cierre Nota Verificar que est colocada la junta de cierre de cobre antes...

Page 11: ...043 1 09 mm 0 072 1 83 mm 15 25 40 15 25 10 15 25 40 10 15 25 40 10 15 25 40 65 10 15 25 40 10 15 25 40 15 25 40 50 15 25 40 50 15 25 40 50 40 65 65 40 65 50 65 80 50 65 80 50 65 80 50 65 80 50 65 80...

Page 12: ...es de 2 a os a partir de la fecha de compra que ser indicada por el establecimiento vendedor en el lugar habilitado al respecto junto con su sello Una vez recepcionado el equipo cumplimente la garant...

Page 13: ...14 3 Safety advice page 14 4 Technical data page 17 5 List of components page 18 6 Instalation and operation page 18 7 Cleaning the gun and accessories page 19 8 Accessories page 20 9 Warranty conditi...

Page 14: ...technical data Make sure the spraying equipment and the accessories used require the same amount of pressure NEVER exceed the maximum working pressure capacity of any component of the system 3 1 RISK...

Page 15: ...in its place on the gun whilst spraying The protector gives warning of the risk of products being injected onto the skin and assists in reducing this danger but it does not eliminate the risk of finge...

Page 16: ...mable liquids in spaces containing a continuous atmosphere may cause fire or explosions These tasks must be performed out of doors or in extremely well ventilated interiors All equipment used must be...

Page 17: ...and then operate the gun 3 3 2 Safety during spraying Reduce the risk of product injection static electricity sparks or splashes by following the spraying procedure described below 17 Moving parts ar...

Page 18: ...tch on the pilotage in such a way that it is completely open or completely closed Keep the gun at a distance of 200 300 millimetres from the working surface Move the gun perpendicularly to the surface...

Page 19: ...wing procedure Fixed tip 1 Open the compression valve of the gun 2 Remove the tip guard and nut 3 Extract the spray tip 4 Remove the obstruction by blowing with compressed air through the front of the...

Page 20: ...n this while puling the piston in order to prevent damage to the sealing ball and seat Note check that the copper seal is placed before inserting the diffuser head 20 Swivel head without tip Ref 814 6...

Page 21: ...5 40 15 25 10 15 25 40 10 15 25 40 10 15 25 40 65 10 15 25 40 10 15 25 40 15 25 40 50 15 25 40 50 15 25 40 50 40 65 65 40 65 50 65 80 50 65 80 50 65 80 50 65 80 50 65 80 65 80 95 65 80 95 65 80 95 114...

Page 22: ...purchase which will be indicated by the seller in the place provided for this purpose together with his stamp Once the unit has been received please complete the warranty and send this to the manufact...

Page 23: ...Mesures de s curit page 24 4 Renseignements techniques page 27 5 clat page 28 6 Installation et fonctionnement page 28 7 Nettoyage du pistolet et des accesoire page 29 8 Accesoires page 30 9 Conditio...

Page 24: ...ion n cessaires selon la l gislation en vigueur pour appliquer ces produits Ne pas utiliser de trichlor thyl ne 1 1 1 de chlorure de m thyl ne ni d autres dissolvants issus d hydrocarbures hallog nes...

Page 25: ...isation Cette protection permet de voir les dangers d injection de produit et de r duire ce danger mais ne supprime pas totalement les risques de placer accidentellement les doigts ou toute autre part...

Page 26: ...ide de substances in ammables dans un local atmosph re non renouvel e est susceptible de causer incendies ou explosions Cet appareil doit tre utilis l ext rieur ou dans un local parfaitement a r Les d...

Page 27: ...ctement au pulv risa teur lui m me correctement reli la terre e Objet peindre respectez les normes locales en vigueur f R servoir de produit selon la l gislation locale en vigueur g Tous les seaux de...

Page 28: ...la pression pour que le uide sorte du pistolet totalement pulv ris Utilisez la pression n cessaire la plus faible possible Une pression trop forte provoque un gaspillage de produit et une usure pr ma...

Page 29: ...e 7 2 Elimination d une obstruction Si au cours de l application la buse de pulv risa tion se bouche stoppez imm diatement la pulv risation Puis observez la proc dure suivante Buse xe 1 Ouvrez la valv...

Page 30: ...il n est plus sous pression 1 Nettoyez correctement le pistolet 2 Suivez la proc dure de d compression expliqu e en page 25 3 D branchez le tuyau de produit du pistolet Retirez la buse de produit 4 D...

Page 31: ...m 0 043 1 09 mm 0 072 1 83 mm 15 25 40 15 25 10 15 25 40 10 15 25 40 10 15 25 40 65 10 15 25 40 10 15 25 40 15 25 40 50 15 25 40 50 15 25 40 50 40 65 65 40 65 50 65 80 50 65 80 50 65 80 50 65 80 50 65...

Page 32: ...vendeur l endroit pr vu cet effet accompagn e du tampon de ce dernier Apr s r ception de l appareil remplir le bon de garantie et la retourner au fabricant pour validation La GARANTIE couvre tous les...

Page 33: ......

Page 34: ......

Page 35: ......

Page 36: ...CHNISCHER DIENST PROFESSIONNELLE REPARATURGARANTIE SERVI O DE ASSIST NCIA T CNICA GARANT A DE REPARA AO PROFISSIONAL SERVIZIO DI ASSISTENZA TECNICA GARANZIA DI RIPARAZIONE PROFESSIONALE Tel 34 945 214...

Reviews: