29
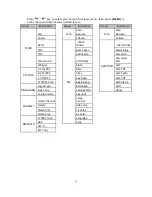
into second-layer menu. Press
key to select item “Alarm Clock”,
press
[MENU]
to enter. Use
key select the one of the three alarm
clock. Press
[MENU]
to enter into alarm clock setting. Press [# A/B] key to go to
different setting items After all the settings are completed, press
[MENU]
key to
confirm and exit.
Alarm ring selecting
The alarm ring can be set as OFF/1/2/3.
OFF: No alarm ring will sound to indicate the alarm clock.
1/2/3: Different rings are selective, and will sound the ring to indicate the alarm
clock.
Press
[MENU]
key, then press
[MENU]
again to enter into first-layer menu. Press
key to select group “ADDITION”, press
[MENU]
to confirm and enter
into second-layer menu. Press
key to select item “Alarm Ring”, press
[MENU]
to enter into parameter setting. Use
key select the desired
alarm ring. Press
[MENU]
to confirm and exit.
Power-on password setting (Password)
Power-on password can be set for this transceiver. If it is turned on, when you
power on the transceiver, a password of 6 digits is required before you get into
the transceiver. Enter the 6-digit password and press
[MENU]
to confirm and get
into the transceiver.
To disable the password, turn this function off.
Press
[MENU]
key, then press
[MENU]
again to enter into first-layer menu. Press
key to select group “ADDITION”, press
[MENU]
to confirm and enter
into second-layer menu. Press
key to select item “Password”, press
[MENU]
to enter into parameter setting. Use
key select ON/OFF.
Press
[MENU]
to confirm and exit.
Power-on password editing
There are 6 digits for the power-on password, which can be set by the numeric
keys.
Press
[MENU]
key, then press
[MENU]
again to enter into first-layer menu. Press
key to select group “ADDITION”, press
[MENU]
to confirm and enter
into second-layer menu. Press
key to select item “Password Edit”,
press
[MENU]
to enter. Use numeric keys to select the desired numbers to
compose the password. Press [# A/B] key to delete current digit and go to last
digit. After the password editing is completed, press
[MENU]
to confirm and exit.
Automatic contact feature (AUC)
This transceiver provides a characteristic Automatic Contact feature which will
help you identify whether you are out of the communication range or not, and
alert you to return to areas within the communication range.
Set a transceiver as “Master”, the other transceivers as “Slave”. The “Mater”
Summary of Contents for RST599
Page 15: ...10 23 59 Time display Current frequency display Channel number...
Page 16: ...11 Radio illustration...
Page 41: ...36 QT DQT sheet...

