background image

VERS.2021.09.28                                                                                                 CS451_MAN_EN 

23 

Add Fuel 

Nominal Fuel Tank Volume: CH395/CH440 : 7.19 qt. (6.8 L) 
Ensure engine is cool. 1. Clean area around fuel cap. 2. Remove fuel cap. Fill to base of filler neck. 
Do not overfill fuel tank. Leave room for fuel to expand. 3. Reinstall fuel cap and tighten securely. 
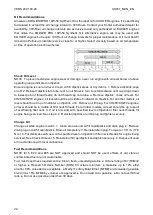
 

Fuel Valve 

Engines  are  equipped  with  a  fuel  valve  and  integral  screen  filter  located  at  inlet  of  carburetor.  It 
controls and filters fuel flow from tank to carburetor. Clean fuel valve cup of debris.  
1. Remove two nuts, two screws, and carburetor cover panel. 2. Turn fuel valve lever to OFF position. 
3. Remove fuel valve cup. Remove O-ring and filter screen. 4. Clean screen and fuel valve cup with 
solvent and wipe it off. 5. Check screen and O-ring, replace if damaged. 6. Reinstall O-ring followed 
by fuel valve cup. Rotate fuel valve cup until it is finger tight. Turn with a wrench 1/2 to 3/4 full turn. 7. 
Turn fuel valve to ON position and check for leaks. If fuel valve leaks repeat steps 5 & 6. 8. Tighten 
fuel cap securely. 9. Reinstall carburetor cover panel securing EN with hardware removed in step 1. 

 
Spark Plugs 

Clean out spark plug recess. Remove plug and replace 
1. Check gap using wire feeler gauge. Adjust gap, see specification table for adjustment. 2. Install 
plug into cylinder head. 3. Torque plug to 20 ft. lb. (27 N·m). 

 
Air Cleaner 

NOTE:  Running  engine with  cover  positioned for cold  weather  operation in  normal  conditions  can 
damage engine. 
NOTE: Operating engine with loose or damaged air cleaner components could cause premature wear 
and failure. Replace all bent or damaged components.  
NOTE: Paper element cannot be blown out with compressed air. 


Quad-Clean™


Move bails on air cleaner cover down; remove latches from under tabs on base; remove cover. or 
Turn air cleaner cover (counterclockwise) to release tabs inside cover from base; remove cover.  
Precleaner:  
1.  Remove  precleaner  from  paper  element.  2.  Replace  or  wash  precleaner  in  warm  water  with 
detergent. Rinse and allow to air dry. 3. Lightly oil precleaner with new engine oil; squeeze out excess 
oil. 4. Reinstall precleaner over paper element.  
Paper Element: 
1. Separate precleaner from element; service precleaner and replace paper element. 2. Install new 
paper element on base; install precleaner over paper element. Position air cleaner cover for normal 
operation (sun decal out) or cold weather operation (snowflake decal out). Place latches under tabs 
on base; lift up bails to secure cover. or Turn air cleaner cover (clockwise) to secure tabs inside cover 
in base. 


Low-Profile


1. Remove screw and air cleaner cover. 2. Remove foam element from base. 3. Wash foam element 
in warm water with detergent. Rinse and allow to air dry. 4. Lightly oil foam element with new engine 
oil; squeeze out excess oil. 5. Reinstall foam element into base. 6. Reinstall cover and secure with 
screw. 


Summary of Contents for NORTON clipper CS 451 P14 Kohler

Page 1: ...CS 451 P14 Kohler OPERATING INSTRUCTIONS Translation of the original instructions...

Page 2: ...VERS 2021 09 28 CS451_MAN_EN 2...

Page 3: ...C COMPATIBILITY 2014 30 CE NOISE 2000 14 CE And the European standard EN 13862 Floor cutting off machines Safety Valid for machines as of serial number 211000010 Storage site for the technical documen...

Page 4: ...Emission in the Environment by Equipment for use Outdoors Regulations 2001 and European standard EN 13862 Floor cutting off machines Safety Valid for machines with a serial number greater than 2110000...

Page 5: ...e emission 14 3 ASSEMBLY AND COMMISSIONING 15 3 1 Operator s handle assembly 15 3 2 Tool assembly 15 3 3 Water cooling system 15 3 4 Starting the machine 16 4 TRANSPORT AND STORING 17 4 1 Securing for...

Page 6: ...sible for any resulting damage Any risk shall be borne entirely by the user Observing the operating instructions and compliance with inspection and servicing requirements shall also be considered as i...

Page 7: ...the blade Never move the machine with the blade running idle Rotation direction of the blade Emergency Stop 1 2 Machine plate Important data can be found on the following plate located on the machine...

Page 8: ...y with specified Processes No 8 of the Protection of Eyes Regulation 1974 Regulation 2 2 Part 1 Also use the other safety equipment as mentioned in the symbols plus a dust mask when dry cutting is app...

Page 9: ...positioning of 25 litre water tank allow outstanding cutting performance as well as easy handling Operator can use specific devices to set cutting depth and track easily Ergonomic handles height can...

Page 10: ...rning the hand wheel clockwise or anti clockwise will lower or raise the cutting blade A depth gauge allows the operator to control precisely the depth of cut The handle 3 is detachable or can be reve...

Page 11: ...taper lock pulleys is held in place by four locking bolts The 14HP Kohler CH440 engine 6 is connected to an emergency shut down switch 7 on the right side of the machine near the levers This allows an...

Page 12: ...rvice classification SG SF SG SF designated on the oil container SAE 10W 30 recommended Starter Manual pull cord Air filter Cyclone type Max blade diameter 450 mm Bore 25 4 mm Max cutting depth mm 170...

Page 13: ...double according to operating conditions depending on o Material o Cutting depth o Machine wear o Lack of maintenance o Tool not adapted to application o Tool in bad shape o Non specialised operator V...

Page 14: ...3744 Uncertainty K Sound power level LWeq NF EN ISO 3744 CS 451 P14 70184631908 88 dB A 2 5 dB A 105 dB A 4 dB A Values determined using the procedure described in the standard EN 13862 The measureme...

Page 15: ...ovable outer flange Remove the nut and the outer flange Remove the nut and the outer flange Clean the flanges and blade shaft and inspect for wear Mount the blade on the shaft ensuring that direction...

Page 16: ...ne usually does not require choke on 4 Retractable Start Slowly pull starter handle until just past compression STOP Return starter handle firmly pull straight out to avoid excessive rope wear from st...

Page 17: ...the parking brake 4 2 Transport and lifting procedure The machine can be moved on a flat surface using its wheels Use the metal hook located over the water tank to lift the machine with a crane Utiliz...

Page 18: ...ing length Make sure you have filled the engine tank with fuel and the water tank with water our when possible the machine is connected to the water net No petrol is supplied with the machine The engi...

Page 19: ...nimum water level regularly when using the water tank To lower blade into the cut turn hand wheel clockwise Each turn of the hand wheel will raise or lower the blade by 10mm Once the required depth of...

Page 20: ...ion Control Water hoses and nozzles Clean Depth screw Grease Engine housing Clean Reachable nuts and screws Tighten up Adjustment and replacement of the belt After one hour of work the belt heats up a...

Page 21: ...or Annually whichever comes first Clean low profile air cleaner element Change engine oil Clean cooling areas Every 200 Hours Replace Quad Clean air cleaner element Every 300 Hours Replace low profil...

Page 22: ...els oil level should be at top of indicator on dipstick or b Remove oil fill plug For CH260 CH270 engines oil level should be to middle of filler neck threads For all other models oil level should be...

Page 23: ...27 N m Air Cleaner NOTE Running engine with cover positioned for cold weather operation in normal conditions can damage engine NOTE Operating engine with loose or damaged air cleaner components could...

Page 24: ...squeeze out excess oil 4 Remove foam filter support plate and oil retainer ring from oil reservoir cup 5 Remove oil reservoir cup from base Empty oil from cup and wash cup in warm water with detergent...

Page 25: ...AUSES AND CURES 7 1 Breakdown finding procedures Should any breakdown occur during the use of the machine turn it off Let only qualified staff make any intervention other than the ones described in th...

Page 26: ...eans which seem appropriate to us and but which is not always the quickest way Clear instructions will avoid problems and faulty deliveries If not sure please send us the defective part In the case of...

Page 27: ...site of Norton Clipper by using the following address https spareparts nortonabrasives com For a quick access you can also use the QR Code shown below using your mobile phone This electronic catalogue...

Page 28: ...00 906 903 SAINT GOBAIN ABRASIFS S A 2 ALL E DES FIGUIERS AIN SEBA CASABLANCA MOROCCO TEL 212 5 22 66 57 31 FAX 212 5 22 35 09 65 SAINT GOBAIN ABRASIVES BV GROENLOSEWEG 28 7151 HW EIBERGEN P O BOX 10...

Reviews: