23
Prior to installing casing, carefully remove the Boiler Serial Number SN tag attached to the tie
rod. Keep the tag so it can be affixed to the casing. For ease of installation, the Boiler should
be standing on a pad or on cinder blocks. Header piping, control wells, gauges, valves; all
boiler tapings should have devices installed and the boiler should be pressure tested before
wrapping the boiler block and mounting the casing brackets and then the panels on the
boiler.
Note: Do not install conduit or piping on top panel of the boiler.
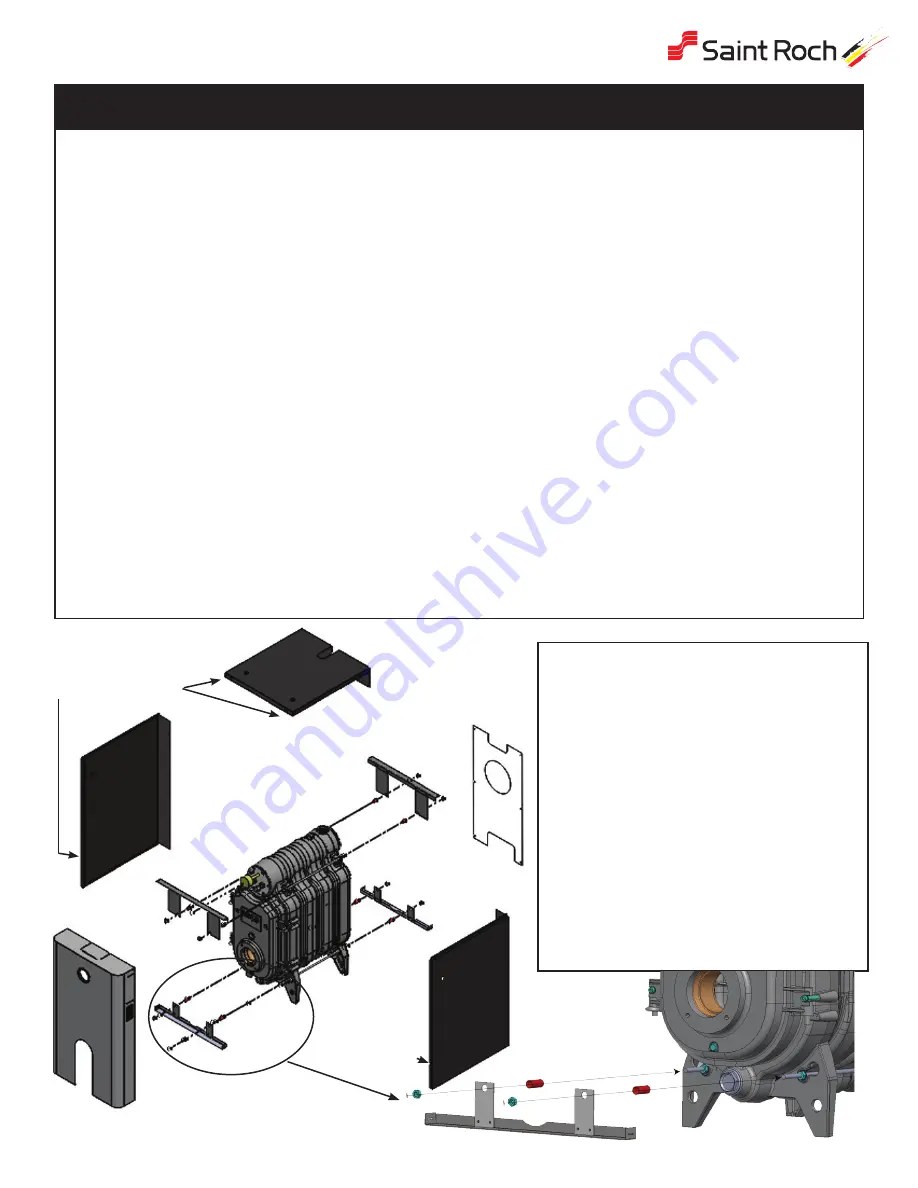
1. Wrap the boiler body (1) with insulation blanket, foil side facing up.(2) and fasten in the place
with foil tape provided.
2. Install the two upper mounting brackets (3) to the upper tie rods between the short spacer
1” and the 17mm nut to mount to the upper face of the front section and rear face of the rear
section. Make sure the shelf surface of bracket faces out away from the boiler.
3. Remove the 17mm nuts on the lower tie rods and install the two lower mounting brackets (4)
(Make sure the shelf surface of bracket faces out away from the boiler) pushed up against the
tie rod spacer and replace and secure the nut onto the tie rod at the foot of the front section
and onto the tie rods at the foot of the rear section.
4. Rest the side panels (5&6) on top of the brackets and use panhead mounting screws to
fasten the casing to the top and bottom bracket tabs. (start screws at bottom and work up)
5. Fasten the rear panel (7) to the side panels with metal screws provided.
6. Close the top of the boiler with the cover (8) by resting it to the sides (5&6) in the front and
fastening the rear fold to the sides. 4 screws on the back side
7. Install the four conical screws (9) in the holes provided - 2 on front side panels, and 2 on
the top panel(front). Mount the front panel (10) of the casing by positioning it onto the four
keyhole slots.
8. Affix the SN tag to the visible side of the casing along with energy guide and Silver rating tag.
11. Boiler Casing Assembly
Note: For replacement parts, contact your local Saint Roch wholesaler.
Boiler Jacket Assembly:
1. Boiler Block
2. Block Insulation (Not Shown)
3. Upper Mounting Brackets (2)
4. Lower Mounting Brackets (2)
5. RH Side Jacket Panel
6. LH Side Jacket Panel
7. Rear Jacket Panel *
8. Top Jacket Panel
9. Front Panel Mounting Screws (4)
10. Front Jacket Panel *
* Supplied with attached insulation
Make sure the shelf of all 4 brackets faces away from boiler.
8
6
7
5
10
1
3
4
4
3
Conical Screws
Conical Screw


