background image

SAITEK 4-IN-1 VIBRATION WHEEL

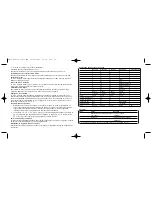
Ausstattungsmerkmale

Kompatibel mit PC, PS2/PS3 und Xbox

Programmierbare Tasteneinstellung für PC und PS2 

Abnehmbare Beinauflage bietet vollkommenen Komfort und Kontrolle bei Spielen auf dem
Sofa

Abnehmbare Klemme zur Befestigung des Lenkrads am Computertisch

Unverzügliche Empfindlichkeitsanpassung hilft Ihnen bei der Umstellung auf verschiedene
Fahrspiele 

Verwenden Sie die mitgelieferten Pedale oder Lenkradsteuerungen zum Beschleunigen und
Bremsen - je nach Ihrer Spielumgebung. 

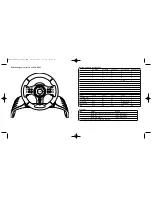
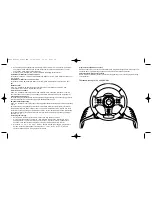
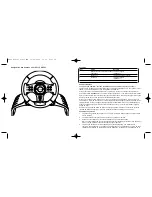
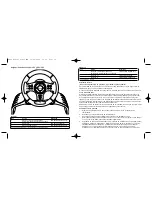
Verbinden des Controllers

1

Verbinden Sie das Hauptgerät mit der Tischklemme oder der Beinauflage. 

3

Bei Verwendung der Tischklemme stellen Sie das Rad auf die Tischkante und drehen Sie den
Klemmengriff im Uhrzeigersinn, bis das Gerät sicher auf dem Tisch befestigt ist. Drehen Sie
nicht zu fest!

4

Verbinden Sie das PS/2-Kabel der Pedaleinheit mit dem Anschluss der Radeinheit.
Vergewissern Sie sich, dass der Anschluss fest einrastet. 

5

Legen Sie die Pedaleinheit in Ihrer gewünschten Fahrposition auf den Boden.

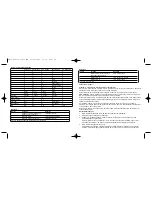
Systemkompatibilität

PC mit Windows XP/Vista (nur 32-Bit), PS2/PS3 und Xbox

Softwareinstallation für PC

1.

Schalten Sie den Computer ein, schließen Sie alle laufenden Programme und legen Sie die
Installations-CD in Ihr CD-ROM-Laufwerk. 

2.

Wenn der Einführungsbildschirm erscheint, klicken Sie auf "Software installieren", um
fortzufahren. Falls die CD nicht automatisch anläuft, wählen Sie die Start-Schaltfläche von
Windows® und dann "Ausführen", tippen "D:\Setup.exe" ein und klicken auf OK. Dabei steht
"D:\" für den Buchstaben Ihres CD-ROM-Laufwerks. Vista-Anwender werden gefragt: "Möchten
Sie diese Datei ausführen?" Klicken Sie auf "Ausführen". Jetzt erscheint die Meldung "Zur
Fortsetzung des Programms ist Ihre Zustimmung erforderlich". Klicken Sie auf "Weiter".

3.

Wenn der Willkommensbildschirm erscheint, klicken Sie auf "Weiter", um fortzufahren. 

4.

Nach dem Lesen des Rechtsverzichts wählen Sie die Option "Ich akzeptiere die Bedingungen"
und klicken auf "Weiter", um fortzufahren. 

5.

Schließen Sie das USB-Kabel an einen der freien USB-Anschlüsse Ihres Computers an und
klicken Sie auf "Weiter". 

7

IMPORTANT: To save yourself unnecessary cost and inconvenience, please check carefully 
that you have read and followed the instructions in this manual. 

This warranty is in lieu of all other expressed warranties, obligations or liabilities. ANY
IMPLIED WARRANTIES, OBLIGATIONS, OR LIABILITIES, INCLUDING BUT NOT LIMITED
TO THE IMPLIED WARRANTIES OF MERCHANTABILITY AND FITNESS FOR A
PARTICULAR PURPOSE, SHALL BE LIMITED IN DURATION TO THE DURATION OF THIS
WRITTEN LIMITED WARRANTY. Some states do not allow limitations on how long an implied
warranty lasts, so the above limitations may not apply to you. IN NO EVENT SHALL WE BE
LIABLE FOR ANY SPECIAL OR CONSEQUENTIAL DAMAGES FOR BREACH OF THIS OR
ANY OTHER WARRANTY, EXPRESS OR IMPLIED, WHATSOEVER. Some states do not
allow the exclusion or limitation of special, incidental or consequential damages, so the above
limitation may not apply to you. This warranty gives you specific legal rights, and you may also
have other rights which vary from state to state.

This symbol on the product or in the instructions means that your electrical and
electronic equipment should be disposed at the end of its life separately from
your household waste. There are separate collection systems for recycling in
the EU.

For more information, please contact the local authority or your retailer where

you purchased the product.

PW21_manual_final.qxd  15/08/2008  15:21  Page 8

Summary of Contents for 4-in-1 Vibration Wheel

Page 1: ...4 in 1 Vibration Wheel USER MANUAL BEDIENUNGSANLEITUNG GUIDE D UTILISATION MANUALE D USO MANUAL DEL USUARIO Saitek PW21_manual_final qxd 15 08 2008 15 21 Page 1 ...

Page 2: ...ap rest for complete comfort and control when playing from your sofa Removable clamp locks the wheel in place when sat at a desk On the fly sensitivity adjustment helps you adapt to different driving games Use the included pedals or wheel paddles to accelerate and brake depending on your playing environment Setting up your controller 1 Attach the main wheel unit to the desk clamp or lap support 3 ...

Page 3: ...t hand lever 2 L2 L2 A A Right hand lever 1 R2 R2 X A Gas Pedal RYK X X Right trigger A Brake Pedal RYL Left trigger A LED Red Red Red Red LED Example 1 Step Action Result 1 Press and hold Select for 3 seconds LED blinks quickly 2 Press O LED stops blinking 3 Press Gas Pedal LED blinks quickly O is now Gas Pedal and Gas Pedal is Gas Pedal L1 7 TRIANGLE 1 L2 6 SQUARE 4 R1 8 2 R2 5 SELE CT 9 START 1...

Page 4: ...ase pack it very carefully preferably using the original packaging materials Please also include an explanatory note Example 2 Step Action Result 1 Press and hold Select for 3 seconds LED blinks quickly 2 Press L1 LED stops blinking 3 Press X LED blinks quickly L1 is now X and X is X Technical Support Nearly all the products that are returned to us as faulty are not faulty at all they have just no...

Page 5: ...führen Jetzt erscheint die Meldung Zur Fortsetzung des Programms ist Ihre Zustimmung erforderlich Klicken Sie auf Weiter 3 Wenn der Willkommensbildschirm erscheint klicken Sie auf Weiter um fortzufahren 4 Nach dem Lesen des Rechtsverzichts wählen Sie die Option Ich akzeptiere die Bedingungen und klicken auf Weiter um fortzufahren 5 Schließen Sie das USB Kabel an einen der freien USB Anschlüsse Ihr...

Page 6: ... Aufwärts Automatische Kalibrierung Zur Kalibrierung des Rades halten Sie die Taste Mapping Zuordnung 2 Sekunden lang gedrückt Die rote LED blinkt rasch um anzuzeigen dass das Rad kalibriert wird Empfindlichkeitsanpassung Das 4 in 1 Vibration Wheel verfügt über sechs Empfindlichkeitseinstellungen Die Grundeinstellung ist drei Zur Anpassung der Empfindlichkeit drücken Sie die Tasten Select Auswahl ...

Page 7: ...odukt haben besuchen Sie bitte zuerst unsere Website www saitek de Unsere Website speziell der Bereich Technischer Support wurde erstellt damit Sie von Ihrem Saitek Produkt die bestmögliche Leistung erhalten Sollten Sie trotzdem noch Probleme haben oder kein Internetanschluss haben dann stehen Ihnen unsere Produktspezialisten im Saitek Technical Support Team zur Verfügung die Sie telefonisch um Ra...

Page 8: ...ous êtes assis à votre bureau Sensibilité ajustable à la volée vous permettant de vous adapter aux différents jeux de course Utilisez les pédales ou les palettes du volant pour accélérer et freiner en fonction de votre environnement de jeu Régler votre contrôleur 1 Attachez le volant sur la pince de bureau ou le support 3 Si vous utilisez la pince de bureau positionnez le volant sur votre bureau e...

Page 9: ... désactiver le retour de force Calibration automatique Pour calibrer le volant pressez le bouton Mapping pendant deux secondes et la diode rouge clignotera rapidement pour indiquer que le volant est en train de se calibrer Réglage de la sensibilité Le 4 in 1 Vibration wheel possède six réglages de sensibilité Le réglage normal est trois Pour ajuster la sensibilité pressez les boutons Select et Dro...

Page 10: ...technique complet et approfondi à tous nos utilisateurs donc avant de nous appeler merci de bien vouloir vérifier que vous avez toute l information requise à portée de main Pour trouver votre équipe locale du Support Technique Saitek merci de vous référer à la feuille Centre de Support Technique qui vous a été fournie dans l emballage de ce produit Conditions de garantie 1 La période de garantie e...

Page 11: ...t le feu des inondations la foudre les catastrophes naturelles ou toute utilisation allant à l encontre des instructions fournies par Saitek PLC 5 Les obligations de Saitek sont limitées à la réparation ou au remplacement par un produit identique ou similaire à notre convenance Afin d obtenir la réparation d un produit sous cette garantie veuillez présenter le produit et sa preuve d achat c est à ...

Page 12: ...dall impostazione normale tre a uno premete i bottoni Select e Right quattro volte 4 5 6 1 Programmazione dei bottoni 1 Mantenete premuto il bottone Select per 3 secondi per entrare nel modo di programmazione il LED rosso lampeggerà rapidamente Premete il bottone che volete modificare e il LED rosso smetterà di lampeggiare Ora premete la funzione desiderata il LED lampeggerà rapidamente dopo il co...

Page 13: ...presentazione della prova d acquisto 2 Seguire le istruzioni per il funzionamento 3 Esclude espressamente qualsiasi danno associato alla perdita delle batterie NB le batterie possono perdere se sono lasciate inutilizzate in un prodotto per un periodo di tempo prolungato e per questo è consigliabile controllarle regolarmente 4 Il prodotto non deve essere stato danneggiato a causa di deturpazione us...

Page 14: ...e alle istruzioni fornite da Saitek plc 5 Gli obblighi di Saitek saranno limitati alla riparazione o sostituzione con la stessa unità o con un unità simile a scelta di Saitek Per ottenere le riparazioni ai sensi della presente garanzia presentare il prodotto e la prova d acquisto ad es la ricevuta o la fattura al Centro Assistenza Tecnica Saitek elencato nel foglio separato contenuto nella confezi...

Page 15: ...rolador Xbox o PS2 del volante en uno de los enchufes de controlador libres de su consola Instalación para usuarios de PC o PS3 Enchufe el cable USB del volante en uno de los puertos USB libres de su PS3 o PC Cambio de modo El Volante de Vibración 4 en 1 permite modos Análogos y Digitales en PS2 Presione el botón Modo Mode para cambiar los modos Reacciones de fuerza de vibración El Volante de Vibr...

Page 16: ...a hoja de Centros de asistencia técnica incluida en el paquete de este producto Condiciones de la garantía 1 El período de garantía es de 2 años desde la fecha de compra con presentación de comprobante 2 Se deben seguir las instrucciones de funcionamiento 3 Se excluye específicamente cualquier daño asociado con pérdidas de pilas Nota Las pilas pueden perder cuando se dejan en un producto sin usar ...

Page 17: ... explicativa 7 IMPORTANTE Para ahorrarse costes e inconvenientes innecesarios rogamos que compruebe cuidadosamente que ha leído y seguido las instrucciones de este manual 8 Esta garantía sustituye a cualesquiera otras garantías obligaciones o responsabilidades explícitas CUALESQUIERA GARANTÍAS OBLIGACIONES O RESPONSABILIDADES IMPLÍCITAS INCLUYENDO SIN LIMITARSE A LO MISMO LAS GARANTÍAS IMPLÍCITAS ...

Page 18: ...atás a számítógéphez Csatlakoztassa Saitek egerét számítógépe USB portján keresztül Kövesse a telepítési varázsló utasításait a sikeres installálás érdekében PL PT Compatibilidade com sistema PC Windows XP Vista Como conectar o aparelho Ligue o computador inserte o plugue USB do aparelho com uma das entradas USB do computador Siga as intruções indicadas para completar a instalação do novo aparelho...

Page 19: ...Saitek Ltd Made and printed in China All trademarks are the property of their respective owners V 1 0 15 08 08 PW21 www saitek com 4 in 1 Vibration Wheel Saitek PW21_manual_final qxd 15 08 2008 15 21 Page 36 ...

Reviews: