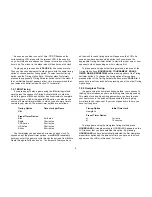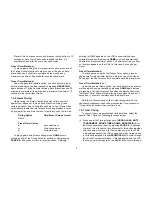
1
KEYS AND FEATURES
6
4
3
5
8
7
10
12
1
2
11
9
14
13
1
Timing Activator Buttons
Press to start your opponent’s clock after you have selected a timing option or
after you have adjusted the time and/or number of moves on the clock. Press
your opponent’s button to restart the clock from PAUSE mode.
2
Battery Compartment
Located on the base of the unit. Simply slide off the lid and insert 2 C size
batteries according to the polarity symbols marked inside the compartment.
The batteries provide around 600 hours’ operating time.
3
LEDs
Light up to show which side is currently playing. They also flash on the
appropriate side when a player’s time is up.
4
ADJUST and SET Keys
To adjust the time and/or number of moves during a game or while setting the
User timing option, press PAUSE followed by ADJUST. You can then press
ADJUST, followed by SET to adjust and confirm the time and/or number of
moves for each segment of the LCDs.
5
Timing Option Keys (HOURGLASS, BLITZ, TOURNAMENT, BONUS
TIMER, GAME, BRONSTEIN)
Press to select the timing or preset timer option of your choice.
6
User Timing Option Key (USER)
Press to concoct your own personalized timing method (see Section 1.2.7).
7
NEXT/MOVE NO.
Press to check the number of moves made so far during a game (watch the
left hand LCD). The clock keeps running while you are checking your moves
and the countdown display returns when you release the key.
When selecting the Tournament timing option, pressing this key allows you
to cycle through the primary, secondary and tertiary stages of each preset
timer method so that you can see how many minutes you have to complete a
set number of moves during each stage of the game.
8
PAUSE
Press to temporarily stop the clock. Press the appropriate Timing Activator
button to restart the countdown. Press for 3 seconds to reset the clocks and use
the same timing method again. Then press one of the Timing Activator buttons
to start one of the clocks.
9
MODIFY/LOCK
This switch is located on the base of the clock. To adjust the remaining time or
number of moves during a game, make sure that the switch is set to “Modify”
(see ADJUST and SET in point 4 of this section). You cannot change them
when it is switched to “Lock”.
10 ACL
Located on the front panel. If static discharge causes the clock to “lock up”,
press a paper clip or another sharp object into the ACL opening for at least 2
seconds. This clears the memory and resets the clock to the “Blitz” default
setting.
11 STOP/GO/SOUND OFF
Located on the bottom of the unit. Slide to “Sound Off” to play without sound
effects. Slide to “Stop” to switch off. Your remaining time and number of moves
are saved in the memory and you can resume at any time by sliding the switch
back to “Go” and pressing the appropriate Timing Activator button.
12 NAME PLATE
Personalize your Game Clock by attaching your name to the back.
13 SAFETY BRACKET
Fix the bracket to the unit and chain your clock down to prevent theft. The
bracket can be hidden away inside the clock when not in use.
14 TIMER OPTIONS REFERENCE GUIDE
A list of all the available timing methods is printed underneath the clock base to
help you choose which one to select.


