●Each switch (for Ignition and for Receiver) should be isolated and set far from each other.
●A gas-engine generates noise which has an adverse effect on RC equipment. Carry out a noise check each time while
the engine is running before flight. As a simple method, after starting engine you can check operating it about 50m
away from the plane. If there is no malfunction, it is safe.
●Charge the battery for the ignition system and RC device fully.
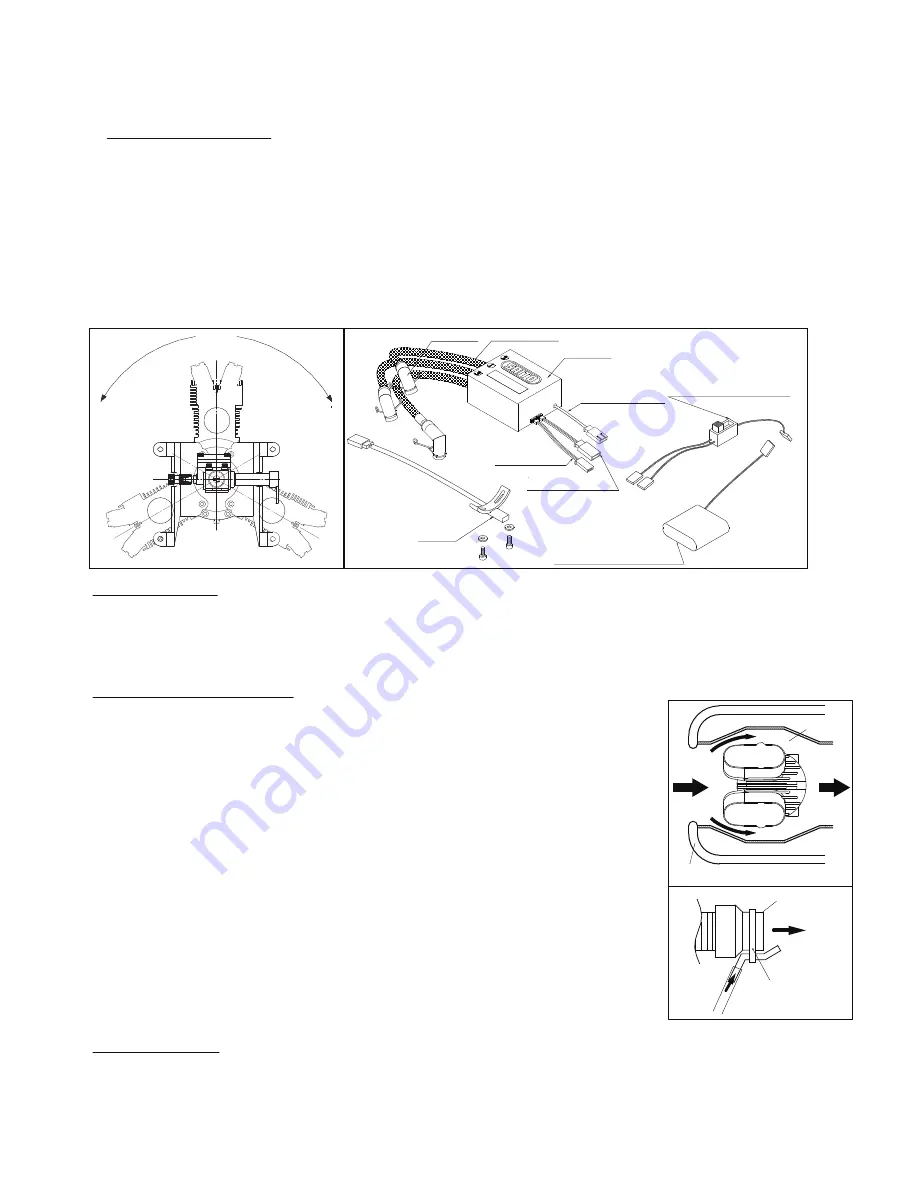
●The function of each cord;
(1) Plug cord (meshed high tension cord)
As Fig.6 shows there are three cords for three cylinders. Make sure to attach each number indicated on the main unit
to each cylinder (Refer to Fig.5 regarding cylinder number). When you put on the plug cap, insert deep into the plug to
avoid coming off during flight. And then pull the plug cap to confirm that it wonʼt come off.
(2) Sensor cord (Gray cord with exclusive connector)
Connect with the cord from the sensor attached to the engine.
(3) Battery cord (black/red cord)
Please use the fully charged battery that has adequate spec. (6-9V, more than 1000mA is recommended.). Between the
battery and main unit, make sure to set a heavy duty switch whose capacity is higher than 3A.
(4)Tachometer cord (black/red/white cord)
Connect the digital tachometer (Option). Otherwise the connector is normally vacant.
4. Spark plug
●UNEF1/4-32mm spark plug (SP-2) is the standard equipment.
●Attach the plug cap from the ignition system to each cap and insert the clip into the groove on the plug.
●Set the numbers of flights by yourself to replace the spark plug.
●Replace the plug to a new one when you flighted as many as above. (A spark plug is consumable.)
5. Engine Installation
●As the carburetor comes out from back of the firewall, cut out the firewall as adequate
size referring to Fig.3.
●Sometimes fuel get flown back from carburetor and may spatter inside the firewall. For
that case, make sure to cover the batteries, RC equipment and all the foam members with
gasoline-proof material.
●Make the firewall robust enough to endure vibration and torque.
●It is preferable to apply some adhesives (such as screw lock) on the tip of each cap screw
to avoid looseness when you install the engine.
●Take special care for cooling engine as insufficient cooling causes engine trouble such as
overheat, percolation, or muffler looseness.
●To ensure cool wind passes through the engine, the cowling should be devised. Building
some baffles inside the cowling is highly recommended for efficient cooling.(Fig.7)
●Make the air flow outlet area about 3-times larger than the inlet area.
●The mufflers should be securely inserted deeply into the adopter and tightened up using
spanners.
●Make sure to fix the outlet of the flexible mufflers outside of the cowling using the
attached bracket.
●To dispose of dirty oil from the breather, attach the gasoline proof tube to the breather
nipple and fix the other side of the tube on outside of the cowling. (Fig.8)
6. Carburetor
●As to both needles, turn to CW, the fuel will become leaner and the rotation speed will increase.
Turn in CCW, the fuel will become richer and the rotation speed will decrease.
Main needle: To adjust the speed at the time of full open of the throttle.
Slow needle: To adjust the speed from the idling to the middle speed.
●Both needles are interfered slightly from each other so confirm the balance of peak and response after adjustment.
From
Breather nipple
Exhaust
Muffler outlet
Aluminum pipe
Fig.8
Baffle
Cowling
Cool air
Fig.7
#1
#2
#3
Firing order
Prop direction
Firing order
#1-#3-#2
From the Pilotʼs view
Fig.5
Plug cap
Switch (not included)
Capacity: more than 3A
Sensor
(2)Sensor cord
(1)Plug cord
Main unit
(3)Battery cord
(4)Tachometer cord
Recommended battery
5cell-NiMH or 2cell-LiPo
Voltage:6-9V
Capacity: 1,000mA~
Fig.6
- 3 -


