●Unless the peak is certainly achieved, idle adjustment will be difficult and not stabilized.
●Start up the engine and run for 1 minute in rich condition. Then fully open the throttle.
●By turning the main needle CW, observing tachometer and exhaust sound, achieve peak carefully.
●Operate the throttle to low until the engine runs stably with an idle speed around 1,500rpm by adjusting the slow
needle with a ⊖screw driver carefully.
●Once idle speed is set, open the throttle to full gradually. If the speed becomes slow or goes up suddenly, adjust the
slow needle carefully until the speed rises linearly from idling to peak by fine-tuning.
●After that perform the process from idling to peak quickly. If the speed rises non-linearly, fine tune the main needle.
●If the speed around slow-mid range gets cough or hesitating, fine tune the slow needle and check the response as
well. Repeat this fine-tuning and response check carefully until the response improves.
●Carb adjustment is affected by many factors such as prop, flight style, humidity, temperature, atmosphere, oil, plug,
fuel, and so on. Please keep trying to find the best condition to match your plane.
●The best richness of the air-fuel mixture at slow speed depends on the flight style. Generally, Scale flight requires
stability in low speed so slightly lean condition is preferable. Acrobatic flight requires quick response from low through
high, so slightly rich condition is preferable.
●Tip for adjustment of the slow needle is to make it as lean as the engine doesnʼt get stole when open the throttle quickly.
●To keep the engine life longer, adjust the main needle as rich as possible in the range it doesnʼt affect to the running.
●Since over throttling of the main needle leads to knocking or overheat and has an adverse effect on the connecting
rod and cam gear, adjust a little richer than peak.
●Once you notice abnormal vibration or sound during throttling the main needle, just return to open the needle
immediately.
●Where the plane achieves peak completely at the attitude of ascent should be a proper peak of the engine during
flight.
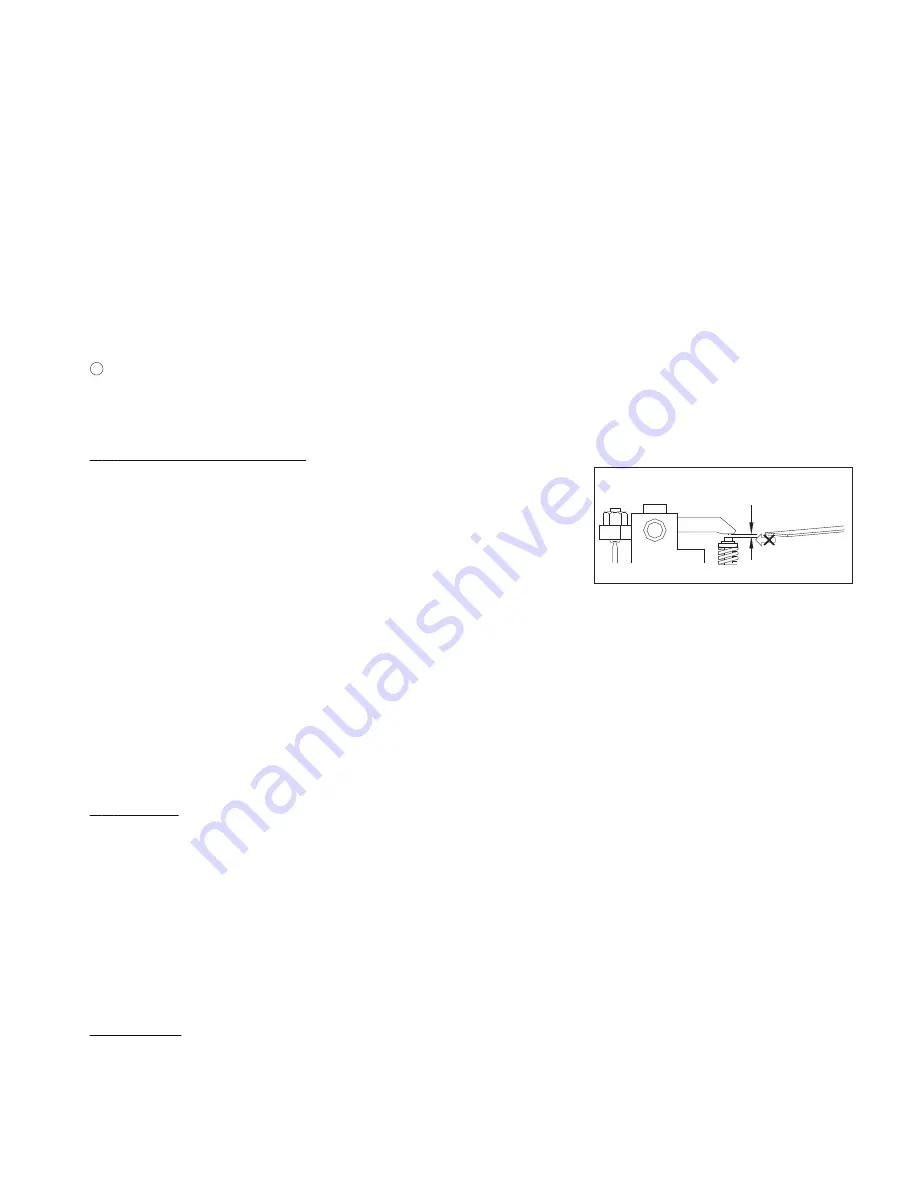
10. Tappet adjustment
●After completing ground break-in or operating the engine for 1 hour, adjust
tappet gaps (valve clearances) by following procedure to compensate initial
wearing, while the engine is cold.
●#1 cylinder should be adjusted first, next #3, finally #2 cylinder should follow
in order by the same procedure.
●Remove the spark plug and rocker covers from the #1 cylinder.
●If the attached gauge (limit gauge, t=0.1mm) comes to be inserted, gap has
been enlarged beyond the allowable limit.
●Turn the prop slowly forward by hand until the rocker arm of intake stops. Further turn the prop to bring the piston to
the TDC (Top Dead Center) of compression stroke.
●Use the attached wrench and hexagonal wrench to adjust the gaps indefinitely close to zero.
●After adjustment, put on the spark plug and turn the prop forward to check if the compression is enough.
●If the gap is lower than 0, the valve is opened all the time so the compression is not generated (then, loosen the screw
to reset).
●If the gap is correct and compression is enough, securely tighten (but not excessively) the lock nut.
●Do the same adjustment for the #3 - #2 cylinders in order.
●For SAITO engines, the tappet gap is enlarged during operation due to thermal expansion of the cylinder (made of
aluminum). Therefore set the gap indefinitely close to zero when the engine is cold.
●As tappet gap is one of the most important factors in the maintenance of 4-stroke engines, occasionally check it.
11. Other
●During operation, the screws all over the engine can be loosen by heat expansion of metal. So please tighten up them
occasionally.
●Just after start up the engine, perform warm up running in rich condition for about 1 minute, and just before stop run
it at idling for 1 minute to cool down as well.
●When stop the engine after the final flight of the day, be sure to stop by cutting fuel to remove fuel from the carbure-
tor. And remove the fuel from the tank and reserve it with special care.
●When the exhaust valve gets dull by carbon or sludge especially in cold atmosphere, remove the rocker cover and
apply some anti-rust spray to the exhaust valve to help the valve to move smoothly.
●Never use anti-rust spray that contains organic solvent which degrades rubber seals inside the engine.
●Sometimes the oil oozes from each joint or commissure however itʼs no problem on performance.
●Notes for purchasing parts: Please give orders to the shop you purchased from with “Engine model”, “Part No. or part
name”, and “Quantity”.
Optional parts
・Filter with weight [G36-154]
・Rubber tube for gasoline(1m) [G36-155]
・Spark plug SP-2 [G60R3-120]
・Aluminum spinner nut [57T-30]
・Tappet adjusting kit [30-161]
・Digital tachometer [G17-167]
Tappet adjustment
Fig.10
Must not be inserted
(over gap)
Limit gauge
(0.1mm)
Close to "0" with no limit
- 5 -


