Daily Use
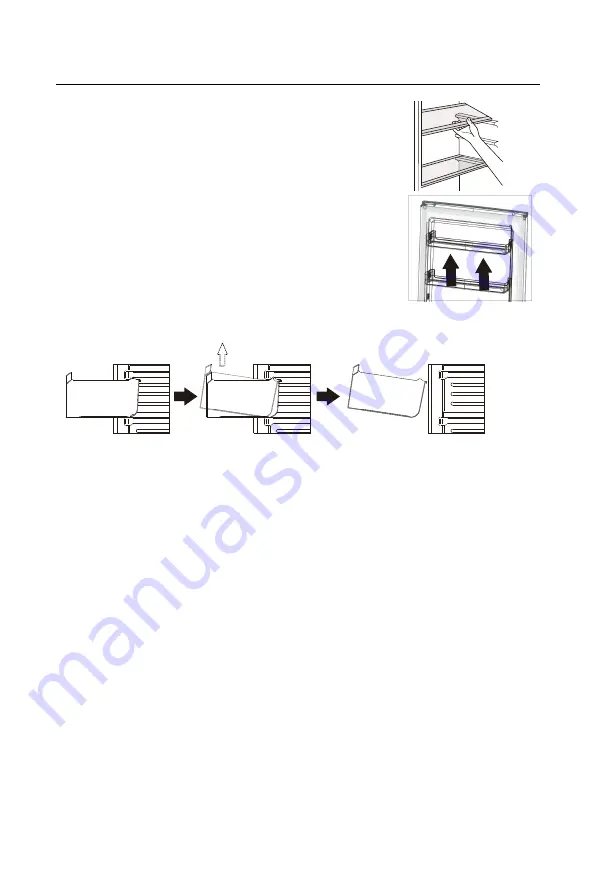
Accessories Movable shelves
The walls of the refrigerator are equipped with a series of runners so
that the shelves can be positioned as desired.
Positioning the door balconies
Door balconies can be disassembled for cleaning. To make the
disassembling as follows:gradually pull the ba lcony in the direction of
the arrows until it comes free, after cleaning, reposition it.
Disassemble the bottom drawer
1. Pull out the bottom drawer to stopper position.
2. Left up the front of drawer.
3. Pull out the bottom drawer.
Helpful hints and tips
Hints for freezing
To help you make the most of the freezing process, here are some important hints:
the maximum quantity of food which can be frozen in 24 hrs. is shown on the rating plate;
the freezing process takes 24 hours. No further food to be frozen should be added during this
period;
only freeze top quality, fresh and thoroughly cleaned, foodstuffs;
prepare food in small portions to enable it to be rapidly and completely frozen and to make it
possible subsequently to t ha w only the quantity required;
wrap up the food in aluminium foil or polythene and make sure that the packages are airtight;
do not allow fresh, unfrozen food to touch food which is already frozen, thus avoiding a rise in
temperature of the latter;
lean foods store better and longer than fatty ones;salt reduces the storage life of food;
water ices, if consumed immediately after removal from the freezer compartment, can possibly
cause the skin to be freeze burnt;
it is advisable to show the freezing in date on each individual pack to enable you removal from
the
freezer compartment, can possibly cause the skin to be freeze burnt;
it is advisable to show the freezing in date on each individual pack to enable you to keep tab of
the storage time.
20
Summary of Contents for CC18660NFWD
Page 1: ...CKSVD S01 CKSVD S01 2023 12 15 80g...
Page 3: ......
Page 19: ...Instalaci n 11 Fijar la cubierta del tornillo 15...
Page 32: ...F H 6 I 0 6 I 2 2 2 6 K 6 6 I F 8 8 KKKH H 28...
Page 49: ...Instala o 11 Fixe a tampa do parafuso 16...
Page 62: ...A 1 03 B 1 1 3 H B H 6B3 6 B36 1 F1 8 F C B 4 9 A 1 3 H3 3 KKKL L 30...
Page 78: ...11 Fix the screw cover Installation 15...
Page 91: ...8 5 4 7 0 7 2 2 2 0 3 0 0 4 3 0 5 3 B 0 00 3 3 6 6 D D 27...


