5-007
RAMMING SYSTEM
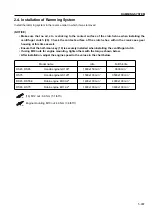
2.4. Installation of Ramming System
Install the ramming system in the reverse order in which it was removed.
(NOTICE)
• Make sure that no oil, etc. is sticking to the contact surface of the clutch shoe when installing the
centrifugal clutch (20). Check the contact surface of the clutch shoe within the crank case gear
housing at this time as well.
• Ensure that the half-moon key (19) is securely installed when installing the centrifugal clutch.
• If using M10 nuts for engine mounting, tighten them with the torque shown below.
• After installation, adjust the engine speed to the values in the chart below.
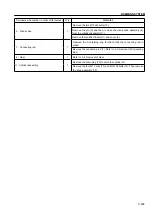
Model name
Idle
Full throttle
RS45, RS65
Honda engine GX100*
1800±150 min
-1
3600 min
-1
RS75
Honda engine GX120*
1500±100 min
-1
3500±100 min
-1
RS45, RS55E
Robin engine EH09-2*
1400±100 min
-1
4000±100 min
-1
RS65, RS75
Robin engine EH12-2*
1600±100 min
-1
3600±100 min
-1
N•m
(18) M12 nut : 69 N·m (51 lbf·ft)
N•m
Engine mounting M10 nut: 49 N·m (36 lbf·ft)
Summary of Contents for RS45
Page 1: ...RS45 RS55E RS65 RS75 SHOP MANUAL 3498 64694 0 ...
Page 2: ......
Page 4: ......
Page 9: ...SAFETY ...
Page 10: ......
Page 17: ...SPECIFICATIONS ...
Page 18: ......
Page 29: ...INSPECTION AND MAINTENANCE ...
Page 30: ......
Page 37: ...PARTS CATALOGUE ...
Page 38: ......
Page 50: ...4 012 PARTS CATALOGUE 2 4 SHOE ASSY 5 6 7 13 12 11 10 9 8 1 2 3 4 16 15 14 17 ...
Page 70: ...4 032 PARTS CATALOGUE 3 4 SHOE ASSY 5 6 13 16 15 14 12 11 10 1 2 3 4 9 8 7 17 ...
Page 76: ...4 038 PARTS CATALOGUE 3 7 NAME PLATE VIEW A A VIEW B B 12 11 2 15 5 9 4 1 3 7 8 10 13 14 ...
Page 92: ...4 054 PARTS CATALOGUE 4 4 SHOE ASSY 8 3 5 4 4 6 5 7 2 1 ...
Page 122: ...4 084 PARTS CATALOGUE 5 4 SHOE ASSY 8 3 5 4 4 6 5 7 2 1 ...
Page 136: ......
Page 137: ...RAMMING SYSTEM ...
Page 138: ......
Page 155: ......


