background image

ASSEMBLY 


CAUTION: For safety reasons, carefully assemble the device as set out 
below and ensure the heating element, light tubes are properly in place. 
All parts should be correctly fitted, then bolted to each other. 


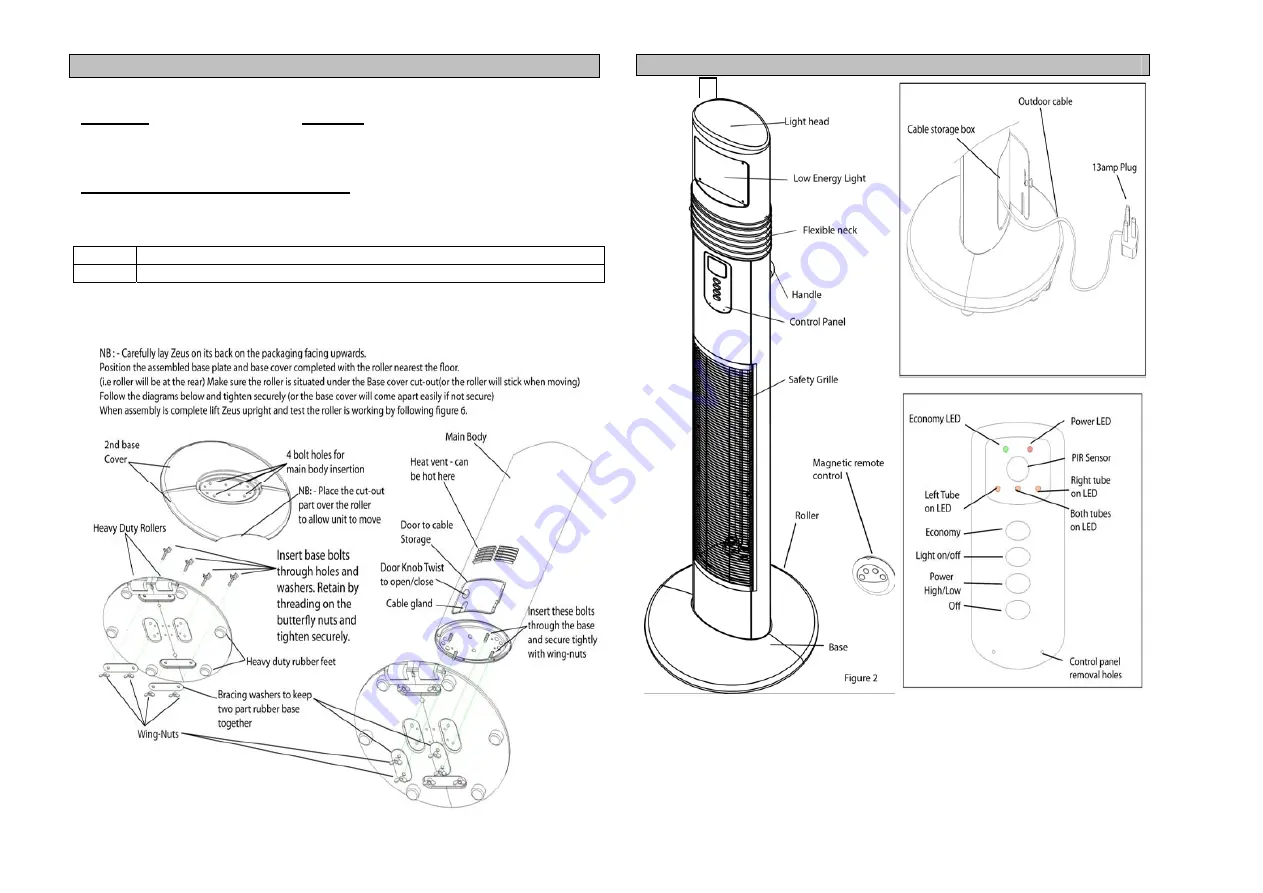
Assembly of the Base & Body section 
This operation requires NO TOOLS but a pliers & Philips screwdriver 
are helpful to tighten fixings securely if you require. 


Please follow Figure 1 –  


PARTS DESCRIPTION 


Figure 3 (top) & Figure 4 (bottom) 


Step1 

Connect the 2 part base with nuts/butterflies as per fig1 left side 

Step2 

Connect the main body with nuts/butterflies as per fig1 right side 

Summary of Contents for SEP-27

Page 1: ...ing element during use or attempt to move the heater 5 Extreme care should be taken whenever the heater is left operating and unattended 6 DO NOT operate any heater with a damaged cord or plug or after the heater malfunctions has been dropped or damaged in any manner Return the heater to an authorised service facility for examination and repair 7 DO NOT attempt to repair or adjust any electrical o...

Page 2: ...container Never use in a bathroom or shower room 19 Do not use this heater in conjunction with a timer device or any other device which facilitates unattended switch on 20 The electrical cord must be fully unwound before use 21 The front grille is intended to prevent direct access to the heating elements and must be in place when the heater is on BS WIRING INSTRUCTIONS Wiring Instructions Should i...

Page 3: ...bolted to each other Assembly of the Base Body section This operation requires NO TOOLS but a pliers Philips screwdriver are helpful to tighten fixings securely if you require Please follow Figure 1 PARTS DESCRIPTION Figure 3 top Figure 4 bottom Step1 Connect the 2 part base with nuts butterflies as per fig1 left side Step2 Connect the main body with nuts butterflies as per fig1 right side ...

Page 4: ...M 3 The remote control is magnetic and will stick to most metallic objects to prevent you losing it 2 Shutdown appliance Press off button and unplug 3 Moving and storing your Patio Heater Tilt the body backwards 30 400 before moving See figure 6 4 Protecting your Patio Heater Use the weatherproof cover to protect the appliance when not in use and for long term winter storage Function button No of ...

Page 5: ...lace Never use any other type of lamp other than ES Low Energy 40W or less DO NOT USE INCANDESCENT LAMPS simply unscrew the front opaque glass panel to access the ES 40W CFL and exchange the lamp Ensure the moisture seals are put back on when replacing the panel WARNING Do not light cigarettes using this heating element as it will damage the heating element rendering your guarantee invalid SERVICE...

Reviews: