RRT 2B
retro portable radio
INSTALLATION, POWER SUPPLY, CHARGING
The device has five different power supply options. Can be used from the built-in accumula-
tor – after it is charged. The accumulator must be charged before the first use. Connect the
supplied power cord to the radio (AC IN socket on the back), then connect to the mains and
leave the radio off. When charging, the red LED is lighting on the right side. Complete the
charging by removing the mains cable if the red LED goes out or after 12 hours at the latest.
In case of completely discharged accumulator, the charging time is approximately 10-12
hours. This provides approx. 18-20 hours operation on the internal accumulator at medium
volume. It also depends on the set volume, the selected mode and the ambient temperature.
The test was done by radio listening at room temperature. It also can be charged while in use,
but it increases the charging time. If it is exhausted, charge it from the mains.
You can operate the built-in accumulator besides from the mains from 3 x D (LR20/1,5 V)
batteries, or from the separately available - placed to the separate compartment next to the
battery holder -18650 type accumulator or from the separately available 5 V
adapter
connected to the miniUSB socket (11.) Extremely long accumulator time can be achieved
with on charge if all available options are used and we insert next to the built-in accumulator
simultaneously 3 x LR20 batteries and an 18650 accumulator.
• Later do not charge it longer than 12 hours, even in case of total depletion! After the given
time, unplug the wire from the electrical network and from the device as well! Exception, if
you are listening to device during charging!
• Even when it is out of use, it is recommended to recharge the accumulator in 1-2 months
to reach a longer lifetime. If it depletes during use, recharge it immediately!
• Insert the 3 x D batteries into the battery holder according to the polarity indicated there.
If you use it from batteries, they are not charging neither from the charging cable, neither
by using the external 5 Volt power supply. It is not recommended to use same (D) size
accumulators instead of the batteries. In case of battery mode, do not connect the power
cable to the device!
• The 3 x D batteries can charge the factory built-in (and optional 18650) accumulator without
connecting the power cable.
• The operation time can be extended by purchasing and inserting an additional accumulator
(18650 type) to the compartment designed for it.
• Decreasing volume or distorted sound indicates the depletion of the batteries or the ac-
cumulator. Charge up the accumulator, immediately remove the depleted batteries!
• Simultaneously do not use together differently manufactured or different-condition batter-
ies. Battery replacement can only be done by an adult!
• If there is some liquid flown out from the battery, take a protective glove and clean the
battery holder with a dry cloth! It is forbidden to open, throw into fire or short circuit the
batteries! The non-rechargeable batteries must not be charged! Risk of explosion! Do not
put batteries instead of accumulators because their voltage and efficiency are significantly
smaller!
• Charging may occasionally cause noise in the speaker. When the unit is turned off, the
automatic battery. The unit functions as an automatic accumulator charger in switched-off
state. Therefore, remove the cable after charging is complete!
• For complete power off, switch it off with the VOLUME control and unplug it from the mains!
• Keep the accumulator in charged state even when it is not in use for extended life.
• The used accumulator-type is a closed, lead-acid type. It requires no maintenance. AT the
end of its lifetime, it can be replaced by a specialist after removing the rear panel. The cover
is secured with screws.
SELECTING FUNCTIONS
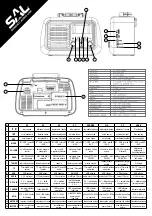
Switch on the unit and the desired volume with
VOLUME (5.)
rotary knob and select the
desired function with the
BAND (6.)
selector and the
MODE (4.)
push button. In the BAND
switch’s
MP3
position switch on the multimedia player. After this by pressing
MODE
you can
scroll between the following modes:
wireless BT mode - USB playback - microSD playback - AUX mode
In the
BAND (6.)
selector’s additional positions you can select radio wave bands: FM-AM-
SW.
• When you select the current multimedia function, you can hear English announcement.
• Loose operation of the BAND switch does not affect its function.
USING THE RADIO
Select the desired waveband with the
BAND (6.)
switch. In case of FM and SW band, care-
fully unplug the antenna and set it according to the best reception. Tune the desired radio
station with the
TUNING (7.)
rotary switch.
• While listening to AM band, the built in antenna will work. Do not pull out the antenna, but
turn the whole product to the best positon of reception.
• Reception ability of the radio significantly depends on the place of use and the actual
reception conditions.
• Handle the antenna carefully, so as not to break it!
• Electric devices located nearby may disturb the reception!
AUX AUDIO INPUT
If you have a device that has a 3,5 mm audio output or headphone connector, then you
can listen to it through the speakers of this radio. Connect the
AUX IN (10.)
input with the
other device’s audio output. Set the
BAND (6.)
rotary switch to MP3 position. Then press
the
MODE (4.)
button, until the
AUX
function is selected and you will not hear the sound of
the external equipment.
• The available audio quality depends on the quality of the audio signal provided by the
external device.
• Adjusting the external device’s volume- and tone-control greatly influences the sound.
MP3 PLAYING (from USB/microSD device)
Select the MP3 function with the
BAND (6.)
rotary switch. Insert carefully the USB or mi
-
croSD device containing the
MP3
songs and playback starts automatically. With the play-
pause
(1.)
and scrolling
(2.) (3.)
buttons you can select the desired track. If
you have a USB and a microSD storage device connected at the same time, then you can
change between them with the
MODE (4.)
button.
• Do not remove the memory card or USB device during operation, since it may cause dam-
age of data!
• The recommended file system for memory is FAT32. Do not use a NTFS formatted memory
unit!
• After inserting the memory unit, playing will start from the first track. If you have been listen
-
ing to it previously, then the playing will go on from the last selected track, even if the device
had been switched off or the memory device had been removed.
• Abnormal operation may be caused by the unique features of the mass storage device,
which does not indicate a malfunction of the device!
• In addition to playable files, do not store other types of files on the memory card, because
it may slow down playback.
USING THE WIRELESS BT CONNECTION
The device can be paired with other devices that communicate with BT protocol, within a
range of up to 10 meters. After that, music, which is played on mobile phone, tablet, note
-
book and other similar devices can be listened to on hands-free way. Remove the USB or
microSD storage, if there is one inserted. Place your mobile phone or other similar BT device
near the radio. Select the MP3 option with the
BAND (6.)
rotary knob. If there is no USB/
microSD storage inserted in it, then the BT mode activates automatically. The fast flashing
of the LED next to the
MODE (4.)
button indicates BT ready-for-pairing state. According to
the way written in instructions of the device to be paired, search for the BT devices nearby,
including this one. Connect together the two devices. After successful pairing, the flashing
LED lights continuously, and a short beep sounds. You can listen to the desired program on
Before using the product for the first time, please read the instructions for use below and retain them for later reference. The original instructions were written in
Hungarian language. This appliance may only be used by persons with impaired physical, sensory or mental capabilities, or lacking in experience or knowledge,
as well as children from the age of 8, if they are under supervision or have been given instruction concerning use and they have understood the hazards associated
with use. Children should not be allowed to play with the unit. Children may only clean or perform user maintenance on the appliance under supervision. After unpacking
the product, make sure it has not been damaged during transport. Keep children away from the packaging material, if it contains polybag or other hazardous components.
● 4in1: BT + MP3 + AUX + RADIO ● Wireless BT connection ● Music playing from mobile device, computer ● Controls the mobile phone’s music
player ● MP3 playing from USB/microSD device ● 3-band AM-FM-SW radio ● Wired audio input (AUX IN) ● Extremely long service life; up to 20 hours
with one charge ● Expected charging time / operation time:
~
10 / 20 hours ● Continuous operation from the mains or from accumulator ● The operation time
can be multiplied by inserting an additional accumulator (18650) and batteries (LR20) ● Versatile power supply: accessory power cable for charging, built-in
accumulator, 3 x D/LR20 (1,5 V) batteries (not included), insertable 18650 type accumulator (not included), external 5 V
miniUSB adapter (option)


