


11
RIS 700PE/PW EKO 3.0
www.salda.lt
- Монтажные работы должны выполняться
только опытными и квалифицированными
специалистами.
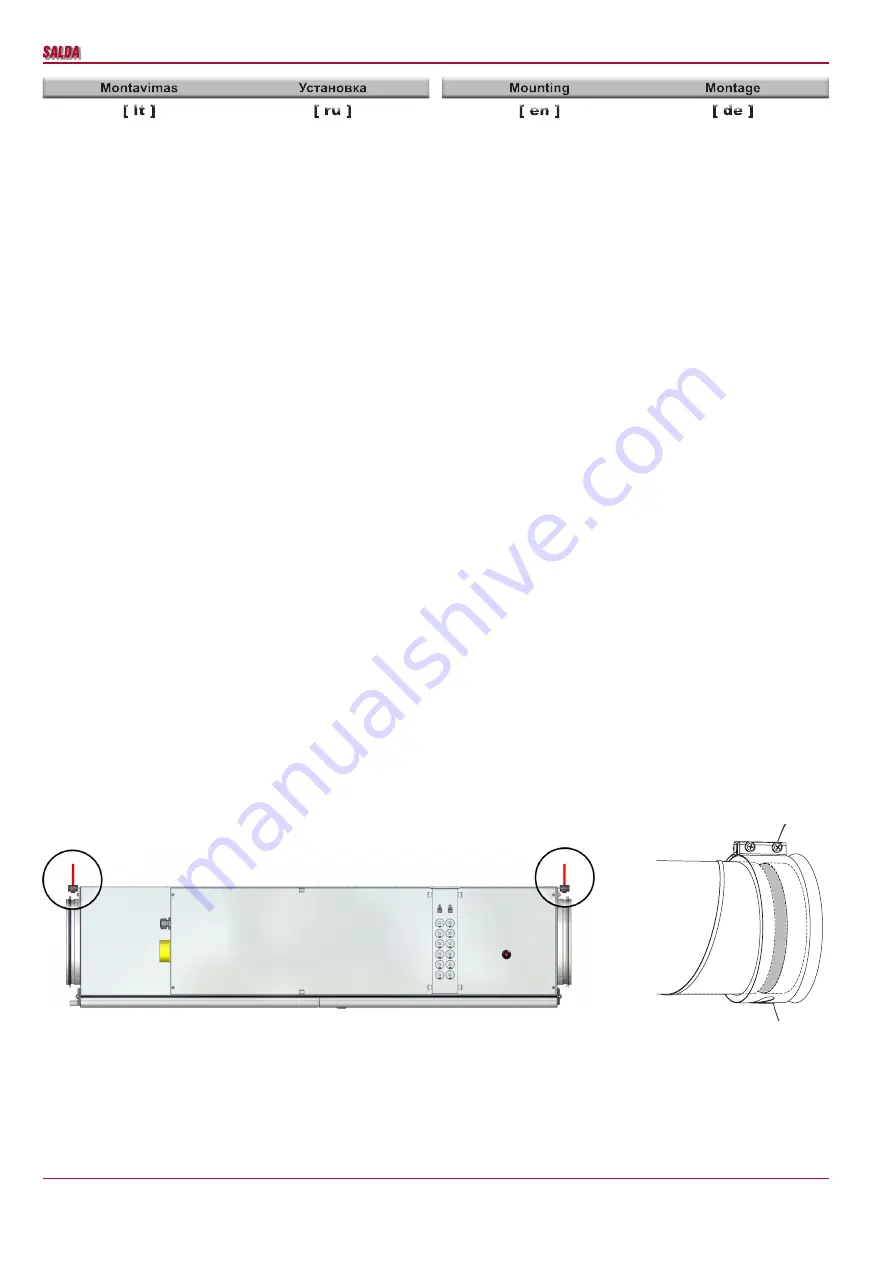
- Устройство должно быть смонтировано на
ровной горизонтальной поверхности так, чтобы
оно не имело наклона (рис. 01).
- Перед тем как подключить вентиляционное
устройство к системе воздуховодов, отверстия
подключения воздуховодов устройства должны
быть аткрыты.
- Имеется возможность при необходимости из-
менить сторону обслуживания.
- При подсоединении воздуховодов обратите
внимание на направление воздушного потока,
указанное на корпусе устройства.
- Не подсоединяйте колена рядом с монтажными
фланцами устройства. Минимальный отрезок
прямого воздуховода между устройством и пер-
вым ответвлением воздуховодов в канале забора
воздуха должен составлять 1хD, в канале отвода
воздуха – 3хD, где D – диаметр воздуховода.
- При подсоединении агрегат к системе воздухо-
водов, рекомендуем использовать аксессуары
– крепежные обоймы (рис. 02). Это уменьшит
передачу вибрации от устройства к системе воз-
духоводов и на окружающую среду.
- Монтаж необходимо произвести так, чтобы вес
системы воздуховодов и всех ее компонентов не
нагружал вентиляционное устройство.
- При установке необходимо оставить достаточно
места для открывания дверцы обслуживания
вентиляционного устройства.
- Если смонтированный приточный агрегат при-
слонен к стене, шумовые вибрации по ней могут
передаваться в помещение, хотя уровень шума
работы вентиляторов является приемлемым.
Советуется монтаж производить на расстоянии
400 мм от ближайшей стены. Если это невоз-
можно, устройство рекомендуется монтировать
рядом со стеной помещения, для которого шум
не так важен.
- Вибрация также может передаваться через пол.
Если имеется такая возможность, с целью сниже-
ния уровня шума пол необходимо изолировать
дополнительно.
- Трубопроводы к нагревателю воды подсоеди-
няются так, чтобы при проведении работ по
обслуживанию и ремонту можно было бы быстро
размонтировать и вынуть нагреватель из корпуса
устройства.
- Трубопроводы с подающими и возвратными
теплоносителями должны подключаться так,
чтобы нагреватель работал в направлении,
противоположном направлению движения воз-
душного потока. Если нагреватель работает в
режиме потоков того же направления, снижается
средняя разница температур, влияющая на про-
изводительность нагревателя.
- Если существует возможность попадания
конденсата или воды на двигатель, необходимо
установить наружные средства защиты.
- Installing should only be performed by qualified
and trained staff.
- The unit must be mounted on the flat horizontal
surface so tas not to lean (Pic. 01).
- Before connecting to the air duct system, the
connection openings of ventilation system air
ducts must be opened.
- If necessary, the maintenance side can be
changed.
- When connecting air ducts, consider the air
flow directions indicated on the casing of the unit.
- Do not connect the duct elbows in vicinity of
the connection flanges of the unit. The minimum
distance of the straight air duct between the unit
and the first branch of the air duct in the suction
air duct must be 1xD, in air exhaust duct 3xD,
where D is diameter of the air duct.
- It is recommended to use the accessories-
holders (Pic. 02) for connection of the unit to
the air duct system. This will reduce vibration
transmitted by the unit to the air duct system
and environment.
- Installation must be performed in such manner
that the weight of the air duct system and its com-
ponents would not overload the ventilation unit.
- Enough space must be left during installation
for opening of the maintenance door of the
ventilation unit.
- If the installed ventilation unit is adherent to
the wall, it may transmit noise vibrations to the
premises even though the level of noise caused
by the fans is admissible. The installation is rec-
ommended at the distance of 400 mm from the
nearest wall. If it is not possible, the installation
of the unit is recommended by the wall of the
room where the level of noise is not important.
- Also, vibrations can be transmitted through the
floor. If possible, additionally insulate the floor to
suppress the noise.
- Pipes are connected to the water heater in such
way that they could be easily disassembled and
the heater could be removed from the unit casing
when performing service or repair works.
- Pipes with supply and return heat carriers must
be connected in such way that the heater would
work in the opposite direction for the air flow. If
the heater works using the same directions, the
mean temperature difference decreases which
affects the heater efficiency.
- If there is a possibility for condensate or water
to access the unit, external protective means
must be fitted.
- Die Montage darf nur durch ausgebildetes
und eingewiesenes Fachpersonal durchgeführt
werden.
- Das Gerät ist auf einer ebenen und horizontalen
Oberfläche nicht geneigt zu montieren (Bild 01).
- Vor dem Anschließen an das Luftleitungssystem
sind Luftleitungen Anschluss öffnen.
- Bei Bedarf besteht die Möglichkeit, die Wartungs-
seite zu ändern.
- Beim Anschließen der Luftleitungen ist auf die am
Gerätegehäuse angegebenen Luftströmungsrich-
tungen zu achten.
- Schließen Sie keine Bögen in der Nähe von Gerä-
teanschlussstutzen an. Der Mindestabstand einer
geraden Luftleitung zwischen dem Gerät und der
ersten Abzweigung in der Zuluftleitung muss 1xD,
in der Abluftleitung 3xD betragen (D - Durchmesser
der Luftleitung).
- Beim Anschließen des Lüftungsgeräte an das
Luftleitungssystem empfehlen wir, Zusatzkom-
ponenten - Flexibele Verbindung - zu verwenden
(Bild 02). Dies verringert die vom Gerät an das
Luftleitungssystem und die Umgebung übertra-
genen Schwingungen.
- Die Montage ist so durchzuführen, dass durch
das Gewicht des Luftleitungssystems und aller
seiner Bauteile keine Belastungen am Lüftungs-
gerät auftreten.
- Bei der Montage ist ein ausreichender Schwenk-
bereich für die Wartungstür des Lüftungsgerätes
vorzusehen.
- Wird das Lüftungsgerät dicht an der Wand
montiert, können dadurch die Schallvibrationen
in den Raum übertragen werden, auch wenn
der Geräuschpegel der Ventilatoren akzeptabel
ist. Es ist zu empfehlen, die Montage in einem
Abstand von 400 mm zur nächstgelegenen Wand
durchzuführen. Ist dies nicht möglich, empfehlen
wir die Montage an einer Wand zu einem Raum,
für den der Lärm nicht wichtig ist.
- Die Schwingungen können auch über die Fußbö-
den übertragen werden. Besteht diese Möglichkeit,
sollten die Fußböden zusätzlich isoliert werden, um
den Lärm abzudämpfen.
- Die Rohrleitungen sind am wasser Heizregister
so anzuschließen, dass sie bei Wartungs- und
Instandsetzungsarbeiten schnell demontiert
werden können, um das Heizregister aus dem
Gerätegehäuse herauszunehmen.
- Der Zu- und Rücklauf der Wärmeübertrager
ist so anzuschließen, dass das Heizregister
in entgegengesetzter Luftströmungsrichtung
funktioniert. Wird das Heizregister in gleicher
Strömungsrichtung betrieben, verringert sich die
mittlere Temperaturdifferenz, die die Leistung des
Heizregisters beeinflusst.
- Besteht die Möglichkeit zum Eindringen von
Kondensat bzw. Wasser ins Gerät, sind externe
Schutzvorrichtungen anzubringen.
Pav.. 01
Рис. 01
Pic. 01
Bild 01
Pav. 02
Рис. 02
Pic. 02
Bild 02
- Montavimo darbus turėtų atlikti tik patyrę ir ap-
mokyti darbuotojai.
- Įrenginį būtina sumontuoti ant lygaus hori-
zontalaus paviršiaus taip, kad gaminys nebūtų
pasviręs (pav 01).
- Prieš pajungiant į ortakių sistemą, vėdinimo
įrenginio ortakių pajungimo angas reikia ati-
dengti.
- Esant poreikiui yra numatyta galimybė pa-
keisti aptarnavimo pusę.
- Prijungdami ortakius, atkreipkite dėmesį į oro
srauto kryptis, nurodytas ant įrenginio korpuso.
- Nejunkite alkūnių arti įrenginio pajungimo
flanšų. Minimalus atstumas tiesaus ortakio tarp
įrenginio ir pirmo ortakių atsišakojimo oro įsiur-
bimo kanale turi būti 1xD, oro išmetimo kanale
3xD, kur D- ortakio diametras.
- Jungiant rekuperatorių į ortakių sistemą, pa-
tariame naudoti priedus- apkabas (pav 02). Tai
sumažins įrenginio perduodamus virpesius į
ortakių sistemą ir aplinką.
- Būtina sumontuoti taip, kad ortakių sistemos
ir jos visų komponentų svoris neapkrautų vėdi-
nimo įrenginio.
- Montuojant būtina palikti pakankamai vietos
vėdinimo įrenginio aptarnavimo durelėms ati-
daryti.
- Jei sumontuotas vėdinimo įrenginys yra pri-
glaustas prie sienos, tai gali perduoti triukšmo
vibracijas į patalpą, nors ir ventiliatorių suke-
liamas triukšmo lygis yra priimtinas. Patariame
montuoti 400 mm atstumu nuo artimiausios sie-
nos. Jei tai nėra įmanoma, patariame montuoti
prie sienos su patalpa, kuriai keliamas triukš-
mas nėra svarbus.
- Taip pat vibracijos gali būti perduodamos per
grindis. Jei yra tokia galimybė, būtina papil-
domai izoliuoti grindis, kad nuslopinti keliamą
triukšmą.
- Vamzdynai prie vandeninio šildytuvo jungiami
taip, kad atliekant aptarnavimo ir remonto dar-
bus, vamzdynus būtų galima greitai išmontuoti
ir išimti šildytuvą iš įrenginio korpuso.
- Vamzdynai su tiekiamais ir grįžtamais šilumos
nešėjais turi būti prijungiami taip, kad šildytuvas
veiktų priešinga oro srautui kryptimi. Šildytuvui
dirbant tos pačios krypties srovių režimu suma-
žėja vidutinis temperatūrų skirtumas, turintis
įtakos šildytuvo našumui.
- Jei yra galimybė kondensatui ar vandeniui
patekti į įrenginį, būtina sumontuoti išorines ap-
saugos priemones.


