7
www.salda.lt
VEKA INT W EKO
e
• Des dispositifs ont des pièces en rotation
et sont connectés au réseau d’alimentation.
Cela provoquer des risques pour la santé
et la vie des personnes. Par conséquent,
il est obligatoire de respecter les exigen-
ces de sécurité lors de l’exécution travaux
d’installation. En cas de doute concernant la
sécurité de l’installation et du fonctionnement
de la centrale, prière de contacter le fabricant
ou son représentant.
• Le montage ne peut être effectué que par du
personnel formé et qualifié.
• Assurez-vous que les spécifications du rése-
au auquel vous connectez la centrale corres-
pondent aux spécifications indiquées dans
l’étiquette sur le caisson.
• Le câble d’alimentation sélectionné doit
correspondre à la puissance de la centrale
(tableau 1).
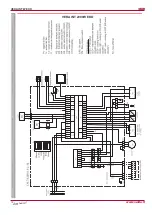
• L’appareil doit être raccordé selon un sché-
ma de raccordement électrique comme cela
est indiqué dans ce document (fig. 10) et
comme cela est indiqué sous le couvercle de
raccordement de la régulation automatique.
• Le câble d’alimentation et le dispositif de pro-
tection (commutateur automatique avec une
caractéristique C) de la centrale sont sélecti-
onnés selon le tableau 1.
• L’appareil doit être correctement mis à la
• Устройства имеют вращающиеся части и под-
ключаются к электросети. Это может пред-
ставлять опасность для здоровья и жизни
человека. Поэтому при выполнении монтаж-
ных работ необходимо соблюдать требования
безопасности. В случае возникновения со-
мнений относительно безопасной установки и
эксплуатации изделия, просим обращаться к
производителю или его представителю.
• Монтажные работы могут выполнять только
обученные и квалифицированные работники.
• Убедитесь, что параметры подключаемой
электросети соответствуют данным, указан-
ным на наклейке изделия на корпусе устрой-
ства.
• Кабель питания должен быть подобран в соот-
ветствии с мощностью устройства (Таблица 1).
• Устройство должно быть подключено в со-
ответствии с установленной для него схеме
электроподключения, которая указана в на-
стоящем документе (Рис. 10), и как это изо-
бражено под крышкой подключения платы
управления автоматики.
• Кабель питания устройства и защитное
устройство (автоматический выключатель с
характеристикой С) подбираются по таблице
1.
• Устройство должно быть заземлено.
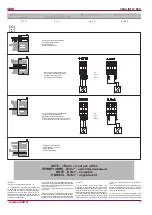
• Соедините автоматику управления и пульт
управления (рис. 10, 11 и см. схему подключе-
ния пульта).
• Units contain rotating parts and are connect-
ed to the mains. It may cause risk to people
health and life. Therefore, it is mandatory to
follow safety requirements when performing
installation works. In case of any doubts re-
garding safe installation and operation of the
unit, please contact the manufacturer or its
representative.
• Installation works shall be performed only by
trained and qualified personnel.
• Make sure that specifications of the con-
nected mains correspond to the specifica-
tions indicated in the product label on casing
of the unit.
• Selected power supply cable must corre-
spond to the power of the unit (Table 1).
• The unit must be connected according the
designed electric connection diagram as in
this document (Pic. 10) and as shown under
the connection cover of the automatic control
board.
• The power supply cable and protection de-
vice (automatic switch with characteristic C)
of the unit are selected according the Table 1.
• The unit must be adequately grounded.
• Connect the automatic control and the re-
mote controller (Pic. 10, 11 and see connec-
tion scheme of the remote controller).
• Die Geräte verfügen über rotierende Teile und
werden an ein Stromnetz angeschlossen. Da-
durch kann Gefahr für Leib und Leben entste-
hen. Deshalb sind bei allen Montagearbeiten
die Sicherheitshinweise einzuhalten. Im Zwei-
felsfall betreffend eine sichere Montage und
Bedienung des Produkts wenden Sie sich bitte
an den Hersteller bzw. seinen Vertreter.
• Die Montagearbeiten dürfen nur von geschul-
tem und qualifiziertem Personal ausgeführt
werden.
• Stellen Sie sicher, dass alle Angaben des
Stromnetzes den Angaben des Produktaufkle-
bers auf dem Gehäuse entsprechen.
• Das Netzkabel muss der Leistungskapazität
des Gerätes entsprechen (Tabelle Nr. 1).
• Das Gerät ist gemäß dem in diesem Dokument
angegebenen Schaltplan (Abb. 10) anzuschlie-
ßen, welcher auch unter dem Deckel der Steu-
erplatine für Automatik dargestellt ist.
• Wählen Sie das Netzkabel und die Schutzvor-
richtung (Automatikschalter mit C-Charakteris-
tik) gemäß Tabelle 1 aus.
• Stellen Sie eine Erdung für das Gerät sicher.
• Verbinden Sie die Steuerautomatik mit dem
Bedienpult (Abb. 10, 11 siehe auch Schaltplan
des Pultes).
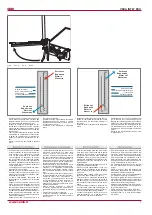
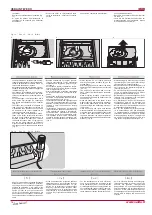
Fig. 9
Рис. 9
Pic. 9
Bild 9
поворота воздуховодов.
• Протяните провод, соединяющий автоматику
управления приточного агрегата с пультом
управление, и подсоедините к пульту (см. схе-
му подключения пульта).
• Установите пульт управления в избранном
месте.
• Install and connect the wire between the ven-
tilation unit automatic control and the remote
controller (see the connection diagram for
controller).
• Install the remote controller in the designated
place.
Zuluftleitung ein. Der Fühler ist möglichst weit
vom Gerät bis zur ersten Abzweigung bzw.
Biegung der Luftleitungen entfernt einzubauen.
• Verlegen Sie das Verbindungskabel zwischen
der Steuerautomatik des Lüftungsgerätes und
des Bedienpultes und schließen Sie es am
Bedienpult an (siehe Schaltplan des Bedien-
pultes).
• Montieren Sie das Bedienpult an dem dafür
vorgesehenen Ort.
a
b
Entrée eau
Вода вход
Water in
Wasser in
Sortie eau
Вода выход
Water out
Wasser aus
Débit d’air entrant
Вход. воздушный поток
Inlet air flow
Einlass-Luftstrohm
Entrée eau
Вода вход
Water in
Wasser in
Sortie eau
Вода выход
Water out
Wasser aus
Débit d’air entrant
Вход. воздушный поток
Inlet air flow
Einlass-Luftstrohm
fonctionne dans un régime avec des flux de
même direction, la différence moyenne des
températures diminue ce qui a une influence
sur le rendement de la batterie (Fig. 9).
• Installer la sonde de température de l’air
soufflé dans le conduit d’air soufflé. La sonde
est montée aussi loin que possible de la cen-
trale avant la première branche ou coude des
conduits d’air.
• Tirer le câble connectant la carte de contrôle
automatique du dispositif de ventilation avec
le boîtier de commande et le raccorder au
boitier (cf. schéma de branchement du boi-
tier).
• Monter le boitier de commande à l’endroit
prévu.


