background image

40

41 

EN

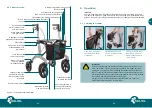
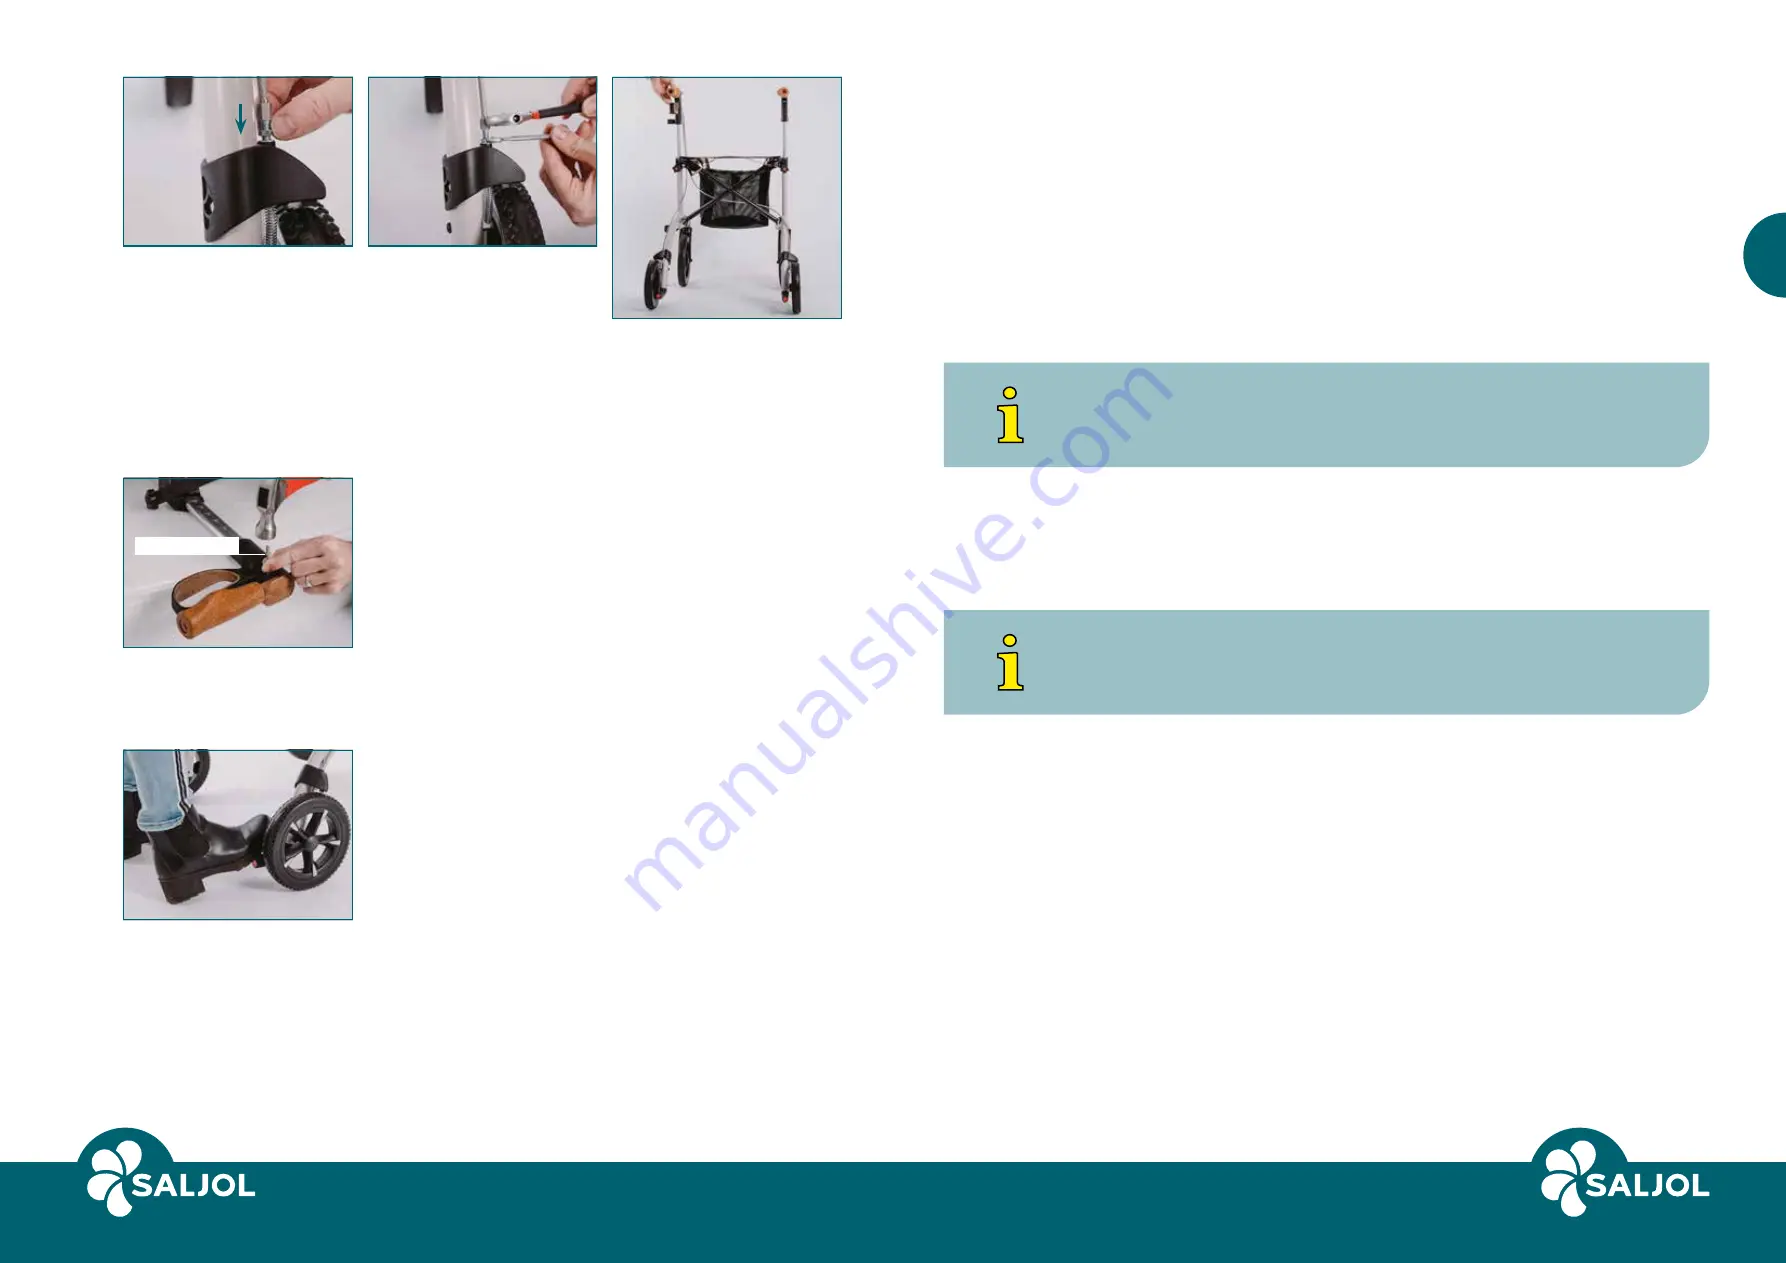
Screw the lock nut back 

down.

Attention: The brake should 

be set so that the rollator 

brakes equally on both 

sides.

Tighten the lock nut with 

the open-end spanner so 

that the brake cannot be 

adjusted.

Caution: Now carefully 

check that both brakes 


brake evenly when the 


brake lever is operated.

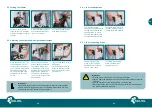
Removing the brake lever when using the one-hand simultaneous brake

Knock-out aid

If you have removed the Bowden cable, you can also 

dismantle the superfluous brake lever. To do this, knock 

out the pin on the brake lever with a knock-out aid, for 

example a nail, and pull it out downwards with your 

hand or pliers. The brake lever is now loose and can be 

removed. Keep the loose pin along with the loose brake 

lever in a safe place.

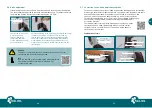
5.8   Using the curb aid

The curb aid is located behind the rear wheels.

Step on the curb aid with one foot and pull the rollator 

slightly towards you using the handles.

The front wheels are now in the air. This way you over-

come thresholds and curbs.

6.   Maintenance

6.1   Cleaning 

Frame

Cleaning can be done with warm water and a sponge. In case of stubborn soiling, 


a commercial cleaning agent can be added to the water. Disinfectants can be used 


without any problems. Plastic parts are best cleaned with a commercially available 

plastic cleaner. Please follow the instructions for use of the cleaning agent used.

To stop squeaking or creaking of the cross struts, simple means such as Teflon spray 

can be used.


Important

Never use aggressive cleaning agents such as solvents/abrasives or hard 

brushes. 

Wheels

Clean the wheels with warm water and a mild solvent. If necessary, use a plastic 

brush, never a wire brush. To stop the squeaking or creaking of the wheels, or the front 

fork, simple means such as Teflon spray can be used.


Important

Never clean the rollator with a high-pressure/steam cleaner!

6.2   Disinfection

The Aluminium Rollator can be disinfected with standard household disinfectants.

The Robert Koch list of approved disinfectants can be found at http://www.rki.de

Allow the rollator to air dry and observe the exposure time of the disinfectant you are 

using.

6.3   Inspection

We recommend that the Aluminium Rollator is inspected by the specialist dealer/Saljol 

at least once a year, ideally even twice. If faults or defects occur during use, the 


Aluminium Rollator must be returned immediately to the specialist dealer/Saljol for 

repair. Saljol reserves the right to limit the warranty claims if the rollator has not been 

serviced regularly.

Summary of Contents for 4058789013588

Page 1: ...www saljol de Saljol Aluminium Rollator Bedienungsanleitung Instruction manual EN DE...

Page 2: ...6 3 Inspektion 19 7 Transportbeschreibung 19 8 Lagerung und Versand 19 8 1 Lagerbedingungen 19 9 Entsorgung 20 10 Technische Daten 20 11 Gew hrleistung und Garantie 21 11 1 Gew hrleistung 21 11 2 Gar...

Page 3: ...tzer ohne auf Hilfe Dritter angewiesen zu sein mit dem Saljol Aluminium Rollator durchf hren Kontraindikation Der Aluminium Rollator von Saljol ist nicht f r Menschen mit sehr schwacher Armkraft erheb...

Page 4: ...nstellen des Ger ts extrem aufmerksam und vorsichtig Nehmen Sie Spaltabst nde bei den Rollatorteilen wahr um sich vor Klemmung der Finger und anderen K rperteilen zu sch tzen 3 Hinweise 3 1 Sicherheit...

Page 5: ...y 6 6 kg Aluminium Rollator EAN cm SALJOLGmbH Frauenstra e 32 82216 Maisach Germany kg kg kg maximales Zuladegewicht der Netztasche cm Sitzh he Medizinisches Hilfsmittel CE Kennzeichnung Produkt f r d...

Page 6: ...e den Rollator verlassen stehen bleiben oder sich setzen m chten 5 Bedienung Bestandsaufnahme Nehmen Sie den Aluminium Rollator von Saljol aus dem Karton und berpr fen Sie ob etwas fehlt Vergleichen S...

Page 7: ...ie Hinterr der blockieren und sich beim Schieben nicht drehen Info Hier finden Sie ein Video indem die Bremseinstellung erkl rt wird https www youtube com watch v _J1p1SceS2M oder Sie scannen den QR C...

Page 8: ...utter vollst ndig heraus schrauben nach oben Jetzt k nnen Sie den Bowdenzug aus dem Bremsklotz herausziehen Den demontierten Bowdenzug k nnen Sie nun beiseitelegen 5 7 Umbau auf Einhand Simultanbremse...

Page 9: ...interr dern Treten Sie mit einem Fu auf die Ankipphilfe und ziehen Sie den Rollator an den Griffen leicht zu sich Die Vorderr der sind nun in der Luft So berwinden Sie Schwellen und Bordsteinkanten Mo...

Page 10: ...Der Rollator ist in trockenen m glichst temperierten R umen lichtgesch tzt so zu lagern dass von au en keine Druckbelastung einwirkt Temperatur 10 bis 35 C Luftfeuchtigkeit 45 bis 60 6 Wartung 6 1 Rei...

Page 11: ...itznetz Bremsmechanik inkl Schleifbremse und Reifen Diese Garantiebedingungen gelten nur f r in Deutschland erworbene Produkte vorausgesetzt sie wurden bei Saljol direkt oder einem autorisierten Fachh...

Page 12: ...317740 bequem von zu Hause aus bestellen 12 Zubeh r R ckengurt Dank R ckengurt k nnen Sie bequem auf dem Rollator sitzen und sich anlehnen Er ist verstellbar und somit auch f r gro e Menschen geeigne...

Page 13: ...zusammenfalten Datum Pr fer Stempel Unterschrift Instruction manual Preface Thank you for purchasing a Saljol Aluminium Rollator With your new rollator you will be able to lead a mobile and self deter...

Page 14: ...shipping 42 8 1 Storage conditions 42 9 Disposal 42 10 Technical data 43 11 Warranty and guarantee 44 11 1 Warranty 44 11 2 Guarantee 44 12 Accessories 45 13 Test protocol for reuse 47 1 Identificati...

Page 15: ...ty and usability of the rollator if changes expansions repairs and maintenance work are carried out regularly and only by authorized specialists and if the rollator is used properly in compliance with...

Page 16: ...yourself from trapping your fingers and other body parts 4 Scope of delivery and product overview 4 1 Scope of delivery 1x Saljol Aluminium Rollator 1x net bag 1x long Bowden cable for conversion to o...

Page 17: ...re with figure 1 on page 32 and with the scope of delivery described in 4 1 on page 30 If any part is missing or damaged contact your dealer or Saljol immediately 5 1 Unfolding the rollator Open the b...

Page 18: ...o that the rollator does not roll away when you adjust it Important Adjust both push handles to the same height to achieve a symmetrical posture when walking Always press the parking brake see 5 5 whe...

Page 19: ...Here you can find a video explaining the brake adjustment https www youtube com watch v k Ru8oiwFM or scan the QR code 5 7 Conversion to one hand simultaneous brake To convert the brake system to one...

Page 20: ...upwards Now you can remove the Bowden cable out of the brake pad The dismantled Bowden cable can now be now put aside Fitting the longer Bowden cable Insert the end with the adjustment screw of the l...

Page 21: ...he water Disinfectants can be used without any problems Plastic parts are best cleaned with a commercially available plastic cleaner Please follow the instructions for use of the cleaning agent used T...

Page 22: ...1 Storage conditions The rollator is to be stored in dry preferably temperature controlled rooms protected from light in such a way that no pressure load is exerted from outside Temperature 10 to 35 C...

Page 23: ...authorised specialist dealer The seller will provide information on the guarantee conditions for products purchased abroad Guarantee services and replacement deliveries for guarantee reasons do not r...

Page 24: ...affic Simply screw it on and ring just like on a bicycle Additional cane holder The cane holder holds your walking aid firmly to the rollator It can be attached to the right and left of the frame and...

Page 25: ...Saljol GmbH Frauenstra e 32 82216 Maisach Germany www saljol de hallo saljol de Tel 49 0 8141 317740 Fax 49 0 8141 3177411...

Reviews: