background image

38

39 

EN

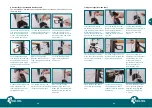
Disassembly of the standard Bowden cable

The standard Bowden cable must be dismantled on the side on which you do not need 

the brake lever. 

Loosen the lock nut with a 

size 8 open-end spanner 

and turn it completely up-

wards. Fix the adjustment 

screw at the same time.

Turn the adjustment screw 

together with the lock nut 

completely downwards.

Pull the Bowden cable out 

of the fixing hole (1.) at 

the handle until a thin wire 

becomes visible and guide 

it upwards (2.).

1.

2.

Push the Bowden cable 

into the hole until the end 

of the Bowden cable and 

the Bowden cable nipple 

stick out at the inside of the 

handle.

Now you can pull the 


Bowden cable out of the 

feed-through hole towards 

the front.

Push the Bowden cable 

nipple onto the Bowden 

cable cover.

Unhook the lower Bowden 

cable nipple from the 


retaining sleeve. Pull the 

spring downwards.

Completely unscrew the 

adjustment screw including 

the lock nut (upwards).

Now you can pull the 


Bowden cable out of the 

brake pad. The dismantled 

Bowden cable can now be 

put aside.

Fitting the longer Bowden cable

Insert the end with the 

adjustment screw of the 

long Bowden cable into the 

brake block from above.

The adjustment screw must 

be screwed in completely.

Push the spring over the 

Bowden cable from below. 

Hook the lower Bowden 

cable nipple into the 


retaining sleeve from the 

tyre side.

Pull the upper Bowden 

cable nipple until the lower 

Bowden cable nipple 


touches the retaining  

sleeve.

Fix the upper Bowden 


cable nipple in the bracket


on the brake lever and 


at the same time pull 


the Bowden cable cover 


forwards out of the  

feed-through hole.

Lay the Bowden cable bet-

ween the cross struts and 

the net pocket and lead it 

to the brake.

Push the upper end of the 

Bowden cable through the 

upper feed-through hole.

Fasten the existing and 

the long Bowden cable 

together with the supplied 

double clip.

Unscrew the adjustment 

screw until the distance 

between the brake pad 


and the tyre is approx. 


2-3.5 mm.

Hang the Bowden cable 

cover into the free fixing 

hole.

Summary of Contents for Allround Rollator

Page 1: ...www saljol de Saljol Allround Rollator Bedienungsanleitung Instruction manual EN DE...

Page 2: ...7 Transportbeschreibung 19 8 Lagerung und Versand 19 9 Entsorgung 19 10 Technische Daten 20 11 Gew hrleistung und Garantie 21 11 1 Gew hrleistung 21 11 2 Garantie 21 12 Hinweis zur Meldepflicht bei V...

Page 3: ...nen Nutzer ohne auf Hilfe Dritter angewiesen zu sein mit dem Saljol Allround Rollator durchf hren Kontraindikation Der Allround Rollator von Saljol ist nicht f r Menschen mit sehr schwacher Armkraft e...

Page 4: ...den Rollatorteilen wahr um sich vor Klemmung der Finger und anderen K rperteilen zu sch tzen 4 Lieferumfang und Produkt bersicht 4 1 Lieferumfang 1x Saljol Allround Rollator 1x Netztasche 1x langer B...

Page 5: ...itzh he Medizinisches Hilfsmittel CE Kennzeichnung Produkt f r drinnen und drau en geeignet Hersteller des Produktes Seriennummer Schiebegriff und Arm auflage aus Kork TPE mit rotem Reflektor Bremsgri...

Page 6: ...5 wenn Sie den Rollator verlassen stehen bleiben oder sich setzen m chten 5 Bedienung Bestandsaufnahme Nehmen Sie den Allround Rollator von Saljol aus dem Karton und berpr fen Sie ob etwas fehlt Verg...

Page 7: ...er finden Sie ein Video indem die Bremseinstellung erkl rt wird https www youtube com watch v _J1p1SceS2M oder Sie scannen den QR Code 5 4 Benutzung der Handbremse Um den Rollator zu brem sen ziehen S...

Page 8: ...utter vollst ndig heraus schrauben nach oben Jetzt k nnen Sie den Bowdenzug aus dem Bremsklotz herausziehen Den demontierten Bowdenzug k nnen Sie nun beiseitelegen 5 7 Umbau auf Einhand Simultanbremse...

Page 9: ...r den Hinterr dern Treten Sie mit einem Fu auf die Ankipphilfe und ziehen Sie den Rollator an den Griffen leicht zu sich Die Vorderr der sind nun in der Luft So berwinden Sie Schwellen und Bordsteinka...

Page 10: ...des Transports gesch tzt 9 Entsorgung Entsorgen Sie die Materialien sortenrein getrennt in den vorgesehenen Sammel systemen Sonderm ll f hren Sie bitte den vorgesehenen Sammelsystemen zu 6 Wartung 6 1...

Page 11: ...en Von der Garantie ausgeschlossen sind Verschlei teile wie Handgriffe Sitznetz Bremsmechanik inkl Schleifbremse und Reifen Diese Garantiebedingungen gelten nur f r in Deutschland erworbene Produkte v...

Page 12: ...tzes sind alle unerw nschten Ereignisse die eine der nachstehenden Folgen haben Tod lebensbedrohliche Verletzung bleibende K rpersch den und chronische Erkrankungen In der Bundesrepublik Deutschland i...

Page 13: ...kraft Frage Ja Nein Hat das Produkt alle Etiketten aufgeklebt Sind lose oder gelockerte Schrauben vorhanden Sind beide Feststellbremsen funktionsf hig Lassen sich die Feststellbremsen einfach aktivier...

Page 14: ...al 42 10 Technical data 43 11 Warranty and guarantee 44 11 1 Warranty 44 11 2 Guarantee 44 12 Note on the obligation to report incidents 45 13 Accessories 46 14 Test protocol for reuse 48 1 Identifica...

Page 15: ...nges expansions repairs and maintenance work are carried out regularly and only by authorized specialists and if the rollator is used properly in compliance with all instructions for use Declaration o...

Page 16: ...ing the device Be aware of gaps in the rollator to protect yourself from trapping your fingers and other body parts 4 Scope of delivery and product overview 4 1 Scope of delivery 1x Saljol Allround Ro...

Page 17: ...re with figure 1 on page 32 and with the scope of delivery described in 4 1 on page 30 If any part is missing or damaged contact your dealer or Saljol immediately 5 1 Unfolding the rollator Open the b...

Page 18: ...st it Important Adjust both push handles to the same height to achieve a symmetrical posture when walking Always press the parking brake see 5 5 when you want to leave the rollator stop or sit down 5...

Page 19: ...Info Here you can find a video explaining the brake adjustment https www youtube com watch v k Ru8oiwFM or scan the QR code 5 7 Conversion to one hand simultaneous brake To convert the brake system to...

Page 20: ...k nut upwards Now you can pull the Bowden cable out of the brake pad The dismantled Bowden cable can now be put aside Fitting the longer Bowden cable Insert the end with the adjustment screw of the lo...

Page 21: ...dded to the water Disinfectants can be used without any problems Plastic parts are best cleaned with a commercially available plastic cleaner Please follow the instructions for use of the cleaning age...

Page 22: ...vailable when needed Then your rollator is optimally protected against environmental influences during storage or transport 9 Disposal Dispose materials separately by type in the designated collection...

Page 23: ...mechanism incl grinding brake and tyres These guarantee conditions only apply to products purchased in Germany provided they were purchased from Saljol directly or from an authorised specialist deale...

Page 24: ...ollator You sit upright and safely no matter where Parasol umbrella Going out in rainy weather With the umbrella on the rollator you stay dry and can push safely with both hands Used as a parasol it p...

Page 25: ...77411 14 Test protocol for reuse Test protocol for reuse by a qualified specialist Question Yes No Does the product have all labels stuck on Are there any loose or loosened screws Are both parking bra...

Reviews: