background image

English

   - 51 -

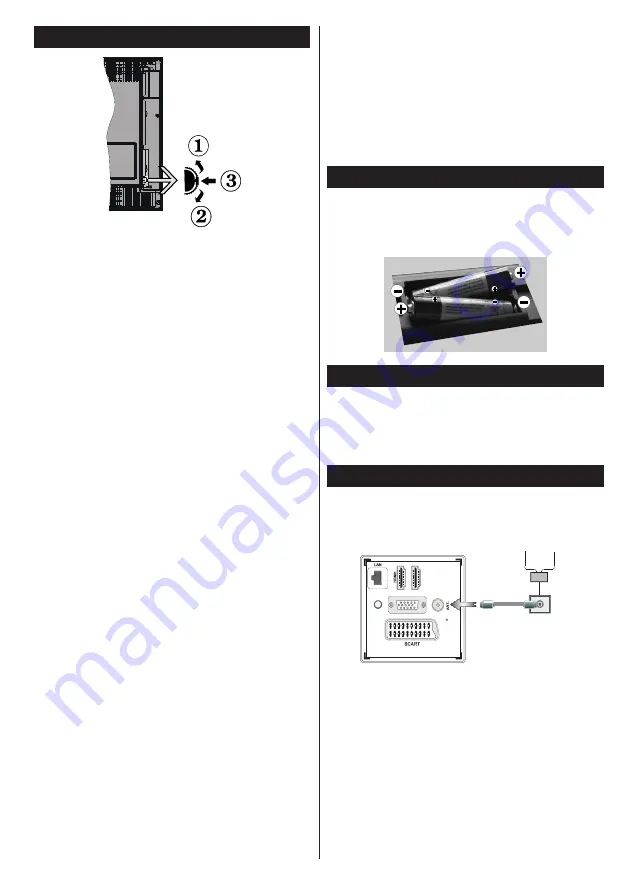
TV Control Switch & Operation

1

.

Up direction

2.

 Down direction

3.


Volume / Info / Sources List selection and Standby-

On switch
The Control button allows you to control the Volume 

/ Programme / Source and Standby-On functions of 

the TV.

To change volume: 

Increase the volume by pushing 

the button up. Decrease the volume by pushing the 

button down.

To change channel: 

Press the middle of the button, 

the  information  banner  will  appear  on  the  screen. 

Scroll  through  the  stored  channels  by  pushing  the 

button up or down.

To change source:

 Press the middle of the button 

twice (for the second time in total), the source list will 

appear  on  the  screen.  Scroll  through  the  available 

sources by pushing the button up or down.

To turn the TV off: 

Press the middle of the button 

down and hold it down for a few seconds, the TV will 

turn into standby mode.

Notes:

• If  you  turn  the  TV  off,  this  circle  starts  again 

beginning with the volume setting.

• Main menu OSD cannot be displayed via control 

buttons.

Operation with the Remote Control

Press  the 

Menu

  button  on  your  remote  control  to 

display the main menu screen. Use the 

Left

 or 

Right


button to select a menu tab and press the 

OK 

to enter. 

Use 

Left / Right / Up / Down

 buttons to select or set 

an item. Press

 Return/Back

 or 

Menu

 button to quit 

a menu screen.

Input Selection

Once you have connected external systems to your 

TV, you can switch to different input sources. Press the 

Source

 button on your remote control consecutively 

to select the different inputs.

Changing Channels and Volume

You can change the channel and adjust the volume 

by using the 

/-

 and 

Pro/-

 buttons 

on the remote. 

Inserting the Batteries into the Remote

Lift  the  cover  on  the  back  of  the  remote  gently. 

Insert  two 

AAA

  batteries.  Make  sure  the  (+)  and 

(-) signs match (observe correct polarity). Place the 

cover back on.

Connect Power 

IMPORTANT

: The TV set is designed to operate on 

220-240V AC, 50 Hz

 socket. After unpacking, allow 

the TV set to reach the ambient room temperature 

before you connect the set to the mains. Plug the 

power cable to the mains socket outlet.

Antenna/Cable Connection

Connect the aerial or cable TV plug to AERIAL INPUT 

(ANT-TV) socket located on the rear bottom side of 

the TV.

Aerial


or


Cable

SPDIF

VGA

HDMI2

Summary of Contents for 28LED9112CSW

Page 1: ......

Page 2: ......

Page 3: ...ssoires 3 Afstandsbediening 1 6 Aansluitingen 7 Eerste installatie USB aansluiting 8 TV menukenmerken en functies 12 Algemene tv bediening 15 Software upgrade 16 Probleemoplossen tips 16 PC invoer nor...

Page 4: ...veroorzaken of een elektrische schok veroorzaken Neem het netsnoer beet bij de stekker en verwijder de stekker niet uit het stopcontact door aan het snoer te trekken Raak het netsnoer de stekker nooit...

Page 5: ...t verschijnt het volgende bericht Tv automatisch overgeschakeld op de stand by modus omdat er gedurende een lange periode geen signaal was Druk op OK om door te gaan 2 Als de tv ingeschakeld is geblev...

Page 6: ...p de MENU toets van de afstandsbediening om de menu s weer te geven Gebruik de Links of Rechts knop om een menutab te selecteren en druk op OK om in te voeren Gebruik de Links Rechts Omlaag toetsen om...

Page 7: ...D Digitale ontvangst Volledig ge ntegreerde digitale kabel TV DVB T C Aantal instelbare kanalen 1000 Kanaalindicator Weergave op het scherm RF Antenne Input 75 Ohm niet gebalanceerd Werkingsspanning 2...

Page 8: ...de applicatie Netflix 10 Gekleurde toetsen Volg de instructies op het scherm voor de functies van de gekleurde knop 11 Taal Schakelt tussen de geluidsmodi analoge TV geeft de taal van de audio ondert...

Page 9: ...informatie over de instellingen Iedere USB ingang van uw tv ondersteunt apparaten tot 500mA Apparaten aansluiten met een stroomwaarde van meer dan 500mA kan uw tv beschadigen Connector Type Kabels App...

Page 10: ...en Nadat alle kanalen zijn opgeslagen verschijnt een zenderlijst op het scherm Tijdens de zoekopdracht verschijnt een bericht met de vraag of u de zenders wilt sorteren in overeenstemming met de LCN S...

Page 11: ...istDialog toetsen kunnen niet worden gebruikt als de teletekst is ingeschakeld Als een opname start via een timer als de teletekst ingeschakeld is wordt teletekst automatisch uitgeschakeld Het gebruik...

Page 12: ...u snel toegang tot bepaalde opties Dit menu bevat de Energiebesparing modus Beeldmodus Favorieten Sleep Timer FollowMe TV FollowMe TV naar DMRCEC RC Passthrough en Informatiebrochure opties Druk op de...

Page 13: ...p de knop Q Menu op de afstandsbediening markeer CEC RC Passthrough en schakel op de Uit stand door te drukken op de Links of Rechts knop Deze functie kan ook worden in of uitgeschakeld in het menu In...

Page 14: ...in Scartmodus met SCART PIN8 hoogspanning laagspanning omschakeling Filmmodus Films worden aan een ander aantal frames per seconde opgenomen dan normale televisieprogramma s Schakel deze functie aan...

Page 15: ...ngen te wijzigen U kunt de menuvergrendeling maturiteitsvergrendeling kan wijzigen naargelang het geselecteerde land en het kinderslot in dit menu eenvoudig aanpassen U kunt ook een nieuw pin nummer i...

Page 16: ...de CEC functionaliteit volledig in of uitschakelen Druk op de knop Links of Rechts om de functie in of uit te schakelen FollowMe TV Deze functie in uitschakelen FollowMe TV naar DMR Deze functie in u...

Page 17: ...r hun uitzendingsschema s Druk op de knop Epg om het menu EPG weer te geven Rode toets Vorige dag Geeft de programma s weer van de vorige dag Algemene tv bediening Groene toets Volgende dag Geeft de p...

Page 18: ...rn La proc dure de recherche et de connexion diff re en fonction du programme utilis Les appareils mobilesAndroid doivent disposer de la version logicielle V4 2 ou ult rieure Probleemoplossen tips De...

Page 19: ...i Onderstaande tabel is een illustratie van een aantal van de normale video schermmodi Het is mogelijk dat uw TV niet alle resoluties ondersteunt Inhoudsopgave Resolutie Interval 1 640x350 85Hz 2 640x...

Page 20: ...er2 8Kbps 384Kbps Bit rate 16KHz 48KHz Sampling rate Layer3 8Kbps 320Kbps Bit rate 16KHz 48KHz Sampling rate wav LPCM WMA ASF WMA WMA Pro WMA 128bps 320Kbps Bit rate 8KHz 48Khz Sampling rate WMA Pro 7...

Page 21: ...televisie met DVI naar HDMI convertorkabels niet geleverd kunt u de onderstaande resolutie informatie raadplegen 56Hz 60Hz 66Hz 70Hz 72Hz 75Hz 640x400 640x480 800x600 832x624 1024x768 1152x864 1152x8...

Page 22: ...twerk muurstekker LAN input on the rear side of the TV network wall socket De instellingen van een bedraad apparaat configureren Netwerk type Het netwerktype kan worden geselecteerd als bedraad of dra...

Page 23: ...SSID Zo niet kunt u verbindingsproblemen ervaren Gebruik de bedrade verbinding als u problemen ondervindt met de draadloze verbinding De instellingen van een draadloos apparaat configureren Om de Wifi...

Page 24: ...k Voor meer informatie gaat u naar www dlna org De DLNA standaard biedt u de mogelijkheid foto s muziek en video s weer te geven en af te spelen die werden opgeslagen op de DLNA mediaserver verbonden...

Page 25: ...ijk zonder deze overeenkomst 7 Klik op Volgende In het volgende scherm kunt u uw installatievoorkeuren instellen 8 Klik op de Installeren knop De installatie begint en eindigt automatisch Een voortgan...

Page 26: ...Remote Control 1 53 Connections 54 First Time Installation USB Connections 55 TV Menu Features and Functions 58 General TV Operation 61 Software Upgrade 62 WIRELESS DISPLAY 62 Troubleshooting Tips 62...

Page 27: ...d plug can cause fire or give you an electric shock Handle the power cord by the plug do not unplug the TV by pulling the power cord Never touch the power cord plug with wet hands as this could cause...

Page 28: ...nto standby When you next switch on the following message will be displayed TV switched to stand by mode automatically because there was no signal for a long time Press OK to continue 2 If the TV has...

Page 29: ...l Press the Menu button on your remote control to display the main menu screen Use the Left or Right button to select a menu tab and press the OK to enter Use Left Right Up Down buttons to select or s...

Page 30: ...BAND I III UHF BAND U HYPERBAND Digital Reception Fully integrated digital terrestrial cable TV DVB T C Number of Preset Channels 1000 Channel Indicator On Screen Display RF Aerial Input 75 Ohm unbala...

Page 31: ...structions for coloured button functions 11 Language Switches between sound modes analogue TV displays and changes audio subtitle language digital TV where available 12 Rapid reverse Moves frames back...

Page 32: ...tion manual for details of the settings Each USB input of your TV supports devices up to 500mA Connecting devices that have current value above 500mA may damage your TV Connector Type Cables Device Sc...

Page 33: ...While the search continues a message will appear asking whether you want to sort channels according to the LCN Select Yes and press OK to confirm LCN is the Logical Channel Number system that organize...

Page 34: ...o stop timeshift recording and return to the live broadcast Timeshift cannot be used while in radio mode You cannot use the timeshift fast reverse feature before advancing the playback with the fast f...

Page 35: ...h FAT32 format and enough space in it HD channels are not supported and both of the devices must be connected to the same network E Manual You can find instructions for your TV s features in the E Man...

Page 36: ...ge lowvoltageswitching Film Mode Films are recorded at a different number of frames per second to normal television programmes Turn this feature on when you are watching films to see the fast motion s...

Page 37: ...settings You can easily adjust menu lock maturity lock may change depending on the country selected and child lock in this menu You can also set new pin number Note DefaultPINcanbesetto0000or1234 Ifyo...

Page 38: ...With this setting you can enable and disable CEC functionality completely Press Left or Right button to enable or disable the feature FollowMe TV Enable or disable this feature FollowMe TV to DMR Ena...

Page 39: ...s of previous day Green button Next day Displays the programmes of the next day Yellow button Zoom Press the Yellow button to see events in a wider time interval Blue button Filter Views filtering opt...

Page 40: ...nning and connecting processes differ according to the programme you use Android based mobile devices should have the software version V4 2 and above Troubleshooting Tips Tv will not turn on Make sure...

Page 41: ...e following table is an illustration of some of the typical video display modes Your TV may not support all resolutions Index Resolution Frequency 1 640x350 85Hz 2 640x400 70Hz 3 640x400 85Hz 4 640x48...

Page 42: ...bps 384Kbps Bit rate 16KHz 48KHz Sampling rate Layer3 8Kbps 320Kbps Bit rate 16KHz 48KHz Sampling rate wav LPCM WMA ASF WMA WMA Pro WMA 128bps 320Kbps Bit rate 8KHz 48Khz Sampling rate WMA Pro 768kbps...

Page 43: ...g DVI converter cable DVI to HDMI cable not supplied you can refer to the following resolution information 56Hz 60Hz 66Hz 70Hz 72Hz 75Hz 640x400 640x480 800x600 832x624 1024x768 1152x864 1152x870 1280...

Page 44: ...ired or Wireless Device in accordance with the active connection to the TVset SelectthisasWiredDeviceifyouare connecting via an ethernet Configuration Status This section displays the status of the co...

Page 45: ...OK button on the remote control Wait until the IP address is shown on the screen This means that the connection is now established To disconnect from a wireless network highlight Network Type and pres...

Page 46: ...ks are found they will be listed on this screen Select media server or network that you want to connect to using the Up or Down buttons and press OK If you select the media type as Videos and choose a...

Page 47: ...s connected to a Wired Wireless if available network After the connection is established you can view portal options Press Internet button on your remote control and the portal application options wil...

Page 48: ...Connexions 76 Installation initiale Connections USB 77 Options et fonctions du menu TV 81 Fonctionnement g n ral de la TV 84 Mise jour du logiciel 85 CRAN SANS FIL 85 R solution des probl mes et astuc...

Page 49: ...ommag e peut causer un incendie ou vous infliger une d charge lectrique Tenez le cordon d alimentation par sa fiche ne pas d brancher le t l viseur en tirant sur le cordon d alimentation Ne touchez ja...

Page 50: ...r passe en mode veille Lors de la prochaine mise en marche le message suivant s affiche l cran TV commut en mode veille automatiquement en raison de l absence de signal pendant une longue p riode Appu...

Page 51: ...sur la touche Menu de votre t l commande pour afficher le menu pincipal Utilisez les boutons Gauche ou Droite pour s lectionner un onglet de menu puis appuyez sur OK pour entrer Utilisez les boutons...

Page 52: ...le num rique enti rement int gr DVB T C Nombre de cha nes pr d finies 1000 Indicateur de cha ne Affichage l cran Entr e d antenne RF 75 Ohm d s quilibr e Tension de fonctionnement 220 240 V AC 50Hz Au...

Page 53: ...s instructions qui s affichent l cran pour les fonctions de boutons de couleur 11 Langue Bascule entre les modes sonores TV analogique affiche et change la langue audio des sous titres si disponible e...

Page 54: ...dule pour plus de d tails sur les r glages Chaque entr e USB de votre t l viseur prend en charge les p riph riques atteignant jusqu 500mA En branchant les appareils dont la valeur actuelle d passe 500...

Page 55: ...ionnez l option Antenne partir du menu S lection du type de recherche le t l viseur recherchera les cha nes diffus es num riques Une fois toutes les stations disponibles enregistr es la Liste des cha...

Page 56: ...t utilis e pour les options PVR disponibles Il doit tre galement format en tant que premi re partition tre utilis pour les fonctions pr tes de PVR Certains l ments pourraient ne pas tre enregistr s en...

Page 57: ...Boucle D marrez la lecture via la touche Lecture et activez Le t l viseur lit le fichier suivant et boucle la liste D marrez la lecture avec OK et activez le m me fichier sera lu dans une boucle r p t...

Page 58: ...t l commande appuyez et maintenez la touche 0 Zero de la t l commande enfonc e pendant 3 secondes Ou appuyez sur le bouton Q Menu de la t l commande surlignez le Serveur interm diaire CEC RC et config...

Page 59: ...enregistr s un nombre d images par seconde diff rent des programmes de t l vision normaux Activez cette fonction lorsque vous regardez des films afin de mieux visualiser les images acc l r es Couleur...

Page 60: ...r glages du contr le parental Vous pouvez facilement r gler le verrouillage du menu le contr le parental peut varier en fonction du pays s lectionn partir de ce menu Vous pouvez galement entrer un no...

Page 61: ...de virtuelle CEC Avec ce r glage vous pouvez activer et d sactiver compl tement la fonctionnalit CEC Appuyez sur le bouton Gauche ou Droite pour activer ou d sactiver la fonction FollowMe TV Permet d...

Page 62: ...n le choix du pays Fonctionnement g n ral de la TV Guide lectronique des programmes EPG Certaines cha nes envoient des informations concernant leurs programmes de diffusion Appuyez sur le bouton Epg p...

Page 63: ...l viseur et tabli une connexion l cran de votre appareil s affichera sur votre t l viseur Remarque Cette fonctionnalit peut tre utilis e uniquement si elle est prise en charge par l appareil mobile co...

Page 64: ...ne entr e de PC Le tableau ci dessous est une illustration de certains affichages vid os typiques Votre t l viseur ne peut pas prendre en charge toutes les r solutions Index R solution Fr quence 1 640...

Page 65: ...20Kbps D bit binaire 16 KHz 48 KHz Taux d chantillonnage wav LPCM WMA ASF WMA WMA Pro WMA 128Kbps 320Kbps D bit binaire 8 KHz 48 KHz Taux d chantillonnage WMA Pro 768 kbps D bit binaire 96 KHz Taux d...

Page 66: ...t de raccorder des p riph riques votre t l viseur l aide des c bles convertisseurs DVI DVI HDMI non fournis 56Hz 60Hz 66Hz 70Hz 72Hz 75Hz 640x400 640x480 800x600 832x624 1024x768 1152x864 1152x870 128...

Page 67: ...pour connecter votre t l viseur directement la prise murale du r seau LAN input on the rear side of the TV network wall socket Configuration des param tres des p riph riques c bl s Type de r seau Vou...

Page 68: ...fil si vous rencontrez des probl mes avec la connexion sans fil Configuration des param tres des p riph riques sans fil Pour acc der aux fonctions du Wi Fi branchez la cl Wi Fi l un des ports USB Ouvr...

Page 69: ...vous sur le site www dlna org La norme DLNA vous permet d afficher et de lire les photos la musique et les vid os m moris es sur le serveur multim dia DLNA connect votre r seau domestique 1 Installati...

Page 70: ...d il vous sera impossible d installer le CD 7 Cliquez sur le bouton Suivant Sur l cran suivant vous pouvez d finir vos pr f rences d installation 8 Cliquez sur le bouton Installer L installation comme...

Page 71: ...s cm Norsk Produktinformasjon Kommersiell merkevare Produkt nr Modell nr Energieffektivitet klasse Synlig skjermst rrelse diagonal ca tommer cm Portugu s Ficha do produto Marca Comercial Produto N Mod...

Page 72: ...ybie wy czonym Wat w Rozdzielczo obrazu pikseli Magyar Energiafogyaszt s bekapcsolva hagyott zemm dban Watt ves energiafogyaszt s kWh ves Energiafogyaszt s standby zemm dban Watt Energiafogyaszt s kik...

Page 73: ...n Eigenschaften Zubeh r 26 Fernbedienung 1 29 Anschl sse 30 Erste Installation 31 TV Men Funktionen 35 Allgemeine Bedienung 38 Softwareaktualisierung 39 Fehlerbehebung Tipps 39 Typische Anzeigemodi PC...

Page 74: ...n Sie das Netzkabel immer am Stecker trennen Sie das TV Ger t nicht durch Ziehen des Netzsteckers vom Netz Ber hren Sie niemals das Netzkabel den Stecker mit nassen H nden da dies einen Kurzschluss od...

Page 75: ...s versetzt Wenn Sie als n chstes das Fernsehger t einschalten wird die folgende Meldung angezeigt Das TV Ger t schaltet automatisch in den Standby Modus weil f r l ngere Zeit kein Signal vorhanden war...

Page 76: ...Fernbedienung um den Hauptmen Bildschirm aufzurufen Verwenden Sie die Links oder Rechts Tasteum ein Men Tab zu w hlen und dr cken Sie OK zum best tigen Verwenden Sie die Links Rechts Auf Ab Taste um...

Page 77: ...l der voreingestellten Kan le 1000 Kanalanzeige Bildschirmanzeige RF Antenneneingang 75 Ohm nicht geregelt Betriebsspannung 220 240V AC 50 Hz Audio German Nicam Stereo Audio Output Power WRMS 10 THD 2...

Page 78: ...nwendung 10 Farbige Kn pfe Folgen Sie den Instruktionen auf dem Bildschirm f r Funktionen der farbigen Kn pfe 11 Sprache Wechselt zwischen Tonmodi Analoges TV Anzeigen und wechselt Audio Untertitel Sp...

Page 79: ...SB Eingang Ihres TV Ger tes unterst tzt Ger te bis zu 500mA Das Anschlie en von Ger ten die diesen Wert berschreiten k nnen zu Sch den am Ger t f hren Stecker Typ Kabel Ger t Scart Verbindung hinten V...

Page 80: ...cht verf gbar Dr cken Sie OK um fortzusetzen Antenneninstallation Wenn SieAntenne im Bildschirm Suchart ausgew hlt haben wird das Fernsehger t nach digitalen terrestrischen Fernsehsendern suchen Wenn...

Page 81: ...Aus diesem Grund empfehlen wir f r die Aufnahme von HD Programmen stets USB Festplattenlaufwerke zu verwenden Trennen Sie w hrend der Aufnahme die USB HDD nicht vom Ger t ab Dies kann Sch den am TV Ge...

Page 82: ...cherte Foto Musik und Videodateien wiedergeben wenn Sie diese an Ihr TV Ger t anschlie en Schlie en Sie eine USB Festplatte an den USB Eingang seitlich am TV Ger t an Wenn Sie im Medienbrowser Modus d...

Page 83: ...igenen Namen anstatt mit dem HDMI Portnamen DVD Player Recorder 1 etc an den es angeschlossen ist gelistet Die Fernbedienung des TV Ger ts ist in der Lage automatisch die wichtigsten Funktionen durchz...

Page 84: ...s Niederspannungsschaltung verf gbar Filmmodus Filme werden mit einer unterschiedlichen Anzahl von Bildern je Sekunde bis zu normalen Fernsehprogrammen aufgezeichnet Schalten Sie diese Funktion ein we...

Page 85: ...u ndern m ssen Sie ein korrektes Passwort eingeben Sie k nnen in diesem Men die Men sperre Altersfreigaben kann sich je nach ausgew hltem Land ndern und Kindersicherung einfach einstellen Sie k nnen a...

Page 86: ...ken Sie die Taste Links oder Rechts um die Funktion zu aktivieren oder deaktivieren FollowMe TV Diese Funktion aktivieren oder deaktiveren FollowMe TV to DMR Diese Funktion aktivieren oder deaktiveren...

Page 87: ...b Zoom Dr cken Sie die gelbe Taste um Ereignisse in einem gr eren Zeitintervall zu sehen Allgemeine Bedienung Taste Blau Filter Anzeige der Filteroptionen SUBTTL Dr cken Sie die Subtitle Taste um das...

Page 88: ...Programm Androidbasierte mobile Ger te sollten die Software Version V4 2 und h her haben Fehlerbehebung Tipps Das TV Ger t schaltet sich nicht ein Vergewissern Sie sich dass das Netzkabel sicher in d...

Page 89: ...eigemodi PC Eingang In der folgenden Tabelle werden einige der blichen Video Display Modi dargestellt Unter Umst nden unterst tzt Ihr TV keine unterschiedlichen Aufl sungen Inhaltsverzeichnis Aufl sun...

Page 90: ...g rate Layer2 8Kbps 384Kbps Bit rate 16KHz 48KHz Sampling rate Layer3 8Kbps 320Kbps Bit rate 16KHz 48KHz Abtastrate wav LPCM WMA ASF WMA WMA Pro WMA 128bps 320Kbps Bit rate 8KHz 48Khz Sampling rate WM...

Page 91: ...efert an die Anschl sse Ihres TV Ger tes anschlie en k nnen Sie sich an die folgenden Aufl sungsinformationen halten 56Hz 60Hz 66Hz 70Hz 72Hz 75Hz 640x400 640x480 800x600 832x624 1024x768 1152x864 115...

Page 92: ...olchen Fall verwenden Sie ein Ethernet Kabel um Ihren Fernseher direkt mit der Netzwerk Steckdose zu verbinden LAN input on the rear side of the TV network wall socket Konfiguration der kabelgebundene...

Page 93: ...bleme mit der Audio Video Leistung haben nutzen Sie einen anderen USB Eingang Sie m ssen die SSID Ihres Modem s ndern wenn in der Umgebung andere Modems mit der gleichen SSID vorhanden sind Sonst k nn...

Page 94: ...ungen zu erhalten Sie ben tigen einen Hochgeschwindigkeitsanschluss f r das Modem Unterbrechung w hrend der Wiedergabe oder verlangsamte Reaktion Versuchen Sie in diesem Fall Folgendes Halten Sie mind...

Page 95: ...nstallationsdatei um die Installation zu starten Der Installations Assistent f hrt Sie durch den Installationsprozess 4 Der Voraussetzungsbildschirm wird zuerst eingeblendet Der Installationsassistent...

Page 96: ...Kan le mit den Tasten Programme w hlen Benutzen Sie die Tasten Links Rechts bzw Aufw rts Abw rts um im Portal zu navigieren Dr cken Sie zur Best tigung die Taste OK Um zur vorherigenAnzeige zu gelange...

Reviews: