background image

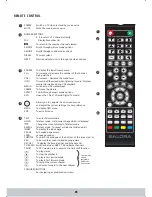
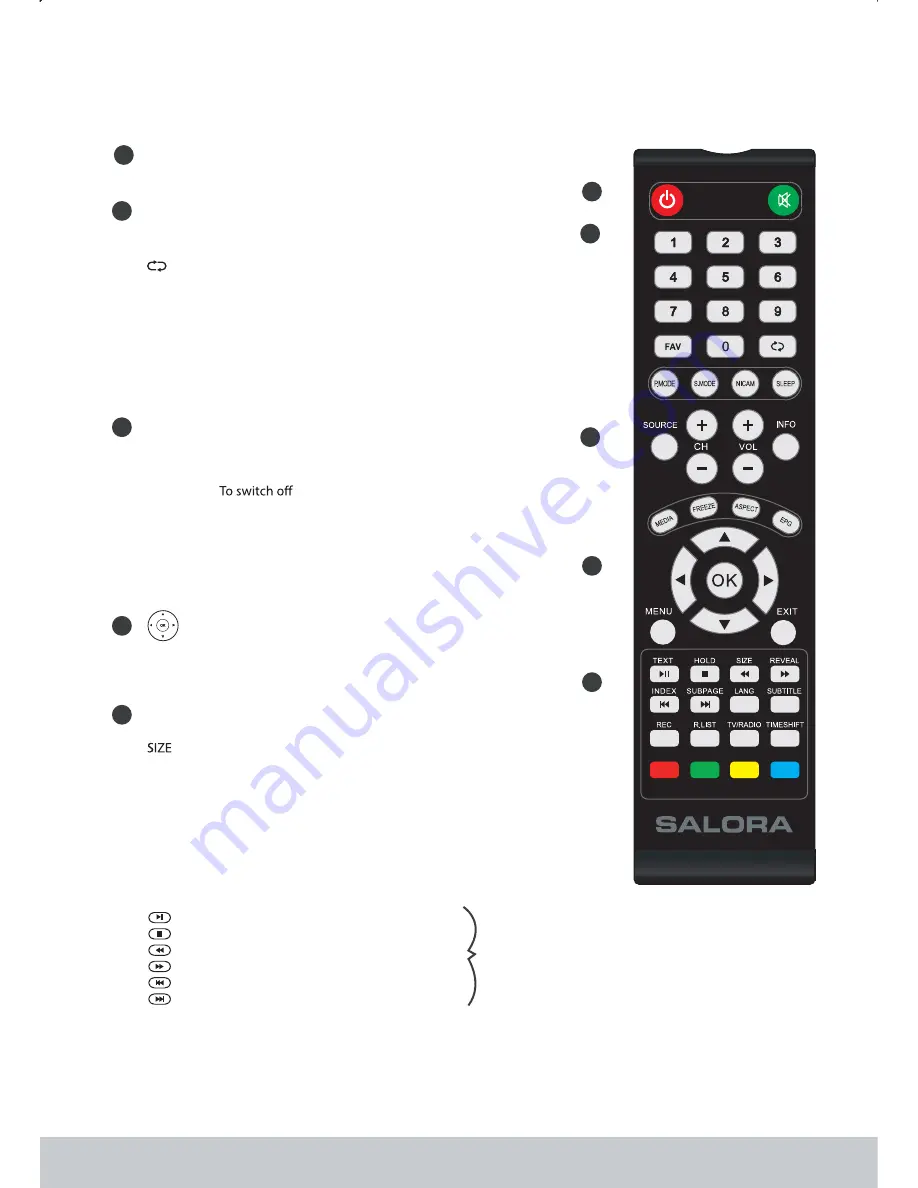
Switch on TV when in standby or vice versa

.

MUTE

POWER

Mute the sound or vice versa

.

SOURCE

To display the input source menu

/

P MODE

.

Scrolls through picture mode options

S MODE

.

Scrolls through sound mode options

ASPECT

Scrolls through aspect mode options
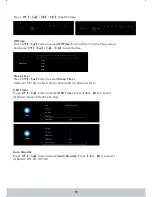
EPG

Opens the 7 Day TV Guide Digital TV mode

(

)

NICAM

SLEEP

Press repeatedly to cycle through the sleep options

FAV

Display Favourites List

.

REC LIST

To display the Recorded List and Schedule List

.

REC

NUMBER BUTTONS

0 9 to select a TV channel directly

-

.

To return to the previous channel viewed

.

COLOURED BUTTONS

For navigating as prompted on screen

the screen when listening to radio / displays

media information during USB playback

TV RADIO

/

Switches between DVB T TV and Radio channels
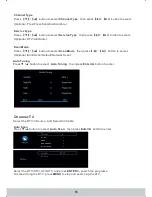
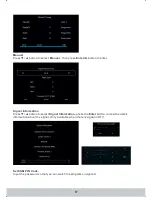
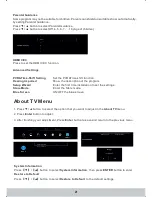
-

MENU

To display OSD menu

EXIT

To exit all menus

CH

+ -

To increase or decrease the number of the channel
being watched

VOL

+ -

To increase

decrease the sound level

/

To Record the current television programme

TEXT

To enter Teletext mode

HOLD

Teletext mode Hold current page which is displayed

-

REVEAL

Teletext mode To reveal or hide the hidden words

-

MEDIA

Switches to USB media screen

FREEZE

To freeze the picture

.

INDEX

To display the index page

S PAGE

.

Sub coded page access

.

SUBTITLE

To switch the dialogue at the bottom of the screen on o

(

/ )

LANG

Language options

.

T SHIFT

.

In DTV mode press to execute the time shift function

,

.

1

2

3

4

5

1

4

5

2

3

To play pause

/

To stop the playback
To play in fast rewind mode
To play in fast forward mode
To restart the current chapter
To advance forward to the next chapter

Only operates
when a
compatible
USB device
is connected

Allows you to navigate the on screen menus

-

and adjust the system settings to your preference

TV nicam select

.

INFO

Change the size of display in Teletext mode

.

R E M O T E CO N T R O L

08

Summary of Contents for 43UHL2600

Page 1: ...ith Ultra HD format Receive digital satellite TV standard DVB S2 Receive digital satellite TV standard DVB T2 IMPORTANT Please read this manual carefully before installing and operating the TV Keep th...

Page 2: ......

Page 3: ...Input Source Menu 07 Remote Control 08 Remote Control Preparation 09 Connections 10 11 TV Menu Operation 12 22 Setting Menu Picture Menu 12 12 13 Sound Menu 14 15 Time Menu 18 19 Channnel Menu 15 18 S...

Page 4: ...f interference is apparent move the device causing the interference away from the television To disconnect the apparatus from the mains disconnect the plug from the wall socket Always ensure the switc...

Page 5: ...en watching DVDs or videos Batteries Observe the correct polarity when inserting batteries erent types of batteries together or mix old and new batteries Dispose of batteries in an environmentally fri...

Page 6: ...re unable to package it correctly The safest way to package your item in the event of warranty service repair is in it s original box packaging WHAT IS INCLUDED IN THE BOX Accessories Included with th...

Page 7: ...onto the TV 3 Put the TV on the bracket IMPORTANT Before drilling any holes in the wall ensure you are not drilling where there could be any electric wires water or gas pipes Important If wall mounti...

Page 8: ...t another if you choose ATV DTV tuning in the previous screen press MENU To cancel completely press EXIT signal being received is not strong enough The signal strength needs to be above 85 you can see...

Page 9: ...n the Television 1 Press SOURCE 2 Scroll up down using CH CH buttons to the input source you require 3 Press Vol to change input source to the one selected Volume up down and menu left right Channel u...

Page 10: ...CH To increase or decrease the number of the channel being watched VOL To increase decrease the sound level To Record the current television programme TEXT To enter Teletext mode HOLD Teletext mode H...

Page 11: ...control sensor Do not place objects between the remote control and the remote control sensor Do not use this remote control while simultaneously operating the remote control of any other equipments Pr...

Page 12: ...m Connections nition HD Device Option 1 Via HDMI to HDMI cable A HDMI cable can output both video and audio and enables you to enjoy digital quality video and audio with minimal loss of quality Tv s I...

Page 13: ...s sible hearing loss may result er Connecting a DVD Player Recorder Video Recorder or Cable or PC Connecting a USB Ports Tv s Input Source should be set to SCART COAX OUT DVD or VCR ANT In SCART SCART...

Page 14: ...ew the program list you set to record Press button to select Setting Press to enter setting ENTER 1 Press button to select the option that you want to adjust in the menu 2 Press button to adjust 3 Aft...

Page 15: ...select press to select O Cool Standard Warm P a O On Off P a O Off Low Medium High nd press nd press Cool Standard Warm Dynamic Noice Reduction Produces a gentle blue hued image Produces a vivid image...

Page 16: ...anced sound in all environments Preserve the original sound Good for musical programs Enhance treble and bass for a rich sound experience Select to customize sound settings Standard Music Theater User...

Page 17: ...Select the DVB S in Source Channel Menu 1 Press button to select the option that you want to adjust in the menu 2 Press button to adjust 3 After finishing your adjustment Press button to save and retu...

Page 18: ...ect then press button to select O Blind Scan Default Network Scan ptional ptional ptional Press button to select then press button to enter Auto Tuning Auto Tuning Enter Channel T2 Select the DTV in S...

Page 19: ...Press button to select then press button to enter Press button to select press the button to view the detail information about the signal Only available when there is signal in DTV Set CAM PIN Code In...

Page 20: ...e 1 Press button to select the option that you want to adjust in the menu 2 Press button to adjust 3 After finishing your adjustment Press button to save and return to the previous menu Time Enter MEN...

Page 21: ...the TV at the time you set And press Press button to select O 10min 20min 30min 60min 90min 120min 240min Off Time Off Time Press button to select Press to select O 20s 30s 60 Press button to select...

Page 22: ...ter Enter System Menu Language Language MENU Language Audio Language Primary Audio Language Secondary Audio Language Subtitle Language Primary Subtitle Language Secondary Subtitle Language Lock Lock P...

Page 23: ...ion Set the PVR Time shift function Show the description of the program Enter the first time installation to set the settings Enter the Store mode ON OFF the blue screen 1 Press button to select the o...

Page 24: ...The default password 1417 Press button to select Press button to select to lock unlock the channel green button Lock Set Password Set Password Channel Lock Channel Lock and p and press Key Lock Selec...

Page 25: ...set the time to record the program Remind Press to set the time to remind you the program and change to the program at the time you set PVR Press PVR button on the remoter to select Press Play button...

Page 26: ...ress button to select MUSIC in the main menu then press button to enter Enter Enter Press button to select drive disk you want to watch then press button to enter Press button to select return option...

Page 27: ...enter Enter Enter Press button to select drive disk you want to watch then press button to enter Press button to select return option to back to the previous menu When highlighting the option you sele...

Page 28: ...26...

Page 29: ...Recording and Playback 2 8W 16 9 4800 1 6000 1 1200 1 8ms 8ms 6ms 941 184 H 529 416 V 1087 7 H 617 8 V 1087 7 H 617 8 V Movie Music 3 AVI MPEG MKV RMVB MP WAV Photo Text JPG JPEG TXT AC 100V 240V 50Hz...

Page 30: ...28...

Page 31: ......

Page 32: ......

Reviews: