background image


DEEL II:


Speciale versie 


Lees deze handleiding zorgvuldig door voordat u de vaatwasser in 
gebruik neemt en bewaar deze handleiding voor toekomstig gebruik.


Vaatwasser 

Handleiding 


Summary of Contents for VWC55

Page 1: ...DEEL I Algemene versie Lees deze handleiding zorgvuldig door voordat u de vaatwasser in gebruik neemt en bewaar deze handleiding voor toekomstig gebruik Vaatwasser Handleiding VWC55 ...

Page 2: ... EN50242 OPMERKING Door het gedeelte over tips voor probleemoplossing te raadplegen kunt u enkele veelvoorkomende problemen zelf oplossen Als u de problemen niet zelf kunt oplossen vraagt u een professionele monteur om hulp De fabrikant kan volgens het beleid van continue ontwikkeling en actualisering van het product wijzigingen aanbrengen zonder voorafgaande kennisgeving Bij verlies van de handle...

Page 3: ...3 ...

Page 4: ... apparaat reinigt of onderhoud uitvoert Gebruik een zachte doek bevochtigd met een milde zeep en gebruik vervolgens een droge doek om af te vegen Dit apparaat moet worden geaard In het geval van een storing of defect vermindert aarding het risico op een elektrische schok doordat voor de elektrische stroom een pad met de minste weerstand wordt gecreëerd Dit apparaat is uitgerust met een geaarde ste...

Page 5: ...voorwerpen op de deur en ga er niet op staan als deze open staat Het apparaat kan naar voren kantelen Bij het laden van de af te wassen vaat 1 Zoek naar de scherpe voorwerpen en plaats deze zodanig dat ze de deurafdichting niet kunnen beschadigen 2 Waarschuwing messen en andere gebruiksvoorwerpen met scherpe punten moeten met hun punten naar beneden of in een horizontale positie in de korf worden ...

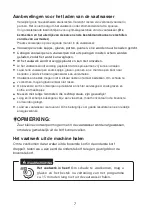
Page 6: ...t u deze voor uw veiligheid laten vervangen door de fabrikant of diens servicevertegenwoordiger of een vergelijkbaar gekwalificeerde persoon Bij het installeren mag de voedingskabel niet overmatig of gevaarlijk worden geknikt of platgedrukt Modificeer of open de bedieningselementen niet Het apparaat moet met nieuwe slangensets op de waterkraan worden aangesloten Oude sets mogen niet opnieuw worden...

Page 7: ... dit product op de juiste wijze wordt verwijderd helpt u de mogelijke nadelige gevolgen voor het milieu en de menselijke gezondheid voorkomen die anders zouden zijn veroorzaakt door onjuiste afvalverwerking van het product Neem voor meer informatie over het recyclen van dit product contact op met uw plaatselijke stadskantoor of gemeentehuis en uw afval of vuilophaaldienst VERWIJDERING Gooi dit pro...

Page 8: ...er alle bedieningsinstructies voordat u deze voor het eerst gebruikt Sproeiarm Filtereenheid Vaatwasmiddelbakje Kopjesrek Korf Bestekmand OPMERKING Afbeeldingen zijn alleen ter referentie modellen kunnen van elkaar verschillen Op de hoofdpunten komen ze met elkaar overeen 8 ...

Page 9: ...het grove vuil van de afwascyclus tegen Opgehoopt grof vuil kan de filters verstoppen Controleer regelmatig de toestand van de filters en reinig deze indien nodig onder de stromende kraan Volg onderstaande stappen om de filters van de afwaskuip te reinigen OPMERKING Afbeeldingen zijn alleen ter referentie de modellen van de filtereenheid en de sproeiarmen kunnen van elkaar verschillen Op de hoofdp...

Page 10: ...ekeerde volgorde terug plaats het filterinzetstuk terug en draai dit rechtsom tot de pijlpunt dicht WAARSCHUWING Draai de filters niet te vast Plaats de filters in de juiste volgorde en op de juiste wijze terug omdat anders grof vuil in het systeem kan komen en een verstopping kan veroorzaken Gebruik de vaatwasser nooit zonder filters Onjuiste terugplaatsing van de filters kan het prestatieniveau ...

Page 11: ...erming van de vaatwasser Ga na elke afwascyclus als volgt te werk 1 Onderbreek de stroomtoevoer naar de vaatwasser bij de voedingsbron 2 Draai de watertoevoer dicht en maak de watertoevoerleiding los van het waterinlaatventiel 3 Laat het water uit de watertoevoerleiding en het waterinlaatventiel lopen Gebruik een pan om het water op te vangen 4 Sluit de watertoevoerleiding weer aan op het waterinl...

Page 12: ...eren Wanneer niet in gebruik voor langere tijd Het wordt aanbevolen één afwascyclus met lege vaatwasser te draaien en vervolgens de stekker uit het stopcontact te halen de watertoevoer dicht te draaien en de deur van het apparaat iets open te laten Hierdoor gaan de deurafdichtingen langer mee en ontstaan geen luchtjes in het apparaat Het apparaat verplaatsen Als het apparaat moet worden verplaatst...

Page 13: ... typeplaatje Steek de stekker alleen in een stopcontact dat correct geaard is Als het stopcontact waarop het apparaat moet worden aangesloten niet geschikt is voor de stekker vervangt u het stopcontact in plaats van adapters en dergelijke te gebruiken deze kunnen oververhitting en brand veroorzaken Zorg er vóór gebruik voor dat correcte aarding aanwezig is WAARSCHUWING Gevaar van elektrische schok...

Page 14: ...sluiten 1 Trek de toevoerslang volledig uit het opbergvak aan de achterkant van de vaatwasser 2 Draai de schroefdraad van de toevoerslang op een kraan met een schroefdraad van 3 4 inch 3 Draai de kraan volledig open voordat u de vaatwasser start De toevoerslang loskoppelen 1 Draai de kraan dicht 2 Draai de schroefdraad van de toevoerslang los van de kraan Watertoevoer en afvoer WAARSCHUWING De sla...

Page 15: ...afvoerslang niet wordt geknikt of geplet De hoogte waar de slang in de afvoerbuis steekt mag max 600 mm zijn Het vrije uiteinde van de slang mag niet in water worden ondergedompeld dit om terugstromen te voorkomen Bevestig de afvoerslang stevig op de positie A of B Aanrechtblad A Achterkant vaatwasser Afvoerbuis B Connector toevoerslang Afvoerslang Voedingskabel Max 600 mm ...

Page 16: ...erslang wilt verlengen moet u erop letten dat u een gelijksoortig slangtype gebruikt Het verlengstuk mag niet langer zijn dan 4 m omdat anders het reinigend effect van de vaatwasser minder kan worden Aansluiting op sifon De aansluiting van het afvoerwater moet op een hoogte zijn op max 100 cm afstand van de onderkant van de vaatwasser De afvoerwaterslang moet vast worden bevestigd Plaats het appar...

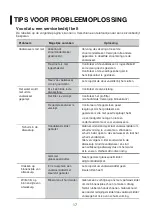
Page 17: ...steenafvoer is verstopt Controleer of de gootsteen goed leegloopt Als het probleem een gootsteen is die niet goed leegloopt hebt u een loodgieter nodig en niet een onderhoudsmonteur voor vaatwassers Schuim in de afwaskuip Handafwasmiddel gebruikt Gebruik uitsluitend speciaal vaatwasmiddel om schuimvorming te voorkomen Wanneer u schuim hebt opent u de vaatwasser en laat het schuim verdampen Giet ve...

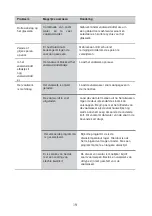
Page 18: ...iameter van de waterleidingen komen Het heeft geen invloed op de werking van de vaatwasser Wanneer u twijfelt neemt u contact op met een gekwalificeerde loodgieter De vaat is niet schoon Het vaatwerk was niet goed gerangschikt Zie DEEL II Voorbereiden en laden van de vaat Het programma was niet krachtig genoeg Selecteer een intensiever programma Er is niet voldoende vaatwasmiddel gebruikt Gebruik ...

Page 19: ...vaatwerk is onjuist geladen Laad de vaatwasser zoals aangegeven in de instructies De vaat wordt te snel uitgeladen Laad de vaat niet meteen uit na het afwassen Open de deur iets zodat de stoom kan ontsnappen Begin pas met het uitladen van de vaatwasser als de vaat nauwelijks nog warm aanvoelt Leeg als eerste de onderste korf Dit voorkomt dat water van de vaat in de bovenste korf drupt Het verkeerd...

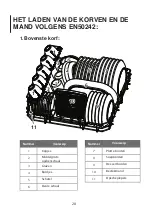
Page 20: ...lazen 4 Bordjes 5 Schotel 6 Ovale schaal Nummer Voorwerp 7 Platte borden 8 Soepborden 9 Dessertborden 10 Bestekmand 11 Opscheplepels HET LADEN VAN DE KORVEN EN DE MAND VOLGENS EN50242 1 Bovenste korf 1 1 4 4 1 1 3 3 3 3 5 5 2 2 9 9 7 7 8 8 6 6 3 3 10 10 11 11 ...

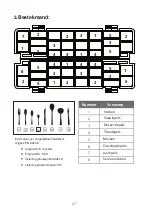
Page 21: ...6 couverts Programma ECO Instelling glansspoelmiddel 6 Instelling waterontharder H4 1 2 3 4 5 6 7 8 Nummer Voorwerp 1 Vorken 2 Soeplepels 3 Dessertlepels 4 Theelepels 5 Messen 6 Opscheplepels 7 Juslepels 8 Serveervorken 7 2 2 3 1 5 2 1 5 3 4 4 4 5 8 2 5 5 4 1 4 4 2 5 3 1 6 1 1 3 3 3 2 ...

Page 22: ...DEEL II Speciale versie Lees deze handleiding zorgvuldig door voordat u de vaatwasser in gebruik neemt en bewaar deze handleiding voor toekomstig gebruik Vaatwasser Handleiding ...

Page 23: ...erwege de cyclus wijzigen Vaatwerk vergeten te laden FOUTCODES TECHNISCHE INFORMATIE OPMERKING Als u de problemen niet zelf kunt oplossen vraagt u een professionele monteur om hulp De fabrikant kan volgens het beleid van continue ontwikkeling en actualisering van het product wijzigingen aanbrengen zonder voorafgaande kennisgeving Bij verlies van de handleiding of als deze verouderd is kunt u een n...

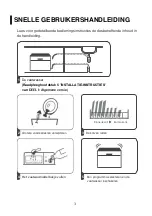
Page 24: ...rde bedieningsinstructies de desbetreffende inhoud in de handleiding Raadpleeg hoofdstuk 5 INSTALLATIE INSTRUCTIES van DEEL I Algemene versie 2 Grotere voedselresten verwijderen 5 Een programma selecteren en de vaatwasser inschakelen 1 De vaatwasser installeren 4 Het vaatwasmiddelbakje vullen ...

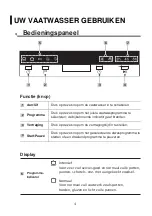
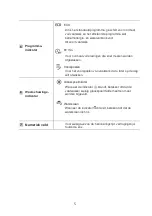
Page 25: ... branden 3 Vertraging Druk op deze knop om de vertragingstijd in te stellen 4 Start Pauze Druk op deze knop om het geselecteerde afwasprogramma te starten of een draaiend programma te pauzeren Display 5 Programma indicator Intensief Voor zeer vuil serviesgoed en normaal vuile potten pannen schotels enz met aangekoekt voedsel Normaal Voor normaal vuil vaatwerk zoals potten borden glazen en licht vu...

Page 26: ...el moeten worden afgewassen Voorspoelen Voor het voorspoelen van vaatwerk dat u later op de dag wilt afwassen Glansspoelmiddel Wanneer de indicator brandt betekent dit dat de 6 Waarschuwings indicator vaatwasser weinig glansspoelmiddel heeft en moet worden bijgevuld Waterkraan Wanneer de indicator brandt betekent dit dat de waterkraan dicht is 7 Numeriek veld Voor weergave van de herinneringstijd ...

Page 27: ...f parelmoeren handvatten Plastic vaatwerk dat niet hittebestendig is Ouder bestek met gelijmde delen die niet hittebestendig zijn Gelijmd keukengerei of gelijmd vaatwerk Tinnen of koperen vaatwerk Kristallen glazen Stalen vaatwerk dat kan roesten Houten schotels Vaatwerk gemaakt van synthetische vezels beperkt geschikt Bepaalde glassoorten kunnen na een groot aantal vaatwasbeurten dof worden Zilve...

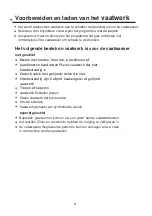
Page 28: ...n kant naar beneden zodat zich daarin geen water kan verzamelen Vaatwerk en bestek mogen niet in elkaar nesten of elkaar bedekken Om schade te voorkomen mogen glazen elkaar niet raken De bovenste korf is ontworpen op delicater en lichter serviesgoed zoals glazen en koffie en theekopjes Messen met lange lemmeten die rechtop staan zijn gevaarlijk Lang en of scherp keukengerei bijv een vleesmes moet ...

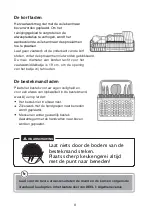
Page 29: ...ing van het bakje vrij te houden De bestekmand laden Plaats het bestek voor uw eigen veiligheid en voor een afwas van topkwaliteit in de bestekmand waarbij u erop let dat Het bestek niet in elkaar nest Zilverwerk met de handgrepen naar beneden wordt geplaatst Messen en ander gevaarlijk bestek daarentegen met de handvatten naar boven worden geplaatst WAARSCHUWING Laat niets door de bodem van de bes...

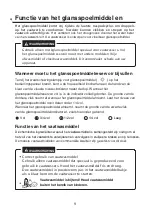
Page 30: ...grootte van de zwarte vlek van de glansspoelmiddelindicator af zoals hieronder getoond Vol 3 4 vol 1 2 vol 1 4 vol Leeg Functie van het vaatwasmiddel De chemische ingrediënten waaruit het vaatwasmiddel is samengesteld zijn nodig om al het vuil van het vaatwerk te verwijderen en vervolgens in stukjes te breken en op te lossen De meeste vaatwasmiddelen van commerciële kwaliteit zijn geschikt voor di...

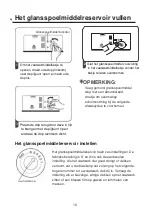
Page 31: ...laats de dop terug door deze in lijn te brengen met de pijlpunt open en draai de dop rechtsom dicht Het glansspoelmiddelreservoir instellen Het glansspoelmiddelreservoir heeft zes instellingen De fabrieksinstelling is 4 en dit is ook de aanbevolen instelling Als het vaatwerk niet goed droogt of vlekken vertoont zet u de draaiknop net zo lang op het volgende hogere nummer tot uw vaatwerk vlekvrij i...

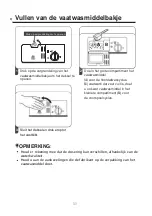
Page 32: ...scyclus Bij vaatwerk dat zeer vuil is doet u ook wat vaatwasmiddel in het kleinere compartiment B voor de voorspoelcyclus 3 Sluit het deksel en druk erop tot het vastklikt OPMERKING Houd er rekening mee dat de dosering kan verschillen afhankelijk van de waterkwaliteit Houd u aan de aanbevelingen die de fabrikant op de verpakking van het vaatwasmiddel doet Vullen van de vaatwasmiddelbakje ...

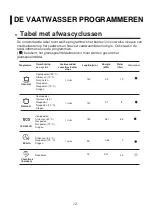
Page 33: ...ogramma Intensief Normaal EN 50242 90 min Omschrijving van cyclus Voorspoelen 50 C Afwassen 70 C Naspoelen Naspoelen Naspoelen 70 C Drogen Voorspoelen Afwassen 60 Naspoelen Naspoelen 70 C Drogen Voorspoelen Afwassen 50 C Naspoelen Naspoelen 70 C Drogen Afwassen 65 C Naspoelen 70 C Drogen Vaatwasmiddel voorafwas hoofd afwas 1 stuks 1 stuks 1 stuks 1 stuks Looptijd min 140 120 180 90 Energie kWh 0 9...

Page 34: ...treffende lampje gaat branden Druk vervolgens op de Start Pauze knop de vaatwasser start de cyclus Een afwascyclus kan alleen nog worden gewijzigd als deze slechts korte tijd heeft gedraaid anders is het afwasmiddel al vrijgegeven of heeft de vaatwasser het afwaswater al afgevoerd Als dit het geval is moet de vaatwasser worden gereset en het vaatwasmiddelbakje opnieuw worden gevuld Volg onderstaan...

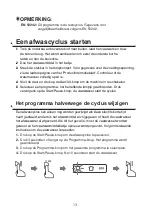
Page 35: ...e instructies 1 Druk op de Start Pauze knop om de afwascyclus te pauzeren 2 Wacht 5 seconden en open de deur 3 Voeg het vaatwerk toe 4 Sluit de deur 5 Druk op de Start Pauze knop Na 10 seconden start de vaatwasser Na 5 sec WAARSCHUWING Het is gevaarlijk om halverwege de cyclus de deur te openen omdat u zich aan de hete stoom kunt branden ...

Page 36: ...kt Kraan is niet open watertoevoer is beperkt of waterdruk is te laag Storing verwarmingselement De ECO indicator knippert snel Overloop Een component van de vaatwasser lekt WAARSCHUWING Wanneer sprake is van overloop draait u eerst de watertoevoer dicht en belt vervolgens een servicebedrijf Als er water in de afwaskuip aanwezig is als gevolg van een overloop of kleine lekkage moet u dit water ver...

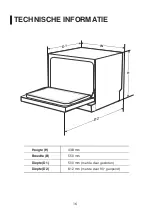
Page 37: ...16 TECHNISCHE INFORMATIE Hoogte H 438 mm Breedte B 550 mm Diepte D1 500 mm met de deur gesloten Diepte D2 812 mm met de deur 90 geopend D1 D1 W W H H D2 D2 ...

Page 38: ... Energieverbruik 1170 1380 W Nominale spanning frequentie 220 240 V 50 Hz Waterdruk stromingsdruk 0 04 1 0 MPa 0 4 10 bar OPMERKING 1 A hoogste efficiëntie tot D laagste efficiëntie 2 Energieverbruik gebaseerd op 280 standaard afwascyclussen met koud water vulling en het gebruik van de energiezuinige stand Het feitelijke energieverbruik is afhankelijk van hoe het apparaat wordt gebruikt Waterverbr...

Page 39: ...PARTⅠ Generic Version Please read this manual carefully before using the dishwasher and Keep this manual for future reference VWC55 ...

Page 40: ...IPS 17 NOTE Reviewing the section on troubleshooting Tips will help you solve some common problems by yourself If you cannot solve the problems by yourself please ask for help from a professional technician The manufacturer following a policy of constant development and updating of the product may make modifications without giving prior notice If lost or out of date you can receive a new user manu...

Page 41: ...akfast type environments This appliance can be used by children aged from 8 years and above and persons with reduced physical sensory or mental capabilities or lack of experience and knowledge if they have been given supervision or instruction concerning use of the appliance in a safe way and understand the hazards involved Children shall not play with the appliance Cleaning and user maintenance s...

Page 42: ...loth moistened with mild soap and then use a dry cloth to wipe it again Earthing Instructions 4 This appliance must be earthed In the event of a malfunction or breakdown earthing will reduce the risk of an electric shock by providing a path of least resistance of electric current This appliance is equipped with an earthing conductor plug The plug must be plugged into an appropriate outlet that is ...

Page 43: ...eavy objects on or stand on the door when it is open The appliance could tip forward When loading items to be washed 1 Locate sharp items so that they are not likely to damage the door seal 2 Warning Knives and other utensils with sharp points must be loaded in the basket with their points facing down or placed in a horizontal position Some dishwasher detergents are strongly alkaline They can be e...

Page 44: ... it must be replaced by the manufacturer or its service agent or a similarly qualified person in order to avoid a hazard During installation the power supply must not be excessively or dangerously bent or flattened Do not tamper with controls The appliance needs to be connected to the main water valve using new hose sets Old sets should not be reused To save energy in stand by mode the appliance w...

Page 45: ...nsuring this product is disposed of correctly you will help prevent potential negative consequences for the environment and human health which could otherwise be caused by inappropriate waste handling of this product For more detailed information about recycling of this product please contact your local city office and your household waste disposal service DISPOSAL Do not dispose this product as u...

Page 46: ...our dishwasher read all operating instructions before using it for the first time IMPORTANT Pictures are only for reference different models may be different Please prevail in kind NOTE 8 Filter assembly Dispenser Cutlery rack Basket Cup rack Spray arm ...

Page 47: ... into the door lock and electrical components do not use a spray cleaner of any kind Never use abrasive cleaners or scouring pads on the outer surfaces because they may scratch the finish Some paper towels may also scratch or leave marks on the surface WARNING Internal Care Filtering system The filtering system in the base of the wash cabinet retains coarse debris from the washing cycle The collec...

Page 48: ... Reassemble the filters in the reverse order of the disassembly replace the filter insert and rotate clockwise to the close arrow Do not over tighten the filters Put the filters back in sequence securely otherwise coarse debris could get into the system and cause a blockage Never use the dishwasher without filters in place Improper replacement of the filter may reduce the performance level of the ...

Page 49: ...ction measures on the dishwasher in winter Every after washing cycles please operate as follows 1 Cut off the electrical power to the dishwasher at the supply source 2 Turn off the water supply and disconnect the water inlet pipe from the water valve 3 Drain the water from the inlet pipe and water valve Use a pan to gather the water 4 Reconnect the water inlet pipe to the water valve 5 Remove the ...

Page 50: ...When not in use for a longtime It is recommend that you run a wash cycle with the dishwasher empty and then remove the plug from the socket turn off the water supply and leave the door of the appliance slightly open This will help the door seals to last longer and prevent odors from forming within the appliance Moving the appliance If the appliance must be moved try to keep it in the vertical posi...

Page 51: ... Connection WARNING For personal safety Do not use an extension cord or an adapter plug with this appliance Do not under any circumstances cut or remove the earthing connection from the power cord The installation of the pipes and electrical equipments should be done by professionals Attention WARNING Electrical Shock Hazard Disconnect electrical power before installing dishwasher Failure to do so...

Page 52: ...he appliance ordinary supply hose How to connect the supply hose 1 Pull The supply hoses completely out from storage compartment located at rear of dishwasher 2 Tighter the screws of the supply hose to the faucet with thread 3 4inch 3 Turn water fully on before starting the dishwasher WARNING A hose that attaches to a sink spray can burst if it is installed on the same water line as the dishwasher...

Page 53: ... with a minimum diameter of 4 cm or let it run into the sink making sure to avoid bending or crimping it The height of drain pipe must be less than 600mm The free end of the hose must not be immersed in water to avoid the back flow of it 15 B A MAX 600mm Counter Drain pipe Back of dishwasher Inlet pipe connector Drain pipe Mains Cable ...

Page 54: ... the excess water in hoses cannot be drained directly into the sink It will be necessary to drain excess water from hoses into a bowl or suitable container that is held outside and lower than the sink Connect the water drain hose The drain hose must be correctly fitted to avoid water leaks Ensure that the water drain hose is not kinked or squashed The waste connection must be at a height less than...

Page 55: ... section titled Internal Care Kitchen sink clogged Check the kitchen sink to make sure it is draining well If the problem is the kitchen sink that is not draining you may need a plumber rather than a serviceman for dishwashers Suds in the tub Improper detergent Use only the special dishwasher detergent to avoid suds If this occurred open the dishwasher and let suds evaporate Add 1 gallon of cold w...

Page 56: ...r pipes This may be caused by on site installation or the cross section of the piping This has no influence on the dishwasher function If in doubt contact a qualified plumber The dishes are not clean The dishes were not loaded correctly See PART Ⅱ Preparing And Loading Dishes The programme was not powerful enough Select a more intensive programme Not enough detergent was dispensed Use more deterge...

Page 57: ...ishwasher immediately after washing Open the door slightly so that the steam can escape Begin unloading the dishwasher only once the dishes are barely warm to the touch Empty the low basket first This prevents water form dropping off dishes in the upper basket Detergent left in dispenser cups Dishes block detergent dispenser cups Re loading the dishes properly Wrong program has been selected In sh...

Page 58: ... EN50242 20 1 2 3 4 5 6 Cups Medium serving bowl Glasses Saucers Dish Oval platter Item Number 1 1 4 4 1 1 3 3 3 3 5 5 2 2 9 9 7 7 8 8 6 6 3 3 10 10 11 11 7 8 9 10 11 Dinner plates Soup plates Dessert dishes Cutlery basket Serving spoons Item Number ...

Page 59: ...pacity 6 place settings Program ECO Rinse aid setting 6 Softener setting H4 7 2 2 3 1 5 2 1 5 3 4 4 4 5 8 2 5 5 4 1 4 4 2 5 3 1 6 1 1 3 3 3 2 1 2 3 4 Forks Soup spoons Dessert spoons Teaspoons Item Number 5 6 7 8 Knives Serving spoons Gravy ladles Serving forks 21 2 3 1 6 4 4 4 5 8 7 ...

Page 60: ...PARTⅡ Special Version Please read this manual carefully before using the dishwasher Keep this manual for future reference ...

Page 61: ...rior notice If lost or out of date you can receive a new user manual from the manufacturer or responsible vendor PROGRAMMING THE DISHWASHER Wash Cycle Table Starting A Cycle Wash Changing The Program Mid cycle Forget To Add A Dish USING YOUR DISHWASHER Control Panel Preparing And Loading Dishes Function Of The Rinse Aid And Detergent Filling The Rinse Aid Reservoir Filling The Detergent Dispenser ...

Page 62: ...or detailed operating method 2 Removing the larger residue on the cutlery 3 Loading the baskets 4 Filling the dispenser Selecting a program and running the dishwasher Inside Outside 3 1 Install the dishwasher Please check the section 5 INSTALLATION INSTRUCTION of PART Ⅰ Generic Version ...

Page 63: ...ram or pause the working program 4 Start Pause Press the button to set the delay time Press this button to select the appropriate washing program corresponding indicator will be lit Display Intensive For heaviest soiled crockery and normally soiled pots pans dishes etc With dried on food 5 Program indicator Normal For normally soiled loads such as pots plates glasses and lightly soiled pans ...

Page 64: ...o clean normally soiled tableware and it is the most efficient program in terms of its combined energy and water consumption for that type of tableware Screen To show the reminding time delay time error code etc 7 Water Faucet If the indicator is lit it means the water faucet is not open 90Min For normally soiled loads that need quick wash To rinse dishes that you plan to wash later that day Soak ...

Page 65: ...s Plastic items that are not heat resistant Older cutlery with glued parts that are not temperature resistant Bonded cutlery items or dishes Pewter or cooper items Crystal glass Steel items subject to rusting Wooden platters Items made from synthetic fibres Some types of glasses can become dull after a large number of washes Silver and aluminum parts have a tendency to discolour during washing Gla...

Page 66: ...arving knives must be positioned horizontally in the upper basket Please do not overload your dishwasher This is important for good results and for reasonable consumption of energy NOTE Very small items should not be washed in the dishwasher as they could easily fall out of the basket To prevent water dripping from the upper basket into the lower basket we recommend that you empty the lower basket...

Page 67: ...l safety and a top quality cleaning place the silverware in the basket making sure that They do not nest together Silverware is placed with the handles down But place knives and other potentially dangerous utensils are placed handles up All tableware can t be placed face up in order to improve the cleaning area and washing performance it is recommended to place the dirty side towards the spray arm...

Page 68: ...r is full the indicator will be fully dark The size of the dark dot decreases as the rinse aid diminishes You should never let the rinse aid level be less than 1 4 full As the rinse aid diminishes the size of the black dot on the rinse aid level indicator changes as illustrated below Full 3 4 full 1 2 full 1 4 full Empty Function Of The Rinse Aid And Detergent Function of detergent The chemical in...

Page 69: ... the rinse aid into its dispenser whilst avoiding it to overflow Rinse Aid indicator Filling The Rinse Aid Reservoir Adjusting the rinse aid reservoir The rinse aid reservoir has six settings Both the recommended setting and the factory setting is 4 If the dishes are not drying properly or are spotted adjust the dial to the next higher number until your dishes are spot free Reduce it if there are ...

Page 70: ...r cavity A for the main wash cycle For more heavily soiled wash loads also add some detergent into the smaller cavity B for the pre wash cycle 3 Close the cover and press on it until it locks into place NOTE Be aware that depending on the soiling of water setting may be different Please observe the manufacturer s recommendations on the detergent packaging 11 ...

Page 71: ... to fill rinse into the Rinse Aid Dispenser Program Running Time min 140 120 180 90 15 Energy Kwh 0 9 0 7 0 61 0 65 0 01 Water L 10 8 6 5 7 2 2 Description Of Cycle Pre wash 50 Wash 70 Rinse Rinse Rinse 70 Drying Pre wash Wash 60 Rinse Rinse 70 Drying Pre wash Wash 50 Rinse Rinse 70 Drying Wash 65 Rinse 70 Drying Rinse Aid Detergent Pre Main Intensive Normal 90 Min Soak EN 50242 1 piece Pre wash R...

Page 72: ... response light will turn on Then press the Start Pause button the dishwasher will start its cycle Changing The Program Mid cycle A wash cycle can only be changed if it has been running for a short time otherwise the detergent may have already been released and the dishwasher may have already drained the wash water If this is the case the dishwasher needs to be reset and the detergent dispenser mu...

Page 73: ...w the instructions below 1 Press the Start Pause button to pause the washing 2 Wait 5 seconds then open the door 3 Add the forgotten dishes 4 Close the door 5 Press the Start Pause button after 10 seconds the dishwasher will start After 5 sec WARNING It is dangerous to open the door mid cycle as hot steam may scald you 14 ...

Page 74: ...rfill or small leak the water should be removed before restarting the dishwasher Codes Meanings Possible Causes Longer inlet time Overflow Some element of dishwasher leaks Faucets is not opened or water intake is restricted or water pressure is too low The ECO indicator flickers fleetly The Soak indicator flickers fleetly The Soak and flicker fleetly Not reaching required temperature Malfunction o...

Page 75: ...TECHNICAL INFORMATION Height H Width W Depth D1 Depth D2 438mm 550mm 500mm with the door closed 812mm with the door opened 90 16 D1 D1 W W H H D2 D2 ...

Page 76: ...d on 280 standard cleaning cycles using cold water fill and the consumption of the low power modes Actual energy consumption will depend on how the appliance is used Water consumption based on 280 standard cleaning cycles Actual water consumption will depend on how the appliance is used A highest efficiency to G lowest efficiency This program is suitable for cleaning soiled normally soiled tablewa...

Page 77: ......

Reviews: