background image


OWNER’S MANUAL  V. 1 ENGLISH 
PT-297 MOTORIZED TREADMILL  
 
         This manual is available at 

www.salter.es


12 


ENGLISH 

6. ADJUSTMENTS 


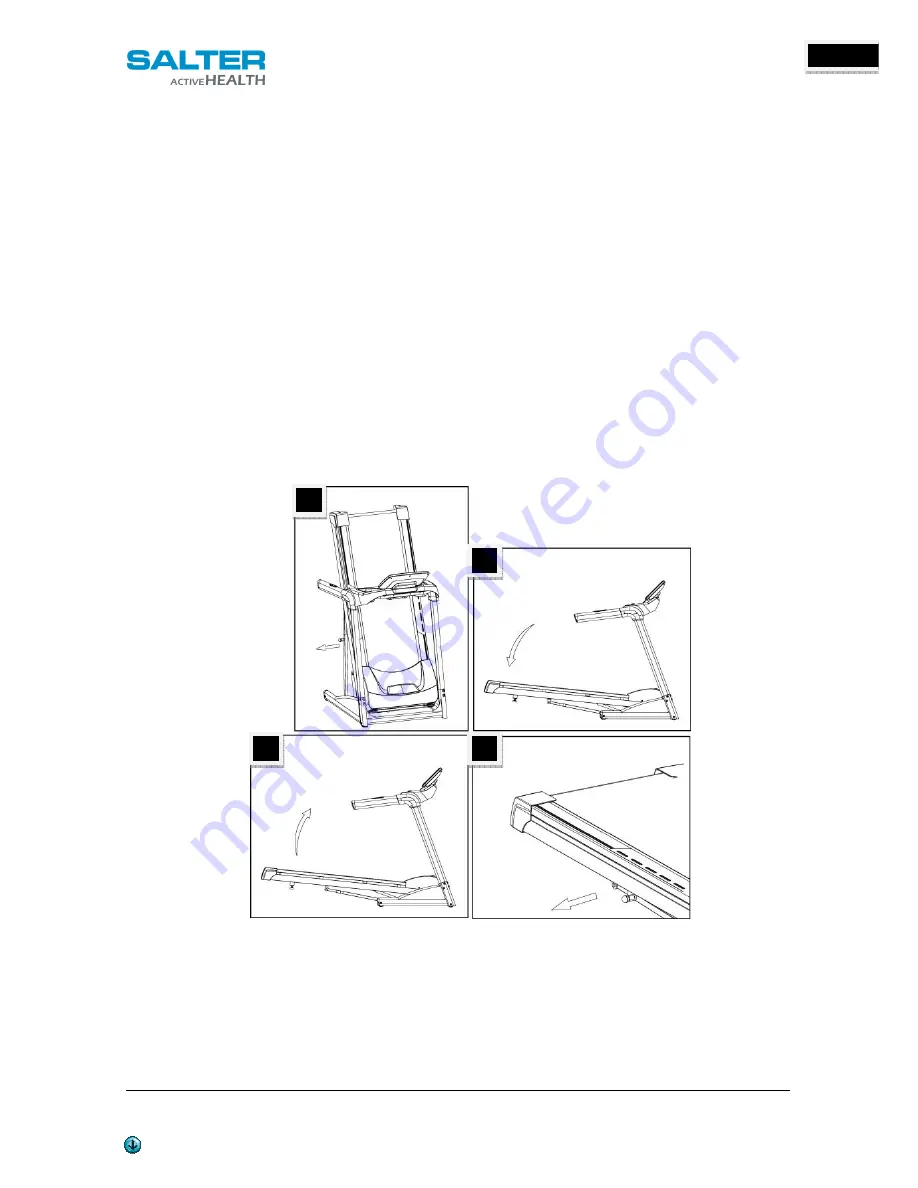
UNFOLDING 

Pull locking knob and hold running deck and lower down to the floor.  
(As shown Figure 1_2.) 


FOLDING 

Pull the locking knob with right hand, left hand lift the running deck up to 30cm then two hands lift it until it is 
locked by the locking knob. (As shown in Figure 3_4)  


TRANSPORT 

Before moving the treadmill, convert the treadmill to the storage as described above. Make sure that the Locking 
Knob is closer fully over the frame guide. 


1).Hold the upper ends of the handrails. Place one foot on the base. 
2).Tilt the treadmill back until it rolls freely on the rear wheels. Carefully move the treadmill to the 
desired location. To reduce the risk of injury, use extreme caution while moving the treading. Do not 
attempt to move the treadmill over an uneven surface. 
3).Place one foot on the base, and carefully lower the treadmill until it is resting in the storage position.  


1

2

3

4

Summary of Contents for PT-297

Page 1: ...S MANUAL V 1 ENGLISH PT 297 MOTORIZED TREADMILL This manual is available at www salter es 1 ENGLISH PT 297 CINTA DE CORRER MOTORIZADA MOTORIZED TREADMILL MANUAL DEL USUARIO OWNER S MANUAL ESPA OL ENG...

Page 2: ...Always choose the workout which best fits your physical strength and flexibility level Know your limits and train within them Always use common sense when exercising 12 Before using this product pleas...

Page 3: ...L V 1 ENGLISH PT 297 MOTORIZED TREADMILL This manual is available at www salter es 3 ENGLISH 2 MAIN PARTS Incline Adjustment Switch Running Belt Wheel Safety Key Console Main Frame Speed Adjustment Sw...

Page 4: ...m Sheet Metal Screw 4 N 103 M6 66 88 Allen Wrench 1 N 126 M5 35m m Phillips Head Screw 2 N 102 Combination M5 Allen Wrench Phillips Head Screw Driver 1 N 99 5 16 1 2 Button Head Socket Bolt 14 N 125...

Page 5: ...he smooth ground STEP 2 Connect the Computer Cable Lower 53 with the Right Upright 4 53 4 STEP 3 Insert the Uprights L R 5 4 into the Frame Base 2 with the 8pcs of 5 16 1 2 Button Head Socket Bolts 99...

Page 6: ...th the Computer Cable Lower 53 55 53 STEP 5 Install the Console Support 6 into the Uprights L R 5 4 with the 6pcs of 5 16 1 2 Button Head Socket Bolts 99 2pcs of 5 16 18 1 5T Flat Washers 100 and 4pcs...

Page 7: ...ailable at www salter es 7 ENGLISH STEP 6 Install the Outer Handlebar Covers L R 129 130 on the Console Support 6 with the 4pcs of 3 5 12 m m Sheet Metal Screws 74 by using the Combination M5 Allen Wr...

Page 8: ...pper cable 21 11 and 5 Pin HR receiver lower cable 90 8 55 21 10 90 7 21 9 21 11 90 8 STEP 8 Insert the Console Assembly 21 into the Console Support 6 Install the Console Assembly 21 and the Console S...

Page 9: ...fat burnt from 0 1 999 9 calories INCLINE Showing 16 incline levels from 0 15 PULSE Showing the heart rate value either wearing heart rate monitor stripe or gripping hand pulse sensor the heart rate...

Page 10: ...NUAL then press ENTER to set parameters First is setting weigh Use FAST SLOW buttons to adjust the weigh and press ENTER for next setting B Now the AGE will be displayed Use FAST SLOW buttons to selec...

Page 11: ...RT to begin the workout HRC HEART RATE CONTROL MODE The user preset a heart rate target and the program automatically adjusts the profile speed and inclination Wearing HR stripe is recommended to use...

Page 12: ...NSPORT Before moving the treadmill convert the treadmill to the storage as described above Make sure that the Locking Knob is closer fully over the frame guide 1 Hold the upper ends of the handrails P...

Page 13: ...er this prompt is shown two times the message will be deleted automatically It is important to lubricate periodically the treadmill WHEN YOU SHOULD LUBRICATE THE BELT 1 After the first 25 hours of use...

Page 14: ...t is recommended to use towels in order to avoid the sweat falling to the equipment Dust and dirt may be the cause of functioning problems in the gears and the internal bearings It is recommended keep...

Page 15: ...nsole Assembly 1 21 1 Console Top Cover 1 21 2 Console Bottom Cover 1 21 3 Top Book Rack 1 21 6 Fan 1 21 7 2 5 32m m_Sheet Metal Screw 4 21 9 350m m_Connecting Cable 1 21 10 350m m_Computer Cable Uppe...

Page 16: ...3 8 3 4 _Hex Head Bolt 4 63 M8 60m m_Hex Head Bolt 1 64 M8 12 m m_Hex Head Bolt 2 65 5 16 1 _Button Head Socket Bolt 2 66 3 8 4 1 2 _Socket Head Cap Bolt 1 67 3 8 2 _Flat Head Socket Bolt 4 68 1 2 1 1...

Page 17: ...peaker Grill Anchor Optional 3 114 4 3 10m m_Sheet Metal Screw Optional 3 115 Console Speaker Cover R 1 115 2 Speaker W Cable R Optional 1 115 3 Speaker Grill Anchor Optional 3 115 4 3 10m m_Sheet Met...

Page 18: ...OWNER S MANUAL V 1 ENGLISH PT 297 MOTORIZED TREADMILL This manual is available at www salter es 18 ENGLISH...

Page 19: ...cling point If properly dispose of the product may be reused and recycled and it will help to conserve natural resources preserve the environment and significally reduce the potential negative impact...

Reviews: