L
C
L
C
-L
EV
ER
-B
EQ
U
IL
LE
-M
A
N
IL
LA
L
C
L
C
V
e
rt
ic
a
l c
e
n
te
r
lin
e
o
f
D
o
o
r
(C
e
n
tr
e
v
e
rt
ic
a
l d
e
l
´a
xe
)
(C
e
n
tr
o
d
e
l
a
p
u
e
rt
a
)
1"
(
25
m
m
)
D
ia
m
et
er
C
EN
TR
EL
IN
E
O
F
ST
RI
K
E
C
EN
TR
E
D
E
LA
G
Â
C
H
E
C
EN
TR
O
D
EL
C
ER
R
A
D
ER
O
2-
1/
8"
(
54
m
m
)
D
ia
m
et
er
FO
LD
A
LO
NG
D
OO
R E
DG
E
2-
3/
4"
(7
0m
m
)
BA
C
K
SE
T
2-
3/
8"
(6
0m
m
)
BA
C
K
SE
T
1-
3/
4"
(4
5m
m
)
2"
(
52
m
m
)
1-
3/
8"
(3
5m
m
)
D
O
O
R
T
H
IC
K
N
ES
S
PO
R
TE
È
PA
IS
SE
U
R
G
RO
SO
R
P
U
ER
TA
Cylindrical latch: SALTO series
LC1Kxx...
LOCK INSTALLATION Electronic escutcheon and Cylindrical latch
PREPARING THE DOOR
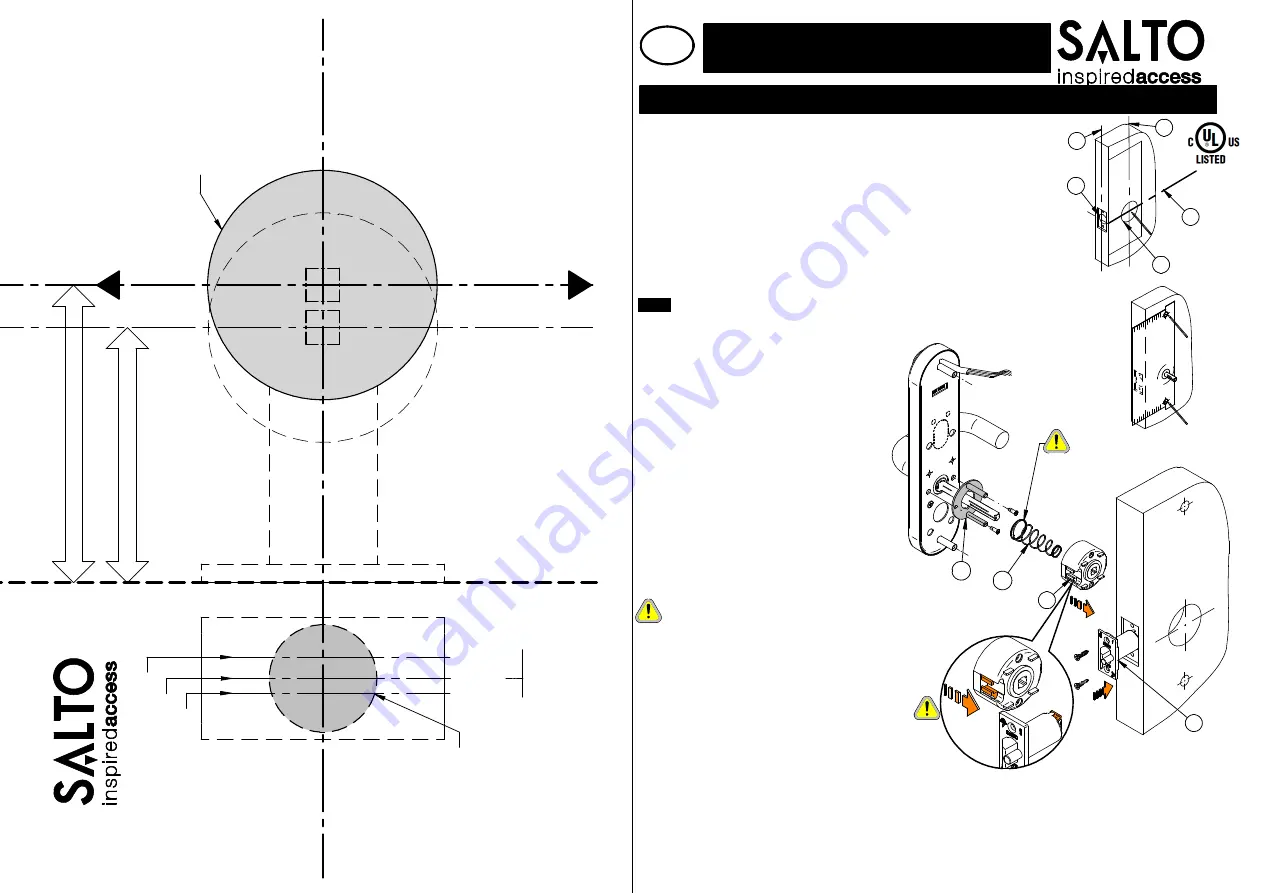
Note: if the strike already exists in the door frame, position latch using strike as reference.
1.
Draw horizontal line on one side and on the edge of door at the desired height
of handle (a).
2.
Draw vertical center line on door edge.
3.
Draw a vertical line on one side of the door at the proper backset to align the
template (c).
4.
Place the template on the door. Drill 2-1/8” (54mm) hole and 1” (25mm) diameter hole
for latch. It is important to ensure that both holes are on the same horizontal center line.
5.
Remove template: insert the latch and using front plate as template, trace outline and
chisel recess.
NOTE :
Holes for fixation SALTO electronic escutcheon are not included in this template.
Please use the template included in the escutcheon box.
Eng
LUBRICATION
_____________________________________________________________________________________________________
All locks come lubricated from factory with grease. However, we recommend a continued periodic lubrication of moving parts
(latch and body) with a commercial quality grease. This can add years to the life of the lockset by reducing excessive wear. For
more severe environments, lubrication should be applied more frequently
.
A
B
HANDLE
L
C
L
C
L
C
L
C
DOOR
EDGE
HANDLE
BACKSET
INSTALLING THE STRIKE
1.
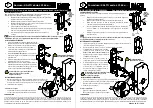
Refer to template to determine strike location on jamb.
Using strike as template, mark and chisel recess. Drill screw holes.
2.
Install dust box and strike.
Please check if:
- Latchbolt fits the cavity of the strike.
- Gap between door and jamb is between 2-4 mm.
D
INSTALLING THE LOCKSET
1.
Insert the latch (A). Mark & drill front plate holes.
Fasten latch with screws.
2.
In case of using an extender, 3-3/4” or 5” (95mm or
127mm ) , assemble it to the latch before
introducing it into the hole.
3.
Insert then the cartridge (B) into the cavity,
from
outside the door to inside
, until it is completely
connected to the latch.
4.
Before installing outside escutcheon, fix the
alignment support (C) with the supplied screws.
5.
For door thickness
≥
1-3/4”, before mounting inside
escutcheon, introduce the spring (D) in the spindle
as shown in the image, and push it against the
lock body using the escutcheon.
22
50
40
T
EM
PL
A
TE
225040 -ED.15/11/2017
C
Spring (D) and cartridge (B) have to be mounted
in the direction and position shown in the image.
Only if door thickness
1-3/4" (45mm)
a
b
c
d
e
≥
FROM
OUTS
IDE
TO IN
SIDE


