background image

6

5.  Press the On/Off Button to turn the unit on. The red Indicator Light 

above the On/Off Button will remain illuminated.

6.  Turn the Control Dial clockwise to select desired setting. 

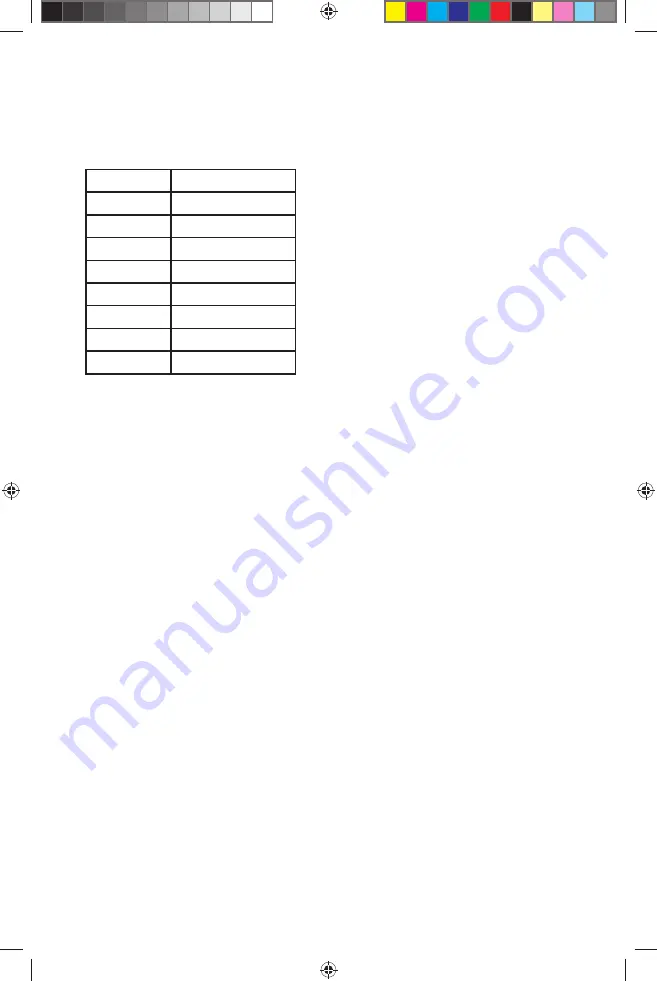
Refer to the table below.

Power

Cooking Level

 P1

Keep warm

  P2

Simmer - Low

 P3

Medium-Low

 P4

Medium

 P5

Medium-High

 P6

High

 P7

Max

 P8

Max/Sear

7.  If you wish to use the timer, press the Timer Button. Turn the 

Control Dial clockwise to select minutes (0-59). Turn the Control Dial 
counterclockwise to select hours (1-2). Once desired time is selected, 
press Timer Button again. A small clock icon will appear above the 
Display Window to show timer is now activated.

When the programmed time has elapsed, the induction cooker will 
beep once and shut off automatically.

NOTE

: If at any time during the cooking cycle you would like to cancel 

the timer, simply press the Timer Button. The clock symbol above the 
Display Window will disappear.

8.  Press the On/Off Button to turn the unit off when fi nished cooking.

NOTE:

 If the cookware is removed from the induction cooktop at any 

time during the cooking cycle, the unit will beep continually for 60 
seconds, error code E1 will appear in the Display Window and the 
unit will shut off automatically. In order to re-activate the unit, place 
cookware back on the cooktop and follow steps 5 through 8.

NOTE:

 When the unit is turned off, the fan will continue running and 

the display window will also display ‘H’ until the temperature of the 
Induction Cooktop is below 122°F (50°C).

ID1654_InductionCooker_E.indd   6

ID1654_InductionCooker_E.indd   6

6/14/16   5:55 PM

6/14/16   5:55 PM

Summary of Contents for ID1654

Page 1: ...Instruction Booklet Model ID1654 portable induction cooktop ID1654_InductionCooker_E indd 1 ID1654_InductionCooker_E indd 1 6 14 16 5 55 PM 6 14 16 5 55 PM...

Page 2: ...y appliance with a damaged cord or plug or after the appliance malfunctions or is dropped or damaged in any manner Return appliance to the manufacturer for examination repair or electrical or mechanic...

Page 3: ...duction cooking has been used for decades in restaurants and commercial kitchens worldwide Only now has the induction revolution been made available at an affordable cost for everyday household use Ho...

Page 4: ...afer There are no open flames or hot elements Induction cooktops will start only once the appropriate cookware has been placed on the surface and stops immediately when the cookware is removed No more...

Page 5: ...IPTION OF PARTS 1 Induction Cooktop 2 Display Window 3 Timer Button with Indicator Light 4 Control Dial 5 On Off Button with Indicator Light HOW TO USE 1 Place the induction cooker on a dry level surf...

Page 6: ...ooker will beep once and shut off automatically NOTE If at any time during the cooking cycle you would like to cancel the timer simply press the Timer Button The clock symbol above the Display Window...

Page 7: ...for approximately 60 seconds error code E1 will be appear in the Display Window and the unit will shut off automatically 3 When the unit is off the fan may continue running until the temperature of th...

Page 8: ...ion Check whether or not cookware is suitable Make sure the cookware is within the circular cookware placement guides indicated on the Induction Cooktop Cookware was removed during cooking Replace coo...

Page 9: ...the only acceptable proof of purchase Salton Canada warrants that this appliance shall be free from defects in material and workmanship for a period of five 5 years from the date of original purchase...

Page 10: ...ivery service with tracking information when returning your product Salton Canada will not be held responsible for in transit damage or for packages that are not received Name Address City Prov State...

Reviews: