

HOW TO USE
1. Place the Induction Cooker on a dry, level surface.
2. Add food to the cookware.
IMPORTANT:
NEVER heat empty cookware. This will cause the unit to overheat
and may damage the cookware and/or cause the unit to shut off.
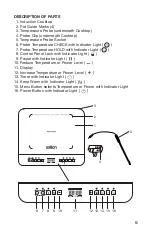
3. If using the Probe, place the Clip on the cookware and the Probe
through the Clip holes and into the food. Plug the Probe into the
socket at the back on the Induction Cooktop (See #5 in Description
of Parts.
4. Place the cookware within the rectangular Guide Marks indicated on
the Induction Cooktop.
NOTE: Ensure that the bottom of the cookware is clean before
placing on the Cooktop.
5. Plug into a 120 volt outlet. The Cooktop will beep and the Indicator
Light above the Power Button ( ) will flash.
6. Press the Power Button ( ) to turn the cooktop On. The red
indicator light above the Power Button ( ) will remain illuminated.
7. Choose the desired function by pressing the Menu Button to select
the temperature or the power level. Press once for Fahrenheit, twice
for Celcius and 3 times for the power level.
8. Press the ‘+’ or ‘-’ Buttons to increase or decrease the temperature
or power level.
9. Press the Pause Button ( ) if you want to remove the pot from the
cooking surface and keep your settings. The Pause feature will work
for a maximum of 10 minutes.
10. Press the Control Panel Lock Button ( ) to lock the setting so they
are not pressed accidently.
11. When finished cooking press the Power Button ( ) to turn the unit
Off and unplug from the wall outlet.
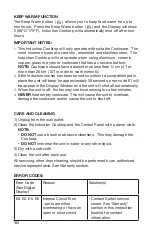
NOTE: If the cookware is removed from the Induction Cooktop at any
time during the cooking cycle and the Pause Function is not activated,
the unit will beep continually for 30 seconds and error code E1 will
appear in the Display Window and the unit will shut-off automatically. In
order to reactivate the unit, place the cookware back on the cooktop and
follow steps in the How to Use section above.
TEMPERATURE AND POWER LEVEL FUNCTIONS
The are two ways to cook with the Induction Cooktop. Choose
Temperature (F° or C°) or Power Level. The instructions below explain
each method.
6


