background image

2. Press the +/- buttons to adjust the timed cooking time from 1 minute

up to 3 hours, in increments of one minute or press and hold the +/-

Buttons to increase or decrease time in increments of 5 minutes.

3. Once you have selected the desired shut off time, press the Timer

Button (      ) again or wait for the screen to blink 5 times, to confirm

your selection.

4. When the programmed time has elapsed the induction cooker will

beep once and shut off automatically.

NOTE: If at any time during the cooking cycle you would like to cancel 

the programmed time, press and hold the Timer Button (      ) for a 

couple of seconds until you hear a beep and the Indicator Light turns 

off.

LOCK FUNCTION

The Lock Button (      ) allows you to set the desired temperature and 

then lock the control panel to avoid changing the setting by mistake. 
To use this feature, press the “Lock” button (      ). The Indicator Light 

will illuminate and LOC will appear in the display. The cooktop will not 

respond to any temperature, power or timer changes.  When the “Lock” 

is activated, the only Button that will function is the On/Off Button. 
To turn the Lock Function off, press and hold the Lock button (      )  for 

a couple of seconds until you hear a beep and the Indicator Light turns 

off.

PAUSE FUNCTION

The Pause Button (      ) will pause the set cooking mode/program 

allowing you to temporarily remove your cookware. To resume cooking 

mode/program, press the Pause Button (      ). The Induction Cooktop 

will automatically turn off after 10 minutes if the Pause Function mode/

program is not resumed. 

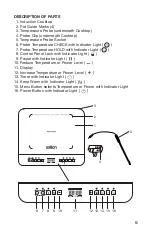
TEMPERATURE PROBE AND CLIP

The Temperature Probe is stored on the underside of your Induction 

Cooktop.  To remove the Probe, pull straight out.  Before use, ensure the 

Temperature Probe is plugged into the back to your Induction Cooktop - 

see #5 in the Description of Parts. 

IMPORTANT NOTES:  

a) The Temperature Probe may become hot during use.  Always handle

with care and use oven mitts to avoid burns.

b) Always use the Probe Clip to ensure that the Probe wire does not

touch the side of the cookware or the food.

8

Summary of Contents for ID1880

Page 1: ...Instruction Booklet Model ID1880 induction cooktop with temperature probe ...

Page 2: ... the appliance malfunctions or is dropped or damaged in any manner Return appliance to the manufacturer for examination repair or electrical or mechanical adjustment All servicing other than cleaning should be performed by an authorized service representative See Warranty section 8 If the appliance is not working as described in this instruction booklet discontinue use and contact the manufacturer...

Page 3: ...he induction revolution been made available at an affordable cost for everyday household use How does induction work Induction cooking uses electromagnetic energy to heat cookware When cookware is placed on an induction cooktop and the cooker is turned on the coil inside the induction unit produces an alternating magnetic field which flows through the cookware Molecules in the cookware vibrate rap...

Page 4: ...is then transferred to cookware With induction cooking there is almost no wasted heat since heat is being generated in the cookware itself Also because there are no open flames or hot elements releasing heat into your kitchen your kitchen stays cooler What can I cook on an induction cooker What you can cook on an induction cooker is no different than what you can cook with gas an electric coil or ...

Page 5: ... Probe Temperature HOLD with Indicator Light 8 Control Panel Lock with Indicator Light 9 Pause with Indicator Light 10 Reduce Temperature or Power Level 11 Display 12 Increase Temperature or Power Level 13 Timer with Indicator Light 14 Keep Warm with Indicator Light 15 Menu Button selects Temperature or Power with Indicator Light 16 Power Button with Indicator Light 5 2 1 3 4 5 6 7 8 9 10 12 13 14...

Page 6: ...emperature or the power level Press once for Fahrenheit twice for Celcius and 3 times for the power level 8 Press the or Buttons to increase or decrease the temperature or power level 9 Press the Pause Button if you want to remove the pot from the cooking surface and keep your settings The Pause feature will work for a maximum of 10 minutes 10 Press the Control Panel Lock Button to lock the settin...

Page 7: ...Level the wattage is increased as is the cooking speed Use this feature if a specific temperature is not required for example to boil water or to quick brown or sauté 1 Press the Power Button to turn the unit On 2 Press the MENU Button 3 times and the letter P and the default Power Level setting 6 appears in the display window 3 To adjust the Power Level press the or Buttons to select from the 10 ...

Page 8: ... display The cooktop will not respond to any temperature power or timer changes When the Lock is activated the only Button that will function is the On Off Button To turn the Lock Function off press and hold the Lock button for a couple of seconds until you hear a beep and the Indicator Light turns off PAUSE FUNCTION The Pause Button will pause the set cooking mode program allowing you to temporar...

Page 9: ... into the socket at the back of the Cooktop see 5 in the Description of Parts Place Probe through the holes in the Clip then into food Arrange the wire so it does not come into contact with food or the cookware 2 Press the Hold Maintenir Button once and the default Fahrenheit temperature of 100 F will appear in the display Press the Hold Maintenir Button twice and the default Celsius temperature o...

Page 10: ...l be appear in the Display Window and the unit will shut off automatically 3 When the unit is off the fan may continue running for a few minutes 4 NEVER heat empty cookware This will cause the unit to overheat damage the cookware and or cause the unit to shut off CARE AND CLEANING 1 Unplug from the wall outlet 2 Clean the Induction Cooktop and the Control Panel with a damp cloth NOTE DO NOT use a ...

Page 11: ...circular cookware placement guides indicated on the Induction Cooktop Cookware was removed during cooking Replace cookware back on Cooktop E3 Incorrect Voltage Sensor Voltage over 150V Make sure the outlet used is 110 120V AC E4 Incorrect Voltage Sensor Voltage below 80V Make sure the outlet used is 110 120V AC ...

Page 12: ... LIMITED WARRANTY The original sales receipt is the only acceptable proof of purchase Salton Canada warrants that this appliance shall be free from defects in material and workmanship for a period of five 5 years from the date of original purchase Salton Canada at its sole discretion during this warranty period will repair or replace a defective product or issue a refund Any refund to the purchase...

Page 13: ... protection we suggest that you use an insured delivery service with tracking information when returning your product Salton Canada will not be held responsible for in transit damage or for packages that are not received Name Address City Prov State Postal Zip Code Daytime Phone No Email Product defect Type of payment Cheque Money Order Visa MasterCard Name on card Expiry Date CSV No Card No To co...

Reviews: