background image

2. Fill the Water Reservoir to the ‘MAX’ fill mark.

3. Place the Iron on its heel.

4. Plug the Iron into the wall outlet.

5. Set the Temperature Control Dial to the MAX (COT/LIN) position.

6. Allow the iron to heat up until the Temperature Indicator 

Light goes out.

7. Turn the Iron to the lowest setting and remove the plug 

from the wall outlet.

8. Hold the Iron horizontally over the sink 

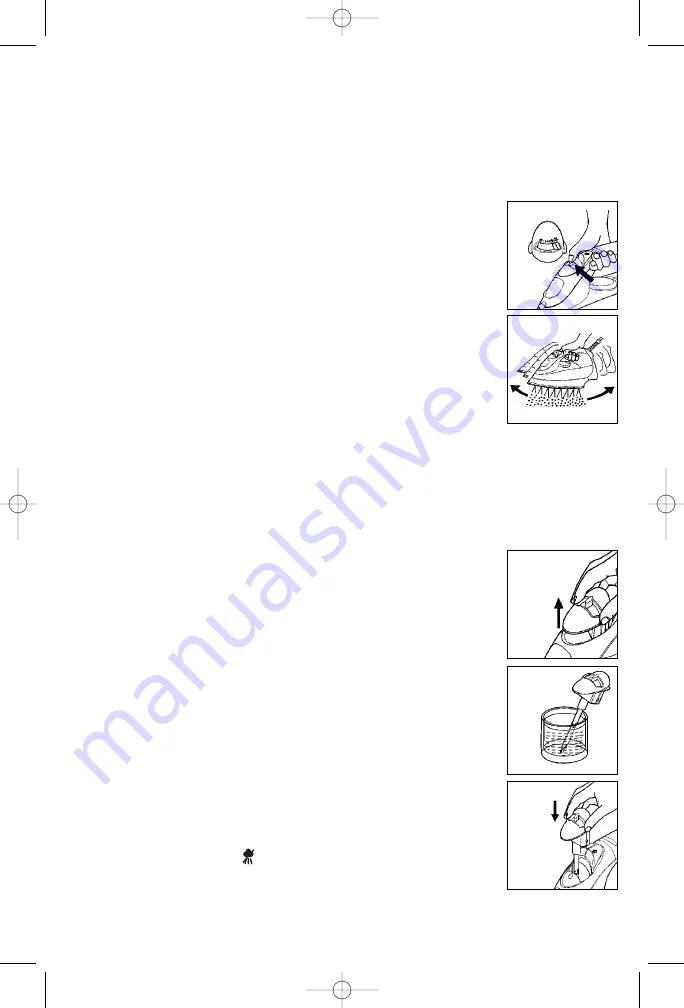
9. Slide and hold the Variable Steam Control Knob 

to the ‘SELF CLEAN’ position (Ill. 9).

10.

CAUTION:

Boiling water and steam will emit from the holes 

in the soleplate. Move the iron back and forth while this 
happens (Ill. 10). Impurities and scale will be flushed out of the iron.

11. A small amount of water may remain in the Water Reservoir. Open the Water

Reservoir Cover and empty the remaining water.

12. If steam development is insufficient, repeat the Self-Cleaning process.

Cleaning the Removable Steam Valve

1. In addition to the self-cleaning operation the Steam Valve 

should be cleaned once or twice a month.

2. Before removing and cleaning the Steam Valve,

unplug the iron and empty the Water Reservoir.

3. Carefully pull out the coloured Variable Steam Control 

(Ill. 11). Do not touch the lower end of the Steam Valve.

4. Immerse the Steam Valve in vinegar for 4 hours (Ill. 12) 

until the lime scale becomes soft. Using a non-metallic brush,
remove the remaining residue. Rinse under running water.

NOTE:

Do not use sharp objects to clean the Steam Valve.

5. Replace the Steam Valve (Ill. 13). Slide the Steam Control 

Knob to the DRY (     ) position.

NOTE:

The iron will not 

operate without the Steam Valve in position.

10

Ill. 9

Ill. 10

Ill. 11

Ill. 12

Ill. 13

SAL6-487 Booklet Salton IRON IR_1031_EN_V3.qxd  31/07/06  16:25  Page 10

Summary of Contents for IR-1031 R

Page 1: ...Nova press Steam Iron Instruction Booklet Model IR 1031 R SAL6 487 Booklet Salton IRON IR_1031_EN_V3 qxd 31 07 06 16 25 Page 1...

Page 2: ...Wrap cord loosely around the iron and store upright on it s heel 8 Always disconnect iron from electrical outlet when filling with water or emptying and when not in use 9 Do not operate the iron with...

Page 3: ...a polarized outlet only one way If the plug does not fit fully in the outlet reverse the plug If it still does not fit contact a qualified electrician Do not modify the plug in any way DESCRIPTION OF...

Page 4: ...ted temperature is reached 8 Temperature Control Dial Allows you to select the desired temperature for each garment The adjustable temperature dial also indicates the amount of steam recommended for u...

Page 5: ...he handle will illuminate 2 Sort the items to be ironed according to the fabric type Iron fabrics requiring the coolest temperatures first Work gradually to higher temperatures Both the temperature di...

Page 6: ...oir Press the Spray Mist Button to dampen the fabric while ironing Filling the Iron with Water Before filling the Iron with water ensure that the Temperature Control Knob has been turned counterclockw...

Page 7: ...furthest right position as this is the self clean function If this setting is selected excess steam and water will be emitted from the soleplate 4 To use the spray mist to remove stubborn creases pre...

Page 8: ...ions in the Filling the Iron with Water section 2 Turn the Temperature Control Dial to the desired setting and wait until the temperature has been reached and the Temperature Indicator Light goes out...

Page 9: ...ockwise to the furthest position 3 Remove plug from the wall outlet 4 Open the Water Reservoir Cover and turn the Iron upside down to empty the Water Reservoir Ill 7 NOTE The water in the iron may be...

Page 10: ...ver and empty the remaining water 12 If steam development is insufficient repeat the Self Cleaning process Cleaning the Removable Steam Valve 1 In addition to the self cleaning operation the Steam Val...

Page 11: ...r scouring pads to clean the Soleplate Cleaning the Steam Holes 1 The Iron must be cool and unplugged from the wall outlet 2 Use a damp cloth to wipe away any build up of lint or starch in the steam h...

Page 12: ...d If you do not wish or are unable to have a defective product replaced under warranty by the retailer Salton Canada will repair or replace the defective product without charge You may contact us for...

Reviews: