background image

How to Clean

1. Move the Rocker Switch to the Off position and wait for the motor to stop 

completely. 

2. Unplug from the wall outlet. 
3. Disassemble the Juicer (see directions above) 
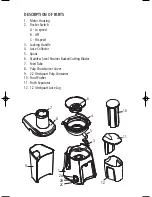
4. Clean the Pulp Container, Pulp Chute/Juicer Cover, Food Pusher, Juice 

Collector, Juice Jug and Froth Separator in warm, soapy water.  A mild 
detergent is recommended.  Rinse well and dry thoroughly.   

5. Hold the Stainless Steel Strainer Basket/Cutting Blades under clean running 

water.  If needed, use a small brush to gently clean away pulp from the 
filter and cutting blades.   Rinse under running water.  Hold the Strainer 
Basket/Cutting Blades up to the light to ensure that the fine mesh holes are
not blocked.  If the holes are blocked, soak the Strainer Basket/Cutting 
Blades in hot water to loosen the pulp and clean with the brush again.  
Allow to dry on a cloth or paper towel before reassembling the juicer.   

CAUTION: THE CUTTING BLADES ARE VERY SHARP.

6. Wipe the Motor Housing with a soft cloth moistened in warm soapy water.

NEVER IMMERSE MOTOR HOUSING IN WATER OR ANY OTHER LIQUID.
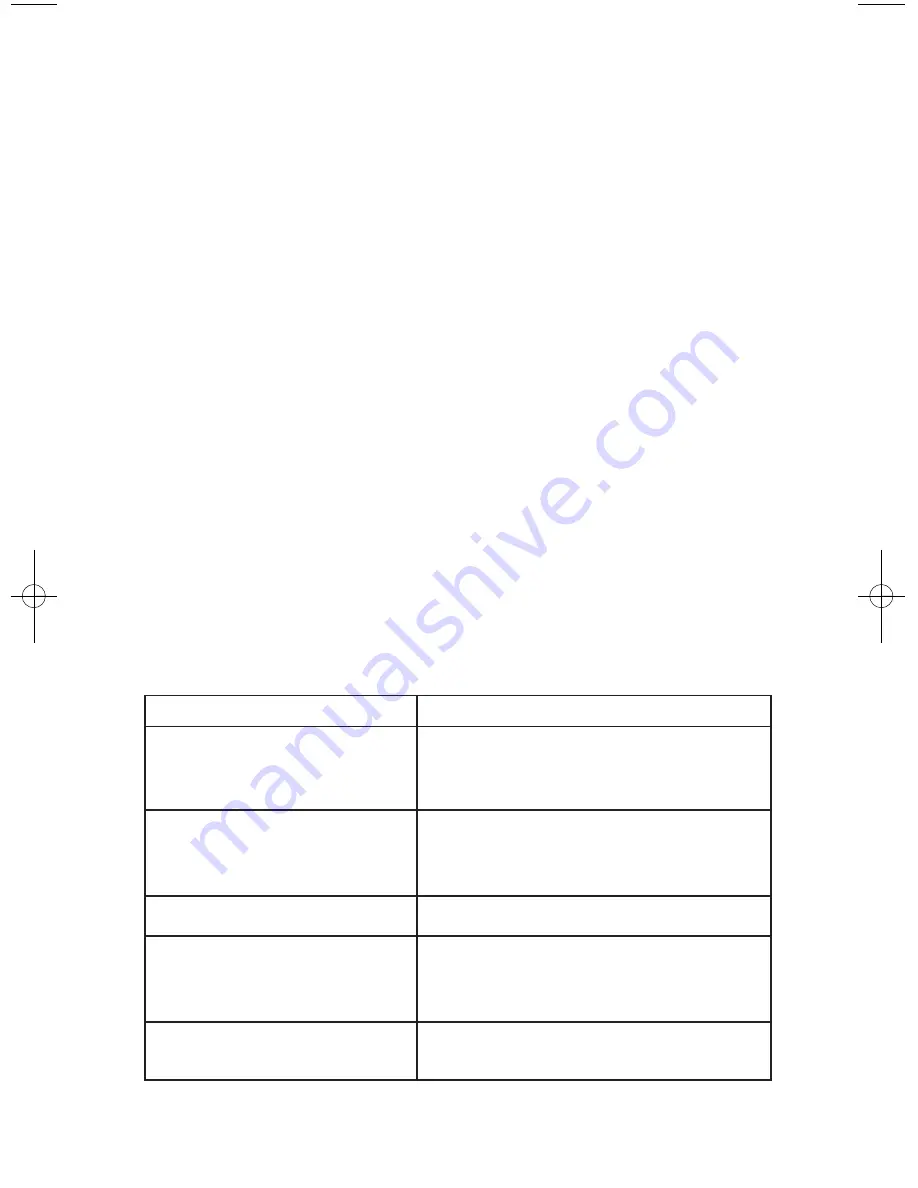
TROUBLESHOOTING

8

PROBLEM

SOLUTION

Juicer will not operate when
switched on. 

The safety locking arm may not be correctly
engaged into the 2 grooves on either side of the
Pulp Chute/Juicer Cover. 

Motor stalls when juicing 

Push the Food Pusher down slowly so that wet pulp
does not build up under the Pulp Chute/Juicer
Cover. Choose Hi speed instead of Lo speed.

Excess pulp building up in filter 

Alternate soft and hard fruit and vegetables 

Pulp too wet 

Use Lo speed.  Check to be sure that the holes in
the mesh filter are not blocked.   If they are blocked 
follow #5 in the How to Clean section. 

Juice leaks between the rim of the
Juicer and Pulp Chute/Juicer Cover 

Use Lo speed.  Fruits and vegetables with a high

water content should be juiced on Lo speed. 

Booklet_JE-1187_ENG:Salton Booklet  4/29/10  1:58 PM  Page 8

Summary of Contents for JE-1187

Page 1: ...juice extractor Instruction Booklet Model JE 1187 ...

Page 2: ...he use of accessories or attachments not recommended or sold by Salton may cause fire electric shock or injury 9 Do not use outdoors 10 Do not let cord hang over edge of table or counter or touch hot surfaces 11 Extreme caution must be used when moving an appliance containing hot liquids 12 This appliance is for Household Use Only Do not use appliance for other than intended use 13 Do not leave un...

Page 3: ... cord into the wall outlet To disconnect turn any control to OFF then remove plug from wall outlet SAVE THESE INSTRUCTIONS HOUSEHOLD USE ONLY POLARIZED PLUG This appliance has a polarized plug one blade is wider than the other To reduce the risk of electric shock this plug will fit in a polarized outlet only one way If the plug does not fit fully in the outlet reverse the plug If it still does not...

Page 4: ... speed 3 Locking Handle 4 Juice Collector 5 Spout 6 Stainless Steel Strainer Basket Cutting Blades 7 Feed Tube 8 Pulp Chute Juicer Cover 9 2 2 litre quart Pulp Container 10 Food Pusher 11 Froth Separator 12 1 2 litre quart Juice Jug 1 4 5 10 9 11 12 3 6 7 8 2A LO OFF HI 2B 2C ...

Page 5: ...th side of the Pulp Chute Juicer Cover NOTE Push the Locking Bar until it is fully upright otherwise the Juicer will not operate 5 Align the groove in the Food Pusher with the small protrusion on the inside of the Feed Tube 6 Slide the Pulp Container into position under the Pulp Chute 7 If the Froth Separator is not in the Juice Jug slide between the tabs inside the Juice Jug If you prefer to have...

Page 6: ...Feed Tube To Extract the maximum amount of juice always push the Food Pusher down slowly IMPORTANT DO NOT PLACE HANDS OR FOREIGN OBJECTS DOWN THE FEED TUBE ALWAYS USE THE FOOD PUSHER 5 If the Pulp Container is full it can be emptied during juicing Turn the Juicer Off and remove the Pulp Container by holding onto the Feed Tube and tilting the juicer slightly to disengage the Pulp Container Empty th...

Page 7: ...ruits or vegetables to yield more juice CARE AND CLEANING How to Disassemble the Juicer IMPORTANT Before disassembling the juicer make sure that the Rocker Switch is in the Off position the plug has been removed from the wall outlet and the motor has stopped completely 1 Remove the Food Pusher from the Feed Tube 2 Remove the Pulp Container by holding onto the Feed Tube and tilting the juicer sligh...

Page 8: ...h again Allow to dry on a cloth or paper towel before reassembling the juicer CAUTION THE CUTTING BLADES ARE VERY SHARP 6 Wipe the Motor Housing with a soft cloth moistened in warm soapy water NEVER IMMERSE MOTOR HOUSING IN WATER OR ANY OTHER LIQUID TROUBLESHOOTING 8 PROBLEM SOLUTION Juicer will not operate when switched on The safety locking arm may not be correctly engaged into the 2 grooves on ...

Page 9: ... apples 3 carrots 1 stalk celery Alternate juicing apples carrots and celery Serve immediately Vegetable Juice 4 carrots 2 ozs 100 g spinach Small handful of flat leaf parsley 2 stalks celery Alternate juicing above ingredients Serve immediately Fruit Vegetable Cocktail 1 2 pineapple peeled 1 carrot 1 apple 1 stalk celery Process through juicer and serve immediately Peach Pear and Apple Juice 1 ap...

Page 10: ...and does not cover damage which occurs in shipment or failure which results from alteration accident misuse abuse glass breakage neglect commercial use or improper maintenance A defective product should be returned to the original place of purchase within the retailer s stipulated return exchange period If you are unable to have a defective product replaced under warranty by the retailer please ch...

Reviews: