background image

14

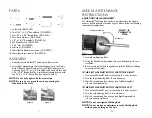
USER MAINTENANCE
INSTRUCTIONS

ADJUSTING THE WALKING  BELT
The Walkmill's™ Walking Belt has been pre-adjusted at the factory;
however if the Belt begins to slip during use, please follow the following
instructions for adjustment:

1. Locate Rear Adjusting Bolts.

2. Using the Allen Wrench provided, turn each Bolt equally 1/4 turn

clockwise.

3. Be sure to adjust both sides equally to avoid the Belt from shifting

to one side or the other.

IF THE  BELT  HAS  SHIFTED TOO  FAR TO THE  RIGHT

1. Turn on the Walkmill™ and set the speed to 2 miles per hour.

2. Turn the Right Adjusting Bolt 1/4 turn clockwise.

3. Wait 20 seconds and if no change, turn Left Adjusting Bolt 

1/4 turn counterclockwise.

IF THE  BELT  HAS  SHIFTED TOO  FAR TO THE  LEFT

1. Turn on the Walkmill™ and set the speed to 2 miles per hour.

2. Turn the Left Adjusting Bolt 1/4 turn clockwise.

3. Wait 20 seconds and if no change, turn Right Adjusting Bolt 

1/4 turn counter clockwise.

NOTE: Do not overtighten Walking Belt.

NOTE: Do not make any adjustments to the Walking Belt

with anyone walking on the unit.

ONLY 1/4

TURN AT A

TIME

Clockwise

Counter Clockwise

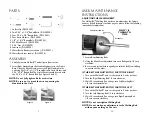
PARTS

1. Safety Clip (P/N 50549)
2. Two 5/16” x 1-1/2" Round Bolts  (P/N 50550)
3. Four 5/16” x 3/4" Round Bolts  (P/N 50551)
4. Four Circle Washers  (P/N 50552)
5. 1/4" x 1-3/4" Round Bolt  (P/N 50553)
6. MS Allen Wrench  (P/N 50554)
7. 5/16” Nut  (P/N 50555)
8. Lubricant  (P/N 50556)
9. Water Bottle Bracket (not shown)  (P/N 50557)

10. Water Bottle (not shown)  (P/N 50558)

ASSEMBLY

1. Carefully remove Walkmill™ and all parts from carton.

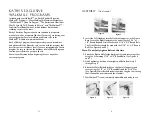
2. Insert Right Handrail into the Handrail Supporter in the Frame

Base. Using the Allen Wrench, secure the Right Handrail to the 
unit using the 5/16" x 1-1/2" Round Bolt and Circle Washer, and
5/16” x 3/4" Round Bolt.The Circle Washer should be used with 
the 5/16" x 1-1/2” Round Bolt. (See Figures 2 and 3.)

NOTE: Do not fully tighten Bolts at this time.

NOTE: Be sure not to pinch the wire connecting the

Handrail to the Unit.

1.

2.

3.

4.

7.

8.

5.

6.

Figure 2

Figure 3

5

Summary of Contents for WALKMILL

Page 1: ...nty for the balance of the 90 Day warranty period and an additional one month period Service and Repair Should the appliance malfunction you should first call toll free 1 800 934 7455 between the hours of 9 00 am and 5 00 pm Central Standard Time and ask for CONSUMER SERVICE stating that you are a consumer with a problem Please refer to model number WALK1 when you call Out of Warranty Service A fl...

Page 2: ...is used by on or near children invalids or disabled persons 4 Use this appliance only for its intended use as described in this manual Do not use attachments not recommended by the manufacturer 5 Never operate this appliance if it has a damaged cord or plug if it is not working properly if it has been dropped or damaged or dropped into water Return the appliance to a service center for examination...

Page 3: ...ea around it so you can get on and off freely and safely 2 Always lock all 4Wheels into place prior to operation 3 Keeps pets a safe distance from the Walkmill 4 Make sure that theWalkmill has come to a complete STOP and has been turned OFF before getting on or off 5 This product is to be used by only one person at a time 6 Parental supervision is advised if the device is used by children TheWalkm...

Page 4: ...l reduce the risk of electrical shock The plug must be plugged into an appropriate outlet that is properly installed and grounded in accordance with all local codes and ordinances DANGER Improper connection of the equipment grounding conductor can result in a risk of electric shock Check with a qualified electrician or serviceman if you are in doubt as to whether the product is properly grounded D...

Page 5: ...he unit is plugged directly into wall 5 If needed reset theWalkmill Reset Switch 6 Make sure the Magnetic Safety Clip is in place Problem Walkmill stops or shuts OFF by itself Correction if needed reset theWalkmill Reset Switch See RESET SWITCH Problem Walking Belt does not run center Correction See ADJUSTINGTHEWALKING BELT Problem Walking Belt slips Correction See ADJUSTINGTHEWALKING BELT Problem...

Page 6: ... Right Adjusting Bolt 1 4 turn counter clockwise NOTE Do not overtighten Walking Belt NOTE Do not make any adjustments to the Walking Belt with anyone walking on the unit ONLY 1 4 TURN AT A TIME Clockwise Counter Clockwise PARTS 1 Safety Clip P N 50549 2 Two 5 16 x 1 1 2 Round Bolts P N 50550 3 Four 5 16 x 3 4 Round Bolts P N 50551 4 Four CircleWashers P N 50552 5 1 4 x 1 3 4 Round Bolt P N 50553 ...

Page 7: ...athy s programs to allow yourself time to get up to speed Consult your Physician before beginning these or any other exercise programs 3 Insert the Left Handrail into the Handrail Supporter in the Frame Base Secure the Right Handrail to the unit using the 5 16 x 1 1 2 Round Bolt and CircleWasher and 5 16 x 3 4 Round Bolt The CircleWasher should be used with the 5 16 x 1 1 2 Round Bolt See Figures ...

Page 8: ... blood pressure medications it is essential that you obtain medical advice from your physician with regard to your safe and recommended exercise heart rate zone 7 MOVING THE WALKMILL In its portable position theWalkmill is designed to move easily throughout your home For best results please follow these simple guidelines NOTE While moving the Walking Deck should be in the upright position 1 Make s...

Page 9: ...e total calories burned during your workout Please note that the calorie count is an estimate to be used as a reference only DISTANCE Displays total distance in miles you have walked during your workout NOTE When not in use the Electronic Display will turn OFF automatically after 4 minutes Speed Dial Elevation Dial 8 ONCETHE WALKMILL IS INTHE DESIRED LOCATION LOWERTHE WALKING DECK 1 Re lock all 4W...

Page 10: ... prior to using the Walkmill The unit will not operate if the Magnetic Safety Button is not in place and will shut down if the Magnetic Safety Button is removed during use It is recommended that you store the Safety Clip out of reach of children so theWalkmill cannot be operated without supervision ELEVATION The Dial on the left controls theWalkmill s elevation Turn the Dial forward away from you ...

Page 11: ... prior to using the Walkmill The unit will not operate if the Magnetic Safety Button is not in place and will shut down if the Magnetic Safety Button is removed during use It is recommended that you store the Safety Clip out of reach of children so theWalkmill cannot be operated without supervision ELEVATION The Dial on the left controls theWalkmill s elevation Turn the Dial forward away from you ...

Page 12: ...e total calories burned during your workout Please note that the calorie count is an estimate to be used as a reference only DISTANCE Displays total distance in miles you have walked during your workout NOTE When not in use the Electronic Display will turn OFF automatically after 4 minutes Speed Dial Elevation Dial 8 ONCETHE WALKMILL IS INTHE DESIRED LOCATION LOWERTHE WALKING DECK 1 Re lock all 4W...

Page 13: ... blood pressure medications it is essential that you obtain medical advice from your physician with regard to your safe and recommended exercise heart rate zone 7 MOVING THE WALKMILL In its portable position theWalkmill is designed to move easily throughout your home For best results please follow these simple guidelines NOTE While moving the Walking Deck should be in the upright position 1 Make s...

Page 14: ...athy s programs to allow yourself time to get up to speed Consult your Physician before beginning these or any other exercise programs 3 Insert the Left Handrail into the Handrail Supporter in the Frame Base Secure the Right Handrail to the unit using the 5 16 x 1 1 2 Round Bolt and CircleWasher and 5 16 x 3 4 Round Bolt The CircleWasher should be used with the 5 16 x 1 1 2 Round Bolt See Figures ...

Page 15: ... Right Adjusting Bolt 1 4 turn counter clockwise NOTE Do not overtighten Walking Belt NOTE Do not make any adjustments to the Walking Belt with anyone walking on the unit ONLY 1 4 TURN AT A TIME Clockwise Counter Clockwise PARTS 1 Safety Clip P N 50549 2 Two 5 16 x 1 1 2 Round Bolts P N 50550 3 Four 5 16 x 3 4 Round Bolts P N 50551 4 Four CircleWashers P N 50552 5 1 4 x 1 3 4 Round Bolt P N 50553 ...

Page 16: ...he unit is plugged directly into wall 5 If needed reset theWalkmill Reset Switch 6 Make sure the Magnetic Safety Clip is in place Problem Walkmill stops or shuts OFF by itself Correction if needed reset theWalkmill Reset Switch See RESET SWITCH Problem Walking Belt does not run center Correction See ADJUSTINGTHEWALKING BELT Problem Walking Belt slips Correction See ADJUSTINGTHEWALKING BELT Problem...

Page 17: ...l reduce the risk of electrical shock The plug must be plugged into an appropriate outlet that is properly installed and grounded in accordance with all local codes and ordinances DANGER Improper connection of the equipment grounding conductor can result in a risk of electric shock Check with a qualified electrician or serviceman if you are in doubt as to whether the product is properly grounded D...

Page 18: ...ea around it so you can get on and off freely and safely 2 Always lock all 4Wheels into place prior to operation 3 Keeps pets a safe distance from the Walkmill 4 Make sure that theWalkmill has come to a complete STOP and has been turned OFF before getting on or off 5 This product is to be used by only one person at a time 6 Parental supervision is advised if the device is used by children TheWalkm...

Page 19: ...is used by on or near children invalids or disabled persons 4 Use this appliance only for its intended use as described in this manual Do not use attachments not recommended by the manufacturer 5 Never operate this appliance if it has a damaged cord or plug if it is not working properly if it has been dropped or damaged or dropped into water Return the appliance to a service center for examination...

Page 20: ...nty for the balance of the 90 Day warranty period and an additional one month period Service and Repair Should the appliance malfunction you should first call toll free 1 800 934 7455 between the hours of 9 00 am and 5 00 pm Central Standard Time and ask for CONSUMER SERVICE stating that you are a consumer with a problem Please refer to model number WALK1 when you call Out of Warranty Service A fl...

Reviews: