background image

Tel: 886. 909 602 109 Email: sales@salukitec.com

www.salukitec.com

78

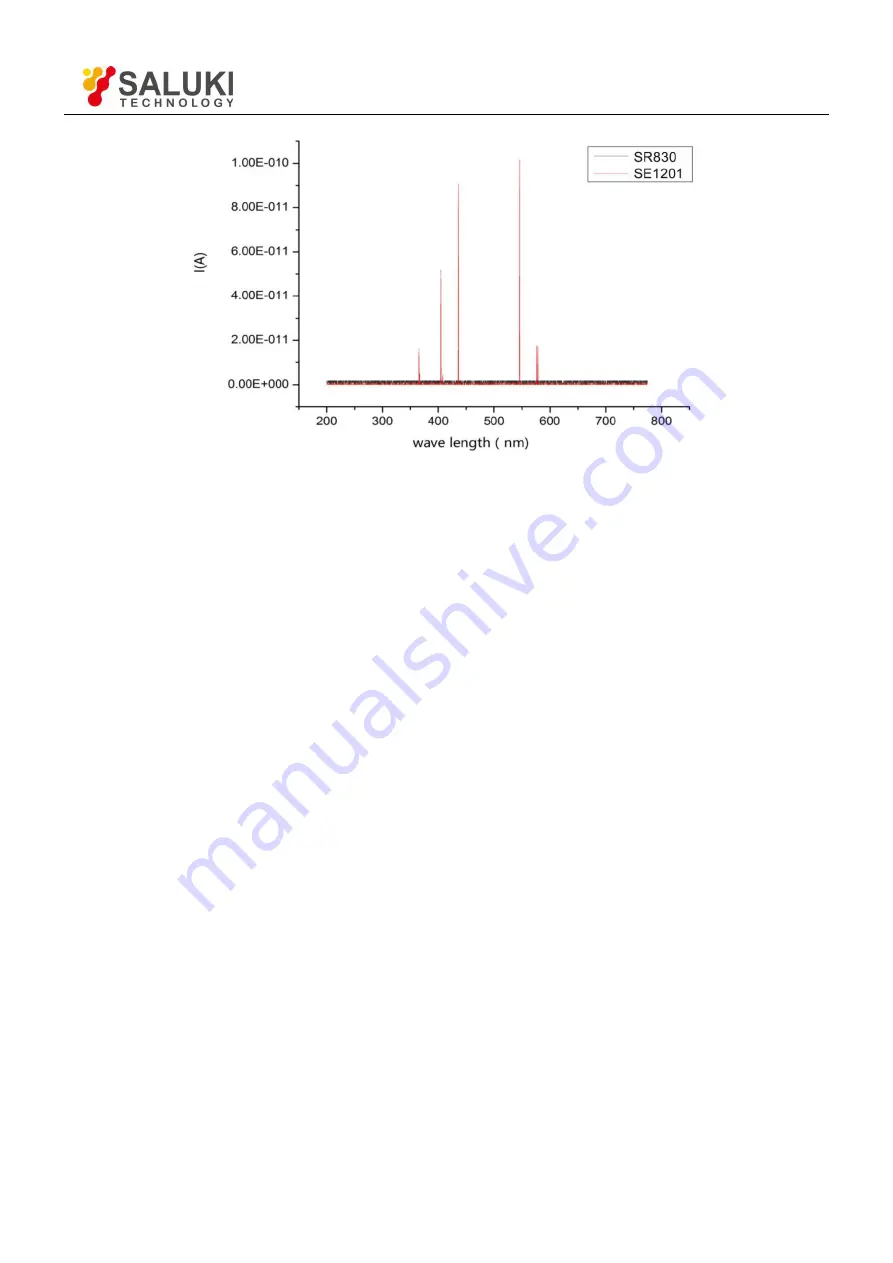
Fig.71 The Contrast Spectrum Curve between SR830 and SE1201

7.4 Serial Communication

This example will show how to remotely run the serial communication. You need an USB cable. The steps are as
follows:

1. Use an USB cable to connect the USB of the SE1201 to the USB of the PC.

2. The PC will recognize the USB device and remind to install the driver program. If your PC system is WIN7, the
PC will do these automatically online. You just need to wait for a few minutes. If the installation fails, you need to
install the driver manually according to Chapter 5.2.

3. Open the folder

Uart Driver

in your disk and double click the file UartAssist.exe. It will call out the software

interface, as is shown in Fig.72.

Note that this software can set the communication mode, the receiver mode, the transfer mode. The default Baud
rate of the SE1201 is 921600. The SE1201 has no parity bit, 8 data bits and 1 stop bit. The port number choose the
COM number automatically assigned by the PC. Users can check it at the

COM and LPT

option in Device

Manager of the PC, as is shown in Fig.73.

Summary of Contents for SE1201

Page 1: ...SE1201 Digital Lock in Amplifier User Manual Saluki Technology Inc...

Page 2: ...salukitec com 2 The document applies to following models SE1201 DSP Lock in Amplifier 50 mHz to 120 kHz Standard Pack 1 Main Machine 1 Power Cord 1 USB Cable 2 BNC Connection Cable 1 Spare Fuse 2A 250...

Page 3: ...itted for the purpose of making profit without its prior permission otherwise Saluki will reserve the right to investigate and affix legal liability of infringement Product Quality Assurance The warra...

Page 4: ...9 Input Connections 16 1 10 Intrinsic Noise Sources 16 1 11 External Noise Sources 18 1 12 Harmonic Detection 20 2 Interfaces 21 2 1 Front Panel 21 2 2 Rear Panel 21 2 3 Main Display 22 3 Menus 27 3 1...

Page 5: ...nd Flatness 62 6 5 Amplitude Linearity 64 6 6 Frequency Accuracy 65 6 7 Sine Output Amplitude Accuracy and Flatness 65 6 8 DC Outputs and Inputs 66 6 9 Input Noise 67 7 Operation Examples 70 7 1 Simpl...

Page 6: ...ifiers will amplify both the noise signals and the required signals If there is no band limiting or filtering amplification will decrease the signal to noise ratio SNR Therefore filtering is needed to...

Page 7: ...frequency region we can redraw these three parts The first part is at 0Hz which is known as the DC component of one signal The second part is at 2fref Hz The third part is a random signal at all the f...

Page 8: ...is 1M Generally both the sine wave and the TTL signal can be used as the reference signal However the generator s sine output has a small and varying amplitude Meanwhile many function generators prov...

Page 9: ...e detectors PSD s digital PSD s and analog PSD s Traditional PSD s use an analog multiplier to multiply the input signal with the reference signal There are many problems associated with these includi...

Page 10: ...as f TC 2 1 Here f is the 3dB frequency of the low pass filter For example to a one order low pass filter of RC type a 1s time constant means its 3dB point occurs at 0 16Hz In fact where there is an...

Page 11: ...lowed filters filter the noise The SE1201 provides time constants as long as 3000s when the reference frequency is below 200 Hz which can satisfy most requirements of measurements DC Output Gain How b...

Page 12: ...as a percentage of full scale Offsets can be set up to 100 of full scale When the sensitivity is changed the percentage does not change The X Y and R outputs can be expanded It s realized by multiply...

Page 13: ...the PSD and DC gain following the PSD The total gain is the product of the AC gain and the DC gain Suppose the total gain is a constant If the AC gain increases and the DC gain decreases the input noi...

Page 14: ...low noise signal amplifier should be large enough so that the output signal can be digitized by the A D converter without degrading the signal to noise ratio SNR The analog gain of the SE1201 ranges...

Page 15: ...um reserve is sufficient then these filters do not improve the measurement obviously Do not use notch filters when making measurement near the notch frequencies Notch filters have a finite range of at...

Page 16: ...cable is just like an antenna The lock in lets the shield quasi float in order to sense the experiment ground and pick up the activities of the electronic in environment In this case the noise came u...

Page 17: ...rs Johnson noise is a typical case of wave dissipation Shot Noise Because of the finite nature of the charge carriers electric current has noise Noise generates in the current since there is always so...

Page 18: ...In addition to the intrinsic noise sources discussed previously there are different kinds of external noise sources Most of these noise sources are asynchronous and not related to the reference They d...

Page 19: ...any ground methods These grounding methods can act as a big loop wire They pick up noises from the environment and generate voltages in the grounding system The 50 Hz magnetic field of the AC power is...

Page 20: ...sitive to temperature This noise is typically at very low frequency because the temperature of the detector and experiment generally changes slowly This effect is large on the scale of many detector o...

Page 21: ...yboards MENU and two buttons under the spin knob which are called the left button and the right button The six buttons at MENU correspond to six different menus The left and the right buttons are used...

Page 22: ...ammable output signal with the maximum amplitude 1Vrms The output impedance is 50 If the external reference signal is used the oscillator is phase locked to the input signal by PLL TTL OUT The TTL out...

Page 23: ...The X value of input signal Y The Y value of input signal R The R value of input signal The value of input signal Fig 10 Status Bar 1 Fig 11 Status Bar 2 2 Function Bar When the current menu is Displ...

Page 24: ...sales salukitec com www salukitec com 24 current menu Fig 12 Function bar 1 in DISPLAY menu Fig 13 Function bar 2 in Input Filter menu 3 Monitoring Bar The monitoring bar is at the bottom of the scre...

Page 25: ...ce the input as soon as possible to prevent over voltage damage to the instrument Freq Display the frequency of input signal Ref Source The mode of the reference signal Internal or External PLL The st...

Page 26: ...Tel 886 909 602 109 Email sales salukitec com www salukitec com 26 Fig 15 The Menu bar at the left portion of the main display...

Page 27: ...1 1 Source Setting the Input Signal Mode A Single ended voltage input mode A B Differential voltage input mode I Current input mode Note that when choose mode A and mode A B the amplitude of the input...

Page 28: ...onent of the input signal will be eliminated If the signal frequency is less than 200 Hz DC should be chosen 3 1 5 Line Notches Setting the Status of the Notch Filters None Turn off all notch filters...

Page 29: ...quare wave Sine Choose Sine when the external reference signal is a sine wave If the external reference signal is TTL logic choose TTL Pay attention that even if the REFIN is a square wave it may stil...

Page 30: ...Full Scale Sensitivity 2 nV fA 500 nV fA 100 V pA 20 mV nA 5 nV fA 1 V pA 200 V pA 50 mV nA 10 nV fA 2 V pA 500 V pA 100 mV nA 20 nV fA 5 V pA 1 mV nA 200 mV nA 50 nV fA 10 V pA 2 mV nA 500 mV nA 100...

Page 31: ...ll off slope is 6 dB oct 12dB oct The roll off slope is 12 dB oct 18dB oct The roll off slope is 18 dB oct 24dB oct The roll off slope is 24 dB oct At the same measurement accuracy a greater roll off...

Page 32: ...the submenu as is shown in Fig 20 The two BNCs CH1 and CH2 can output R X Y and that users wanted by setting in the CHANNEL OUTPUT submenu The output offset and expand is set in Offset Expand Fig 20 C...

Page 33: ...56 and 1 is default If the setting value of Expand causes the calculation result over 5V the output will be seriously affected The settings of Offset and Expand will not affect the data display in dyn...

Page 34: ...the submenu in Fig 22 There are 3 function settings in this submenu including StoreRecall Channel and Execute Fig 22 StoreRecall Submenu StoreRecall Store or recall settings Store The current operatio...

Page 35: ...Communication Settings Choose USB in UTILITY and enter the submenu in Fig 23 There are 2 function settings in this submenu including Baud Rate and Parity Fig 23 USB Submenu Baud Rate Baud rate settin...

Page 36: ...43000 56000 57600 115200 230400 380400 460800 and 921600 The default baud rate is 921600 Parity mode setting Even Even mode ODD Odd mode NONE None mode Remote Master and slave settings Master The loca...

Page 37: ...background color Style1 Yellow background Style2 Green background Backlight Setting the level of the background brightness Spin the knob to change the brightness from Level1 to Level8 3 6 5 Info Info...

Page 38: ...ry the current value of internal parameters through commands A query is formed by appending a question mark to the command mnemonic and omitting the desired parameter s from the command Values returne...

Page 39: ...P i The RSLP command sets or queries the trigger way of reference signal when in external reference mode The parameter i selects TTL rising edge i 0 or Sine zero crossing i 1 When the frequency is les...

Page 40: ...23 100 mV nA 6 200 nV fA 15 200 V pA 24 200 mV nA 7 500 nV fA 16 500 V pA 25 500 mV nA RMOD i The RMOD command sets or queries the mode of dynamic reserve The parameter i selects Low Noise i 0 Normal...

Page 41: ...1 j 256 For example the command OEXP 2 50 00 2 will set the offset to 50 00 and the expand to 2 of the parameter Y The OEXP i command queries the offset and expand of the parameter corresponding to i...

Page 42: ...ers X Y R and Freq The values return in ASCII float number in the unit of volt V degree or hertz Hz 4 2 7 Status Read Commands RSTU The RSTU Command queries the status of the gain overload the input o...

Page 43: ...g 27 Fig 27 Software files 1 Install the UART to USB Driver 1 Double click FT232_drive exe in Fig 28 in the fourth file Uart Driver in Fig 27 and then you can see the Fig 29 which shows the installati...

Page 44: ...Serial to USB diver skip this step If the installation fails open readme txt in file Uart Driver and use file inf to install 2 Install NI LabView 2011 or Higher Version and the VISA Driver 1 You need...

Page 45: ...stallation is right and then you will see the Fig 33 3 Now you can configure the SE1201 parameters in PC Fig 32 SE1201_Console_EN File Fig 33 SE1201 Software Interface 5 2 How to Use the Software 1 Be...

Page 46: ...arch for the proper COM automatically If the connection succeeds you will see the version information in Fig 36 Fig 36 Connection Succeeds Wait for a few seconds If the interface pops up a prompt box...

Page 47: ...the COM is right wait for a few seconds and the connection status will refresh to Fig 36 The second solution a Click Wait until it becomes b Click again c Repeat the operations 1 and 2 until the conn...

Page 48: ...ut Configuration Input Source Single Ended Voltage Differential Voltage Current Current Impedance 1MOhm Current Gain 100MOhm Current Gain Input Shield Grounding Float Ground Input Coupling AC coupling...

Page 49: ...ration Area of Reference Signal Table 4 Reference Signal Configuration PHASE 180 to 180 by one step of 0 01 Reference Source External Internal External Ref Trigger TTL Rising Edge Sine Zero Crossing I...

Page 50: ...Dynamic Reserve Low Noise Normal High Reserve Sensitivity 2nV fA 500nV fA 100 V pA 20mV nA 5nV fA 1 V pA 200 V pA 50mV nA 10nV fA 2 V pA 500 V pA 100mV nA 20nV fA 5 V pA 1mV nA 200mV nA 50nV fA 10 V...

Page 51: ...Fig 43 The harmonic order is set manually from 1 to 32767 The harmonic frequency is no more than 120 kHz Fig 43 The Configuration Area of Harmonic Configuration 7 Filter Configuration The filter confi...

Page 52: ...configuration is controlled by a single button If you need to turn off the sync filter click the button and then it changes to which means the sync filter has been turned off 8 Output Configuration Th...

Page 53: ...from 100 mVrms to 1 000 Vrms The minimum accuracy is 1 mVrms Fig 46 The Configuration Area of Sine Out Channel 10 Data Storage The software has the function of data storage Users can choose to save th...

Page 54: ...tion Area of Data Storage 5 3 Usage Examples This example will show how to use SE1201 PC software to configure parameters and observe and record the value of R X Y First connect the SE1201 and PC acco...

Page 55: ...table 8 are as follows 1 According to Table 8 choose the following options in Input Setting including Input Source Input Coupling and Input Notch Filter with other options in default as is shown in Fi...

Page 56: ...50 At last click the button to finish the configurations If you don t use sync filter do not click the corresponding button Close and just keep it If you use sync filter click the corresponding butto...

Page 57: ...and Sensitivity with other options in default as is shown in Fig 51 At last click the button to finish the configurations Fig 51 Reserve Sensitivity Configuration Compare the two SE1201 interfaces be...

Page 58: ...ion 5 These configurations of SE1201 are finished Other options are in default Then uses can collect and save data Fig 54 The data saving is paused As is shown in Fig 54 click the button in the red bo...

Page 59: ...Tel 886 909 602 109 Email sales salukitec com www salukitec com 59 Fig 55 The data saving is executing...

Page 60: ...is a performance test record It is necessary to make a copy of it before filling in the record This record will allow you to determine whether the tests pass or fail and also preserve a record of the...

Page 61: ...y change to the corresponding setting Finally press Sensitivity and spin the knob to check whether the knob is OK 6 1 Self Test The self test checks the lock in hardware This test should be done befor...

Page 62: ...Connect the cable from the SINE OUT to the TEE Do not use any termination Steps 1 Turn the lock in off and on to restart it 2 Press the buttons in the following sequence Sensitivity Set to 1 V through...

Page 63: ...it 2 Set Filter to 24 dB oct 3 Amplitude accuracy is verified at 1kHz and various sensitivities Set the sensitivity of the lock in and the amplitude of the function signal generator in the following s...

Page 64: ...a sine wave Use a cable with BNC connector to connect the output of the function signal generator to the A I input of the lock in Use another cable with BNC connector to connect the reference output o...

Page 65: ...then record Freq 4 End the test and fill in the performance test form 6 7 Sine Output Amplitude Accuracy and Flatness This test measures the amplitude accuracy and frequency response of the internal o...

Page 66: ...then record R then test next frequency e Repeat from 4 c to 4 d until all the frequencies are tested over 5 End the test and fill results in the performance test form 6 8 DC Outputs This test measures...

Page 67: ...input so the lock in s own noise is measured Steps 1 Turn the lock in off and on to restart it 2 Set the parameters in the following sequence Ref Source Set to Internal Ref Frequency Set to 997 Hz Se...

Page 68: ...6mV 200mV 96kHz 196mV 200mV 120kHz 196mV Upper Limit 1 0200V 202 00mV 102 00mV 20 400mV 10 200mV Upper Limit 204mV 204mV 204mV 204mV 204mV 5 Amplitude Linearity Sensitivity Amplitude Lower Limit Readi...

Page 69: ...put Offset Lower Limit Reading Upper Limit CH1 100 00 4 850V 5 150V 50 00 2 376V 2 625V 0 00 0 050V 0 050V 50 00 2 625V 2 375V 100 00 5 150V 4 850V Output Offset Lower Limit Reading Upper Limit CH2 10...

Page 70: ...then turn on the power switch The system is in default now 2 Use a BNC cable to connect the output of the function signal generator and the A I input of the SE1201 Use another BNC cable to connect th...

Page 71: ...utput amplitude of the function signal generator If the output is overload you should increase the sensitivity of the SE1201 The default sensitivity is 100 mV So in this case it will not overload If y...

Page 72: ...com www salukitec com 72 Fig 60 GAIN TC Menu Interface 2 Press DISPLAY as below to see X Y R and as Fig 61 Fig 61 DISPLAY Menu Interface 3 Press any other buttons except DISPLAY to see X Y R and at t...

Page 73: ...SE1201 The steps are below 1 Disconnect all cables from the lock in Connect the power source and then turn on the power switch The system is in default 2 Use a BNC cable to connect the output of the f...

Page 74: ...4 Measured Signal Parameter 4 Press REF PHASE in front panel and enter the corresponding submenu as is shown in Fig 66 Fig 65 REF PHASE Submenu Fig 66 REF PHASE Submenu Set the harmonic number in Harm...

Page 75: ...re value is E and the angular frequency is After Fourier expand the result is sin 1 5 sin 5 1 3 sin 3 1 sin 2 t n t t t E t f Where the nth harmonic is a sine wave sin 2 t n n E t f Therefore the vali...

Page 76: ...switch The system is in default 2 Set the corresponding parameters of SE1201 1 Press INPUT FILTERS and then set the input mode to I and Amplitude 1M Other settings remain the default 2 Press REF PHAS...

Page 77: ...data collection platform Then you will get an uncalibrated spectral curve as is shown in Fig 70 Fig 70 Spectrum Curve measured by SE1201 5 Use the SR830 instead of the SE1201 to measure Repeat the st...

Page 78: ...hese automatically online You just need to wait for a few minutes If the installation fails you need to install the driver manually according to Chapter 5 2 3 Open the folder Uart Driver in your disk...

Page 79: ...ommUart Assistant Software Display After these settings are completed if you see a black circle like you need to click the button to make it red like If you cannot make it red please check the port nu...

Page 80: ...alukitec com 80 The port number is COM5 Fig 73 Check the port number at Device Manager Select COM5 port number Select the default baud rate 921600 Open and close buttons Fig 74 USB connection succeeds...

Page 81: ...se see Chapter 4 Remote Programming The terminator can be a carriage return cr or a hexadecimal number 0D When sending the command first input the command in the sending area then press the Enter key...

Page 82: ...er the 0X0D Selecting this item will cause the ASC II in the send area to be converted to a hex format display After the instruction to be added 0X0D Fig 76 Send and Receive Commands in HEX 2 The seri...

Page 83: ...com 83 Can return parameters normally Select the fixed byte set the value to 0D No additional carriage return 0xD is required Fig 77 Setting the checksum 3 Multiple commands are separated by such as S...

Page 84: ...nt to read the values of X Y R and Freq continuously you can set the transfer interval time as Fig 79 Note that when use this software to control the SE1201 the LCD display will refresh at the same ti...

Page 85: ...com www salukitec com 85 Continuously receives the returned R value data Set the data cyclic to send The transmission interval is set to 200ms Send an instruction to read the R value Fig 79 Read the s...

Reviews: