L
L
COM
Regula
tor
ER
T20T
X
NO
N
N
L
L
M
N
N
COM
NO
lub
Odbiornik R
XR
T505
STYKI W KOTLE
DO PODŁĄCZENIA
REGULATORA ON - OFF
(WG INSTRUKCJI KOTŁA)
Odbiornik R
XR
T505
MAX
16 (5) A
5
10
15
20
25
30
Regula
tor
ER
T20T
X
5
10
15
20
25
30
L
L
COM
Regula
tor
ER
T20T
X
NO
N
N
L
L
M
N
N
COM
NO
lub
Odbiornik R
XR
T505
STYKI W KOTLE
DO PODŁĄCZENIA
REGULATORA ON - OFF
(WG INSTRUKCJI KOTŁA)
Odbiornik R
XR
T505
MAX
16 (5) A
5
10
15
20
25
30
Regula
tor
ER
T20T
X
5
10
15
20
25
30
ON
OFF
NO
NO
COM
COM
L
L
N
N
ON
5
10
15
20
25
30
SY
NC
ER
T20T
X
T40
IP30
868MH
z
3V
A
A
x
2
NOTE:
Always isolate the AC Mains supply before installing
or working on any components that require 230 V AC 50Hz supply.
The assembly should be carried out by a person having appropriate
electric permissions. Incorrect wires connection can damage
the device.
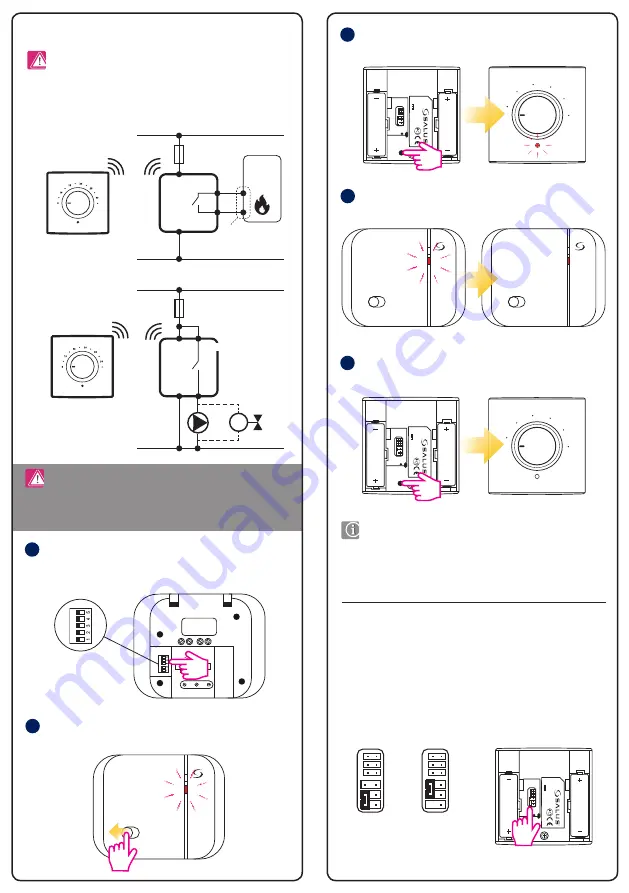
Communication code change is done by DIP switches (numbered 1-5).
Set the DIP switches on the receiver in random positions.
To check if the devices have been paired correctly, set the
thermostat knob to the maximum.
Red
led diode will light up
on the thermostat and heating signal will be sent. If the
green
LED lights up on the receiver it means that the devices are paired
correctly.
Set the receiver’s switch to the ON position -
red
LED diode on the
receiver will start to flash.
Press and hold for 3 seconds SYNC button located on the back of the
thermostat. Thermostat’s
red
LED diode will start flashing.
If the LED diode on the receiver stops flashing, it means that the
pairing process was successful.
To finish the pairing process, press and hold SYNC button again.
LED diode on the thermostat will stop flashing.
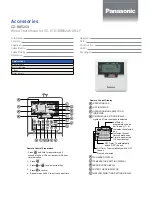
The ERT20RF thermostat is factory-adjusted to work with a heating device
(heating mode), however, there is a possibility to switch it to cooling mode,
so it can work also with a cooling device.
To change heating/cooling mode, change the position of the jumper on the
back of the thermostat, as shown in the figure below:
Heating
mode
Cooling
mode
Heating/cooling mode changing
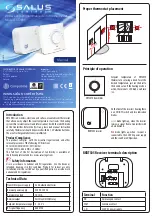
Wiring diagram
COMMUNICATION CODE CHANGE
NOTE:
To avoid interference caused by other wireless devices, it is
strongly recommended to change the communication code for other
than factory.
1
2
3
4
5
ON
OFF
NO
NO
COM
COM
L
L
N
N
ON
5
10
15
20
25
30
SY
NC
ER
T20T
X
T40
IP30
868MH
z
3V
A
A
x
2
ON
OFF
NO
NO
COM
COM
L
L
N
N
ON
5
10
15
20
25
30
SY
NC
ER
T20T
X
T40
IP30
868MH
z
3V
A
A
x
2
ON
OFF
NO
NO
COM
COM
L
L
N
N
ON
5
10
15
20
25
30
SY
NC
ER
T20T
X
T40
IP30
868MH
z
3V
A
A
x
2
ON
OFF
NO
NO
COM
COM
L
L
N
N
ON
5
10
15
20
25
30
SY
NC
ER
T20T
X
T40
IP30
868MH
z
3V
A
A
x
2
ON
OFF
NO
NO
COM
COM
L
L
N
N
ON
5
10
15
20
25
30
SY
NC
ER
T20T
X
T40
IP30
868MH
z
3V
A
A
x
2
ON
OFF
NO
NO
COM
COM
L
L
N
N
ON
5
10
15
20
25
30
SY
NC
ER
T20T
X
T40
IP30
868MH
z
3V
A
A
x
2
ON
OFF
NO
NO
COM
COM
L
L
N
N
ON
5
10
15
20
25
30
SY
NC
ER
T20T
X
T40
IP30
868MH
z
3V
A
A
x
2
ON
OFF
NO
NO
COM
COM
L
L
N
N
ON
5
10
15
20
25
30
SY
NC
ER
T20T
X
T40
IP30
868MH
z
3V
A
A
x
2
ON
OFF
NO
NO
COM
COM
L
L
N
N
ON
5
10
15
20
25
30
SY
NC
ER
T20T
X
T40
IP30
868MH
z
3V
A
A
x
2
3
3 sec.
3 sec.
ER
T20T
X
Thermosta
t
RXR
T505
Rec
eiv
er
BOILER CONTACTS FOR
ON-OFF THERMOSTAT
(ACCORDING TO THE
BOILER INSTRUCTION)
ER
T20T
X
Thermosta
t
RXR
T505
Rec
eiv
er
or


