background image

48

After inserting the batteries, the LED will turn on for 2 seconds. 

Red

 colour = device not 

paired, 

green

 colour = device is paired. To re-pair the device please refer to section 7.2.2.

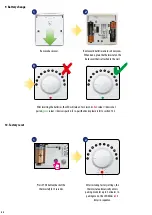
9. Battery change

10. Factory reset

Remove old batteries and insert new ones. 

When done, place the thermostat on the 

back cover that is attached to the wall.

Remove back cover.

5 sek. 

2

2

3

After restoring factory settings, the 

thermostat automatically enters 

pairing mode for up to 2 minutes. In 

pairing mode, the LED blinks 

red

 3 

times in sequence.

1

1

Press SYNC button (back of the 

thermostat) for 5 seconds.

Summary of Contents for HTR-RF(20)

Page 1: ...HTR RF 20 THERMOSTAT FULL USER MANUAL...

Page 2: ...e pencil icon 17 6 4 Setpoint temperature change 18 6 5 Heat Cool mode change KL08RF connection 19 6 6Thermostat modes 20 6 6 1 Schedule mode 20 6 6 2Temporary override mode 24 6 6 3 Manual mode 24 6...

Page 3: ...8 OPERATING in OFFLINE MODE 47 8 1 Heat cool mode change KL08RF connection 47 9 Battery change 48 10 Factory reset 48 11 Cleaning and Maintenance 49 12 Technical Informations 49 13 Warranty 50...

Page 4: ...4...

Page 5: ...tions in accordance with standards and regulations in force in the given country and in the EU Never try to connect the device other than as described in the manual Before assembly repair or maintenan...

Page 6: ...e through the coordinating unit CO10RF The ideal position to thermostat mounting is about 1 5m under floor level far from heating or cooling sources Thermostat can t be exposed to sunlight or any extr...

Page 7: ...l automatically adjust the temperature decrease value according tothejumpersettings Jumper Function Default TPI Hysteresis TPI jumper on or Hysteresis 0 5 C jumper off TPI on NSB function NSB on jumpe...

Page 8: ...reliability detectionand removal of transmission errors as well as connectivity between established priority devices Security measures include devices authenticated using a unique key pair encrypted c...

Page 9: ...DTOTHEINTERNET You can use your devices locally withouttheSmartHomeApp Gateway works in this mode as standard ZigBee coordinator Compatibiledevices KL08RFwireless wiring centre for 8 zone underfloor h...

Page 10: ...odeasaconfirmation etc WiringCentregroupselectionOK choiceof1group 1blinkofgreendiodeasaconfirmation choiceofsecondgroup 2blinksofgreendiodeasaconfirmation choiceofnogrouping 1blinkofgreendiodeasaconf...

Page 11: ...ode will blink alternately green red showing the firmware version after all red diode will start to blink 3 times in a row sequently which means that thermostat is in pairing mode Before pairing proce...

Page 12: ...ake sure that you have downloaded the Salus Smart Home App from the Google Play or App Store You will need to follow a few easy steps to create an account and then link your thermostat to the Universa...

Page 13: ...p Equipment Press Scan for equipment button 7 8 App has started scanning 1 2 For easier installation please make sure you have already added underfloor heating wiring centre KL08RF Control Box to your...

Page 14: ...elect your KL08RF Control Box added before Diode will flash constantly red Thermostat is connected Go to the Smart Home app to configure it 10 Select your thermostat and press Connect equipment button...

Page 15: ...Box 3 Gateway stop flashing and turn to steady blue color which means pair process has been finished Press Finish button to end the setup process in the app Select hour format 24H 12H and confirm by C...

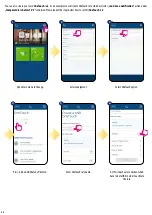
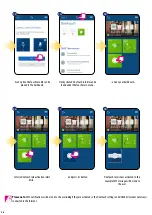
Page 16: ...vices or Internet browser 6 2 App icons description Menu view of HTR RF 20 thermostat set as a programmable thermostat in SALUS SmartHome application Thermostat mode selection Thermostat Heat Cool mod...

Page 17: ...17 6 3 Change thermostat name pencil icon Name your termostat and confirm it by Save button Click on the pencil icon Select the thermostat in the main app menu 1 2 3 4 Press the thermostat s name...

Page 18: ...sor to left right on your App On your App screen the setpoint temperature is the number displayed in a larger font Select the thermostat in the main app menu 1 2 3 4 Old setpoint value New setpoint va...

Page 19: ...Look at the instructions below In the application you will see blue thermostat tile with snowflake icon when cooling mode is on 1 2 When there is jumper at CO terminal KL08RF is automatically working...

Page 20: ...leicononyourApp TheHTR RF 20 thermostatgivesyouthepossibilitytoprogrammscheduleONLYbySALUSSmartHomeapp Youcanchoosefrom3differentschedule configurations Separate schedule for working days Mo Fri and w...

Page 21: ...dd interval option to add your intervals to the schedule Then add a start time and temperature setpoint after all confirm by pressing Add button 4 5 6 TO SETTHE SCHEDULE INTHE APP Press thermostat s n...

Page 22: ...LY You can duplicate the same schedule for other thermostat s Click on the Duplicate schedule option Select thermostat for which you want to duplicate the schedule Now app is saving your choice and af...

Page 23: ...use Default schedule button It will remove all current intervals and it will set default schedule 4 Select thermostat in the main app menu 1 2 3 Scroll down and press pencil icon TO SET DEFAULT SCHEDU...

Page 24: ...k modes icon Select Permanent Hold mode Hand icon confirms that thermostat is in manual mode 1 2 2 6 6 2Temporary override mode Temporary override mode means manual temperature change during active sc...

Page 25: ...perature When thermostatworksinFrostprotectionmodethenyouhavenopossibilitiestochangetemperaturesetpoint ToactivateFrostprotectionmodeonline please followe steps below NOTE When the thermostat exits fr...

Page 26: ...f you want to have acces to this function then first you have to add window door sensor OS600 or SW600 please refer to the OS600 or SW600 manual instruction To pair window door sensor OS600 SW600 with...

Page 27: ...here is no need to heat If you want to have acces to this function then first you have to add SPE600 Smart Plug to the SALUS SmartHome system please refer to the SPE600 manual instruction To pair SPE6...

Page 28: ...heat If you want to have acces to this function then first you have to add SR600 Smart Relay to the SALUS SmartHome system please refer to the SR600 manual instruction To pair SR600 Smart Relay with...

Page 29: ...o identify your device during thermostat s pairing process 4 Use the magnifying glass icon Click on the magnifying glass icon 1 2 Select the thermostat in the main app menu 3 Press thermostat s name T...

Page 30: ...n unpin thermostat from dashboard in Smart Home application please follow steps below 1 2 3 Open main menu in the app Select equipment Select All equipment option Select your HTR RF 20 thermostat Pres...

Page 31: ...w how to enter those settings 6 12 User settings basic settings Select the thermostat in the main app menu Select thermostat s settings 1 2 3 Press thermostat s name Select the hour format for the the...

Page 32: ...lified installers or knowledgeable users Scroll down to enter Admin settings Select the thermostat in the main app menu Select thermostat s settings 1 2 3 4 5 Press thermostat s name Select the temper...

Page 33: ...s ComfortTemperature set thermostat temperature to 21 C Frost Protection Mode set thermostat to the Frost Mode temperature setpoint can be set in the user settings 5 C by default Holiday Mode set ther...

Page 34: ...example we will create OneTouch rule which activates send me a notification action under temperature is below 10 C condition Please look at the steps below how to set this OneTouch rule Press Add a A...

Page 35: ...ail or SMS notification and enter the message content Confirm by pressing Set button To finish OneTouch rule creation press Save button Choose the condition details for your thermostat In this case se...

Page 36: ...pinned to the dashboard Newly created OneTouch rule tile can be found under OneTouch main menu and on your dashboard To force OneTouch rule activation select it tile 13 17 18 14 15 16 Please note SMS...

Page 37: ...oblem has been solved exclamation mark will disappear in application and thermostat will stop flashing error 1 2 Press the exclamation mark button All current errors are displayed LED diode Descriptio...

Page 38: ...is expressed in decibel units db Compare your value with scale below 50db to 0db very good quality signal 75db to 50db good quality signal 85db to 75db low quality signal 95db to 85db bad quality sig...

Page 39: ...teps below NOTE FactoryresetfunctionremovesthermostatfromtheZigBeenetwork Thismeansthatthermostatisnotvisibleanymoreinthe Myequipment list At the very bottom of thermostat s menu choose Remove option...

Page 40: ...seconds 5sek At the very bottom of thermostat s menu choose Remove option Select the thermostat in the main app menu You can also do factory reset from the thermostat directly It will also remove your...

Page 41: ...dtotheInternet all devices should be found in the SALUS Smart Home application using Scan for equipment button All devices found in the application don t need to be reconfigured because all settings a...

Page 42: ...L N L Wyj cie na czujnik punktu rosy opcjonalnie UWAGA Przeka nik modu u sterowania pompy w listwie KL08NSB jest beznapi ciowy dlatego pod czaj c pomp CO nale y wykorzysta zewn trzne r d o zasilania...

Page 43: ...bia y zasilany 230V VS10BRF Regulator podtynkowy czarny zasilany 230V VS20WRF Regulator natynkowy bia y zasilany bateryjnie 4xAAA VS20BRF Regulator natynkowy czarny zasilany bateryjnie 4xAAA Powy sze...

Page 44: ...grzewania pod ogowego Modu sterowania kot em listwy KL08RF nale y podpi do kot a w miejsce zworki termostatu pokojowego N L N L Wyj cie na czujnik punktu rosy opcjonalnie UWAGA Przeka nik modu u stero...

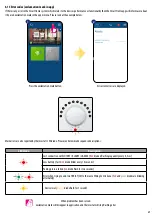
Page 45: ...heating wiring centre KL08RF Control Box and installation of the thermostat as a group thermostat SLAVE 3 OpentheZigBeenetwork OR 5sec 5sec 9 Choose group number using knob Without group 1 position G...

Page 46: ...e 14 13 11 10 12 The number of green flashes of the LED confirms your choice Select the wiring centre zone number up to 12 zones using knob 1 Zone 1 position 2 Zone 2 position 12 Zone 12 position Conf...

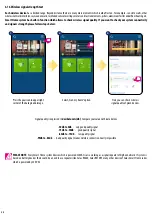
Page 47: ...it s necessary to insert jumper into CO terminal KL08RF wiring centre Look at the instructions below CO terminal of the KL08RF wiring centre if contacts are closed then all thermostats paired with KL...

Page 48: ...ange 10 Factory reset Removeoldbatteriesandinsertnewones Whendone placethethermostatonthe backcoverthatisattachedtothewall Remove back cover 5sek 2 2 3 After restoring factory settings the thermostat...

Page 49: ...pecial maintenance Periodically the outer casing can be wiped clean using a dry cloth please DO NOT use solvents polishes detergentsorabrasivecleaners asthesecandamagethethermostat Therearenouserservi...

Page 50: ...twillbefreefromanydefectinmaterialsorworkmanship andshallperforminaccordancewithitsspecification foraperiodoffiveyearsfromthedateofinstallation SALUSControlssoleliabilityforbreachofthiswarrantywillbe...

Page 51: ......

Page 52: ...CONTROLS Sp z o o Sp k Rolna 4 43 262 Kobielice Poland www salus controls com SALUS Controls is a member of the Computime Group Maintaining a policy of continuous product development SALUS Controls pl...

Reviews: