background image

6

COMPANY

MODEL

Alpha Heating

E-Tec S
E-tec Plus
E-tec
Evoke
Intec GS

Atag

iC
iC Economiser
iS

Baxi

100 Combi
200 Combi
400 Combi
600 Combi

Daikin

D2CND 24Kw
D2CND 28kw
D2CND 35kw

Ferroli

i25 Condensing Combination Boiler
i29 Condensing Combination Boiler

Ideal

Indep Combi
Independent Combi
Independent System
Logic Combi+ Combi C
Logic Combi C24, C30, C35 (via a separate bundle set)
Logic Code Combi (via a separate bundle set)
I-mini C24, c30 (via a separate bundle set)
Vogue Combi C26,C32, C40
Logic + System
Logic + Heat

Intergas

Intergas Rapid
Intergas Rapid Plus
Combi Compact, Compact Range
ECO RF
Xtreme
Xclusive

Main

Eco Compact Combi 25-30

Navien

Navien NCB

Ravenheat

Avanta, Quinta Ace
Quinta Pro
Gas 110 Eco

Vokera

Evolve C
Evolve S
Linea One (przez OpenTherm Kit Part_1221179)
Vision Combi (requires a control interface 294501430
Compact A (requires a control interface 29450143)
Verve (only heating mode)
Mynute I (only heating mode)
Vision System (only heating mode)
Unica I
Vibe
Vision C

COMPANY

MODEL

Vokera

Linea HE
Mynute A
Mynute HE
Unica HE

Viessmann

Vitodens 100W Typ WB1A (Connection: X3.3 and X3.4)
Vitodens 100W Typ WB1B (Connection: X21.1 and 
X21.2)
Vitodens 100W Typ WB1C (Connection: X21.1 and X21.2)
Vitodens 200-W WB2B 26+ 35 kW (via Expansion Mo-
dule OT and OT-A8 + _Terminal -10 and +10 are on the 
extension of the A8 boiler)
Vitodens 200-W WB2C, B2HA,B2JA, B2LA (via icm 
Expander OpenTherm)

Vaillant

(via Vaillant 

VR33 module)

Ecotec Pro
Ecotec Plus
Ecotec Exclusive
Ecofit Pure

Worcester 

Bosch

(via Nefit 

EMS-OT 

OpenTherm 

converter)

EMS capable boilers
Greenstar i
Greenstar i Junior (Made in July 2013)
Greenstar Si Compact
Greenstar CDi Compact
Greenstar CDi Classic (Made after 16.01.2007 with 
CF12.10 software version and newer)
Greenstar Highflow CDi
Greenstar 12i System – 24i System (On condition that 
an optional integrated diverter valve manufactured 
after February 2011 is installed)
Greenstar 27i System – 30i System (Provided the optio-
nal Integrated Changeover Valve is installed Greenstar 
CDi Classic System (provided the optional Integrated 
Changeover Valve manufactured after 02/16/2007 with 
software version CF12.10 and above is installed))

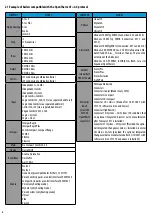
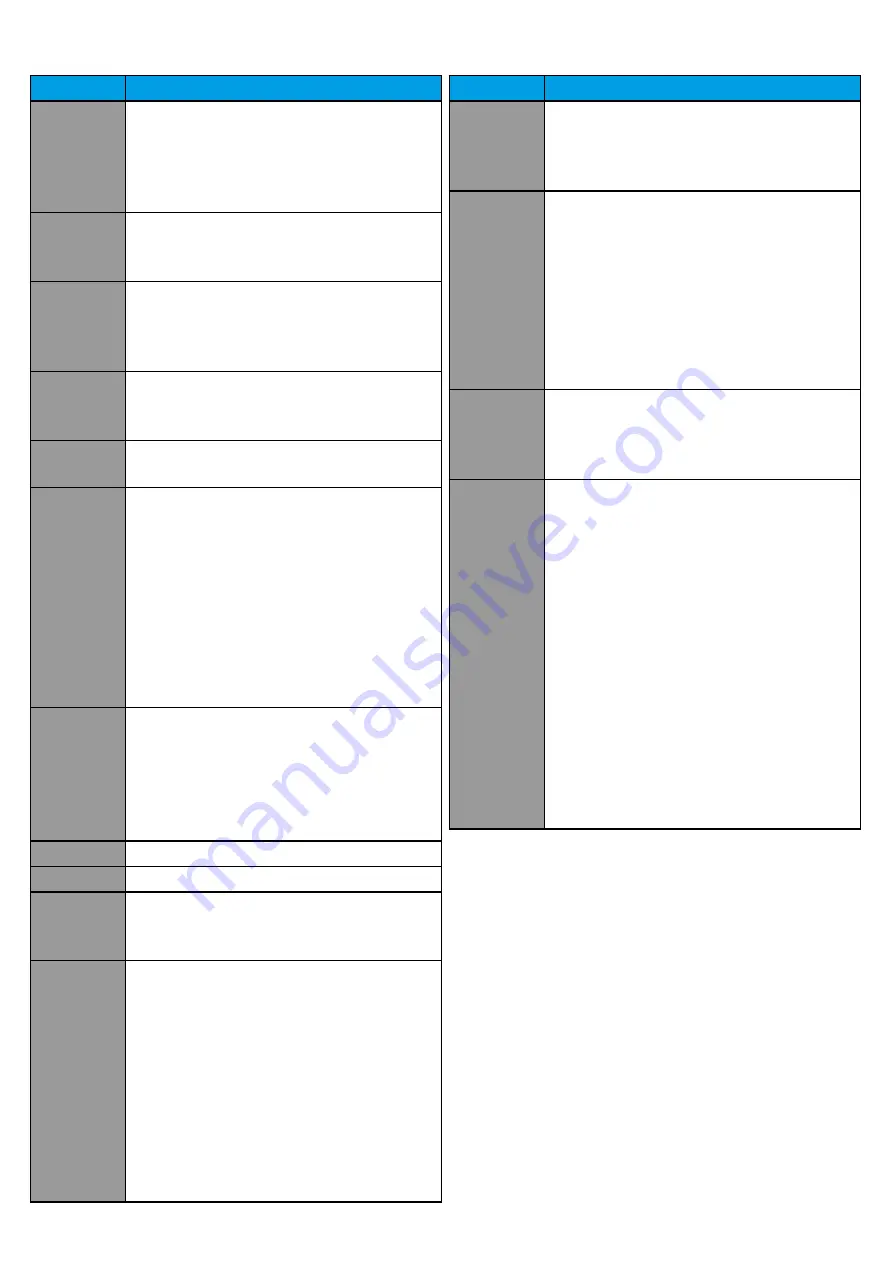
2.1 Example of boilers compatible with the OpenTherm OT+ 4.0 protocol

Summary of Contents for RXRT520

Page 1: ...RT520RFTHERMOSTAT FULL USER MANUAL...

Page 2: ...OpenTherm HotWater configuration 17 4 5 Max boiler temperature settings 17 5 User settings 18 5 1 Manual mode 18 5 2 Schedule mode programming schedule 19 5 3 Switching between manual and schedule mo...

Page 3: ......

Page 4: ...tions in accordance with standards and regulations in force in the given country and in the EU Never try to connect the device other than as described in the manual Before assembly repair or maintenan...

Page 5: ...you don t have TRVs you should choose a temperaturethatisreasonableforthewholehouse IfyoudohaveTRVs youcanchooseaslightlyhighersettingtomakesurethateventhecoldestroom is comfortable then prevent any...

Page 6: ...ODEL Vokera Linea HE Mynute A Mynute HE Unica HE Viessmann Vitodens 100WTypWB1A Connection X3 3 and X3 4 Vitodens 100W Typ WB1B Connection X21 1 and X21 2 Vitodens100WTypWB1C Connection X21 1andX21 2...

Page 7: ...ermostat can t be exposed to sunlight or any extreme conditions like for example draft Because of fire and explosion risk there is not allowed to use thermostat in atmosphere of explosive gases and fl...

Page 8: ...ation The RXRT520 receiver can operate in two different modes AUTO automatic and MANUAL manual To select a specific mode use the buttons on the front of the receiver For the receiver to work with the...

Page 9: ...ver is in the pairing mode and is looking for a signal from the thermostat then you must activate the PAIRING option in the thermostat or The receiver was paired but lost communication with the thermo...

Page 10: ...elow Loosen the screws with a scre wdriver just enough to tilt the back housing Attach the back housing to the wall keeping the correct positioning of the plastic hinges using the marked holes see the...

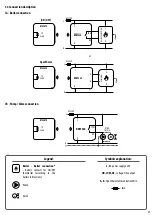
Page 11: ...O M l u b N O N N L L N L A C 2 N R X R T 5 1 0 P O D C Z E N I E K O T A 3 V 2 x A A R T 5 2 0 T X L A C 2 3 0 V C O M l u b N O N N L L N L A C 2 N R X R T 5 1 0 P O D C Z E N I E K O T A 3 V 2 x A...

Page 12: ...measured set 14 Program number 15 Settings 16 Program indicator 17 Boost function PLEASE NOTE The LCD screen can be activated by using any button 6 2 7 9 11 17 3A 3B 13 5 4 14 15 16 1 8 10 12 1 2 3 4...

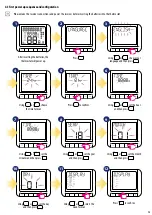
Page 13: ...mat Press to confirm Using or set the year and then press Using or set the month and then press Press to confirm Using or set the hour and then press Using or choose your language and then press After...

Page 14: ...le DST Daylight SavingTime Using or select your temperature accuracy Press to confirm When OpenTherm is connected the device software will automatically adjust to the OpenTherm settings Press to confi...

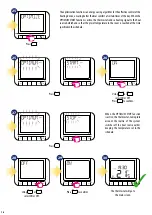
Page 15: ...Press Press to confirm Using or select the TPI type you want to use TPI Time Proportional Integral is a self learning time proportional algorithm TPI type of regulation ensures economical system opera...

Page 16: ...ive the thermostat sends a heating signal to the heat source beforehand so that the preset temperature in the room is reached at the time specified in the schedule 25 25 26 The thermostat will go to t...

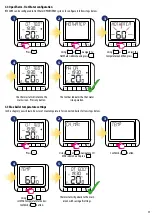
Page 17: ...ates that hot water is in operation Thermostat will go back to the main screen with saving all settings The thermostat will return to the main screen Press any button 1 1 2 3 2 3 5 4 4 4 OpenTherm Hot...

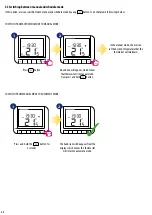
Page 18: ...on for 3 seconds A hand icon is displayed when manual mode is active 1 4 5 2 3 Press button A hand icon will appear which means that thermostat is in manual mode To set temperature use or button Confi...

Page 19: ...ime periods Using or select the program type between 5 Individual set a daily schedule Using or set the temperature and then press Press 2 schedule for the working days and for the weekend Using or se...

Page 20: ...ch means that thermostat is in manual mode Now press and hold button 3 sec TO SWITCH FROM MANUAL MODETO AUTOMATIC MODE TO SWITCH FROM AUTOMATIC MODETO MANUAL MODE 2 The hand icon will disappear from t...

Page 21: ...ode Press Hr button to set hour for temporary override eg 4 hours 4 times button pressing Confirm by button Using or buttons set the temperature for BOOST mode Confirm by button Thermostat is working...

Page 22: ...ions COOL thermostat controls cooling installations Thermostat is set to heating mode by default To change the parameter follow the steps below 1 4 5 6 2 3 Press Using or move between parameters Using...

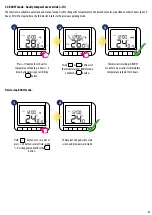
Page 23: ...3 5 Cto3 5 C in steps of 0 5 C To calibrate temperature please follow steps below 1 4 5 2 3 Press Using or move between parameters Using or move between parameters Confirm OFFSET option using button U...

Page 24: ...lordtosetaservicereminderonthethermostatthatwillwarnthetenantwhenthe boiler is due its annual service 5 7 Landlord settings 5 7 1 PIN code setting To confirm and exit this option use button Then use o...

Page 25: ...select the warning period and then press Press Using or navigate to Landlord submenu and press Using or select ON and press Inthischapteryouwilllearnhowtosettheservicenotification reminderfortheboile...

Page 26: ...ian It will be available in the notification for easier contact regarding the renewal of the boiler service Using or select the lock temperature and then press Using or enter the phone number Press to...

Page 27: ...u and press 1 2 5 7 3 Maximum Minimum setpoint temperature setting MAX_MINseetingallowsyoutodefinemaximumandminimumtemperaturesetpointwhichcouldbesetbythethermostat Pleaseseethestepsbelow To confirm a...

Page 28: ...s the thermostat signals and its operation depends only on the position of the top ON OFF switch If the RECEIVER thermostat parameter is set to OFF MANUAL the receiver switch AUTO MANUAL is locked dis...

Page 29: ...1 2 3 Press Using or move between parameters Press to enter Time Date settings Using or choose the time format Press to confirm Using or set the minutes and then press Using or set the day and then pr...

Page 30: ...ture which should be maintaned during holiday mode and then press According to set period of time the plane icon will appear on the main screen and thermostat is working in holiday mode Using or set t...

Page 31: ...e language follow steps below 1 2 Press Using or move between parameters Using or choose your language Press to confirm Thermostat will go to the main screen with saving the changes 3 4 5 6 Press to e...

Page 32: ...the devices correctly you must first prepare the receiver for synchronization If you want to re pair the devices with each other make sure that the receiver is disconnected from the power supply and t...

Page 33: ...lls drywallcoveredwithaluminumfoil metalobjectssuchascabinets generalradiointerference etc However therangeissufficientformost domesticuse Itisrecommendedtotesttheradiotransmissionbetweendevicesbefore...

Page 34: ...ry default settings please follow steps below Thermostat will display errors only when it s connected to the boiler by OPENTHERM terminals A B Please refer then to boiler manual Each boiler can have d...

Page 35: ...x 95 x 26 Receiver 96 x 96 x 27 TheRT520RFthermostatrequiresnospecialmaintenance Periodically theoutercasingcanbewipedcleanusingadrycloth pleaseDONOTusesolvents polishes detergents or abrasive cleane...

Page 36: ...or replacing the defective product This product includes software that matches the distributor s identification at the time of sale The manufacturer distributor provides a guarantee covering all func...

Page 37: ......

Page 38: ...S Sp z o o Sp k ul Rolna 4 43 262 Kobielice www salus controls eu SALUS Controls is a member of the Computime Group Maintaining a policy of continuous product development SALUS Controls plc reserve th...

Reviews: