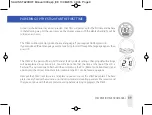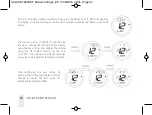
As soon as the batteries have been inserted, the ST620 will power up for the first time and behave
in thefollowing way: All the segments on the display along with the display backlight will be
turned on as shown.
The ST620 will now prompt you to choose a language. If you require ENGLISH press OK.
If you require a different Language use the touch ring to scroll through the language options then
press OK.
The ST620 at this point will be in AUTO and at factory default settings. Changing default settings
will be explained in sections 4 & 5. You will also notice that the time at the top of the LCD is
flashing. This will continue to flash until the unit picks up the RCC (Radio Controlled Clock) signal
and displays the correct time. More information on the RCC can be found on page 28.
Now put the ST620 front fascia in a safe place so you can mount the ST620 back plate. The back
plate is easily fixed to the wall and uses industry standard mounting positions. We recommend
that you continue with the back plate mounting before starting to program the ST620.
POWERING UP THE ST620 FOR THE FIRST TIME
ST620ROF INSTRUCTION MANUAL
09
SALUS ST620ROF Manual 003.qxp_89 11/08/2015 09:45 Page 9

