background image

ST621TX INSTRUCTION MANUAL

32

MAINTENANCE

The ST621TX programmable thermostat requires no special maintenance. Periodically, the outer 

casing can be wiped clean using a dry cloth (please DO NOT use solvents, polishes, detergents or 

abrasive cleaners, as these can damage the thermostat). There are no user serviceable parts within the 

unit; any servicing or repairs should only be carried out by SALUS Controls or their appointed agents.
Should the ST621TX programmable thermostat fail to function correctly, check:
•  The batteries are the correct type, fitted correctly and are not exhausted - 

  fit new batteries if in doubt.

•  Heating system time switch or programmer is switched on.

•  If the ST621TX is still not functioning correctly, press the Reset Button.

Summary of Contents for ST621TX

Page 1: ...TheST621TXcanbeusedwithanyof thesereceivers 868MHz RXBC605 RXST625 RXRT505 RXVBC605 RXWBC605 ST621TX Digital Room Thermostat...

Page 2: ...ns are applicable to the SALUS Controls model stated on the front cover of this manual only and must not be used with any other make or model These instructions are intended to apply in the United Kin...

Page 3: ...Liquid Crystal Display LCD The thermostat provides the user interface and temperature sensing control The thermostat and RF receiver are linked together by a Radio Frequency RF signal The use of the r...

Page 4: ...ase of the ST620 undo the securing screw on the bottom Now pull the screw down until it stops then carefully separate the two halves of the case by gently pulling out an upwards direction You will now...

Page 5: ...g to scroll through the language options then press OK The ST621TX at this point will be in AUTO and at factory default settings Changing default settings will be explained on page 15 You will also no...

Page 6: ...ostat is mounted away from any possible sources of interference such as radios TV sets computers etc and is not mounted on or in close proximity to large metal objects Installing the ST621TX in enclos...

Page 7: ...ve selected programme Output indicator Indicates output is turned on Holiday indicator Indicates Holiday operation mode is selected Battery Status Indicates battery is low RF Signal indicator Indicate...

Page 8: ...h Ring move clockwise Increases the selected setting and scrolls down the menu selection Touch Ring move anti clockwise Decreases the selected setting and scrolls up the menu selection OK Key Enters M...

Page 9: ...N OF SYNC BUTTONS ON THE RECEIVERS RXST625 RXVBC605 RXWBC605 For full instructions on the receiver pairing refer to the RXBC605 manual For full instructions on the receiver pairing refer to the RXRT50...

Page 10: ...e menu you want to use You can scroll through the menus in either direction forwards or backwards depending on the direction you move your finger around the Touch Ring The menus are displayed in the o...

Page 11: ...s being transmitted The RF address code will be generated randomly and the thermostat will transmit the signal every second for the full 10 minutes until The Arrow key is pressed to return to the prev...

Page 12: ...g distance e g shielding by thick walls foil back plasterboard metal objects such as filing cabinets general RF interference and so on The operating range is generally around 30 metres which is large...

Page 13: ...mmable thermostat display and is operated very easily by moving your finger around the ring The backlit Liquid Crystal Display LCD gives a highly visible easily readable indication of the programmable...

Page 14: ...direction forwards or backwards depending on the direction you move your finger around the Touch Ring The menus are displayed in the order shown in the picture above Pressing the Arrow key will retur...

Page 15: ...mmes are not suitable for your particular situation reprogramming the ST621TX with your own settings is a very straightforward operation To start programming the ST621TX press the OK key when in NORMA...

Page 16: ...ng the minutes section of the time will then start to flash Change this setting using the Touch Ring in the same way that you changed the hour setting confirming your setting with the OK key Finally s...

Page 17: ...ttings for Tuesday have been programmed by copying the settings can then be copied to Wednesday and so on Pressing the Arrow key at any time will return the ST621TX to the previous screen Once all the...

Page 18: ...d off automatically and the ST621TX will operate in AUTO mode The HOLIDAY mode indicator will be displayed on all the HOLIDAY menu screens To start entering the Holiday Override settings press the OK...

Page 19: ...red is the protection temperature you want set while HOLIDAY mode is active Use the Touch Ring to set the preferred temperature and confirm the choice using the OK button Once the temperature setting...

Page 20: ...e REVIEWING THE SET TEMPERATURE NORMAL mode is when the thermostat is displaying the room temperature if you press the Touch Ring anywhere except the OK and Arrow keys when the ST621TX is in NORMAL mo...

Page 21: ...nu screens On entering the menu use the Touch Ring to scroll to the preferred option OFF or ON and confirm the choice using the OK button Use the Arrow key to return to the Menu Option display If the...

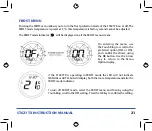
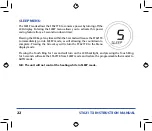
Page 22: ...e within the 5 seconds will cause the ST621TX to immediately go into SLEEP mode as will allowing the countdown to complete Pressing the Arrow key will return the ST621TX to the Menu display mode Press...

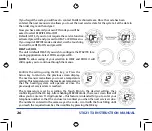
Page 23: ...ill start to flash again approximately 0 5 seconds after the Touch Ring is released The ST621TX will go back to NORMAL mode without changing the set temperature after 10 seconds of inactivity or after...

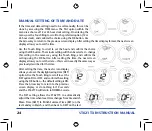
Page 24: ...n be selected change this setting in the same way using the Touch Ring and confirm the setting using the OK button After setting the time the next screen display allows you to set the date this is set...

Page 25: ...is in NORMAL mode To access the Menu screens press the OK key once The first menu displayed is the PROGRAMME menu Your ST621TX can be configured for HEAT or COOL applications This allows the product t...

Page 26: ...in the same way as the code scroll with the Touch Ring until you reach the required number then confirm by pressing the OK key If you forget the code you will have to contact SALUS technical team Once...

Page 27: ...laying the current mode AUTO or MANUAL and the telephone number previously entered Once the SERVICE date has been reached the system will only operate at the temperature that was previously set in SER...

Page 28: ...nd day of the week settings are updated automatically every day at 12 00 AM or 2 00 AM by the use of a very accurate internal Radio Controlled Clock The RCC status indicator will be displayed for 10 m...

Page 29: ...mostat will continue to operate normally at this stage you should replace the batteries as soon as possible to prevent the ST621TX entering OFF mode OFF MODE The Low Battery indicator will be displaye...

Page 30: ...y Override modes in this case the backlight will remain illuminated for 10 seconds after the last key press The backlight will not illuminate if the ST621TX battery is low or if the Slide Switch is in...

Page 31: ...s check that the Slide Switch is in the UNLOCKED position RESET BUTTON The Reset Button is provided as a way to restore the thermostat to its default factory settings Pressing this button will delete...

Page 32: ...thermostat There are no user serviceable parts within the unit any servicing or repairs should only be carried out by SALUS Controls or their appointed agents Should the ST621TX programmable thermost...

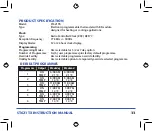
Page 33: ...ion Number of Programmes Six 6 user programmes plus factory default programme Override Facility User selectable programme override facility Holiday Facility User selectable option to temporarily overr...

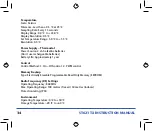
Page 34: ...atteries Don t use rechargeable batteries Battery Life Approximately 1 year Control Control Method 1 On Off control 2 PWM control Memory Backup Type Electrically Erasable Programmable Read Only Memory...

Page 35: ...r a period of two years from the date of purchase SALUS Controls sole liability for breach of this warranty will be at its option to repair or replace the defective product ST621TX Warranty Customer N...

Page 36: ...salus tech com Tel 01226 323961 Email tech salus tech com Tel 01226 323961 Sales Technical SALUS Controls plc SALUS House Dodworth Business Park South Whinby Road Dodworth Barnsley S75 3SP www salus c...

Reviews: