3
Fabricator Instructions
Installation
24
3
/
4
"
(62.87)
22
1
/
4
"
(56.52)
24” min.
Dish rack space
Dish machine
36
1
/
2
"
(92.78)
22
1
/
4
"
(56.52)
24” min.
Dish rack space
Dish machine
24
3
/
4
"
(62.87)
22
1
/
4
"
(56.52)
24” min.
Dish rack space
Dish machine
36
1
/
2
"
(92.78)
22
1
/
4
"
(56.52)
24” min.
Dish rack space
Dish machine
Use the above dimensions for the table cut out. Place the Scrap Collector (S914) top or the Pot/Pan Scrap Collector (P914)
top to the underside of the table for welding.
Attention:
When attaching the Scrap Collector or Pot/Pan Scrap
Collector top to the table, make sure the top is mounted in the table with the recirculated water opening (water
plume) on the same side as the dishmachine. Leave a minimum of 24 inches between the Collector and the
loading end of the dishmachine to allow space for the dish rack.
TABLE CUTOUT
DETAIL FOR MODEL
S914 ONLY
TABLE CUTOUT
DETAIL FOR MODEL
P914 ONLY
OR
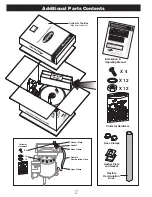
All Collector parts/hardware shown are located in the
“additional parts” carton inside the Collector tank box.
Upon request, the Collector top may be shipped separately to a fabricator for welding to table.
STOP!
If you have any questions about this installation call 1-888-SALVAJOR for installation advice.
X 12
X 12
X 4
Collector Top
Collector Tank
COLLECTOR
HARDWARE
GUSHER PLATE
GASKET
HOSE
CLAMP
FLEXIBLE
RECIRCULATION
HOSE
ADJUSTABLE LEGS
FLEXIBLE
RECIRCULATION HOSE
PUMP
CONTROL
HOSE CLAMP
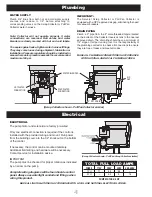
The control and sensor can be mounted on either side of the Collector
with existing fasteners, mounting holes and wiring to accommodate
dish flow to the left or to the right. It is not necessary to disconnect
factory-installed wiring.
The control and sensor should always face the operator.
If necessary, the control can be mounted remotely. Additional
field wiring and hardware will be necessary. Contact service for
installation advice.
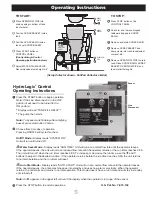
Attach Collector tank to the Collector top. The tank must be oriented
so that the recirculation plumbing is properly aligned. The control,
pump and incoming water will be on the opposite side of the recircula-
tion hose. Connect gusher plate and flexible recirculation hose to the
Collector. Adjust the legs until they extend to the floor. Note: Be-
fore installation of the Collector tank to the top, confirm that the
pre-installed gasket is affixed to the bottom of the Collector top.


