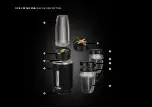
background image

EN

16

BEFORE FIRST USE 

 -------------------------------------------------------------------------------------------------------------------------------------------------------------------------------------------------------------------------------------------------------------------------------------------------------------------------------------------------------------------------------------------------------------------------------------------------------------------------------------------------------------------------------------------------

1.  Remove the Nutri Blender from the box. 

Discard all bags, sti ckers and polystyrene 

fi llers.

2.  Inspect the Nutri Blender for damage which 

may have been caused in transport. Con-

tact the seller when in doubt.

3.  Verify that your power mains match the 

nameplate rati ngs of the Nutri Blender.

4.  Wash all Nutri Blender parts that are in-

tended for contact with food (see Secti on: 

CLEANING AND MAINTENANCE).

ASSEMBLING AND DISASSEMBLING 

THE NUTRI BLENDER BOTTLES

1.  Choose the bott le you need,

 ④

 or 

, and 

place it upright, with the mouth up.

2.  Place the blade rotor ring you need, 

3A

 or 

3B

, on the threaded edge of the bott le 


or 

 with the blades toward the bott om. 

Next, twist the blade rotor ring to stop with 

the thread 

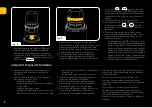
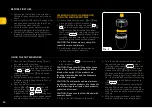
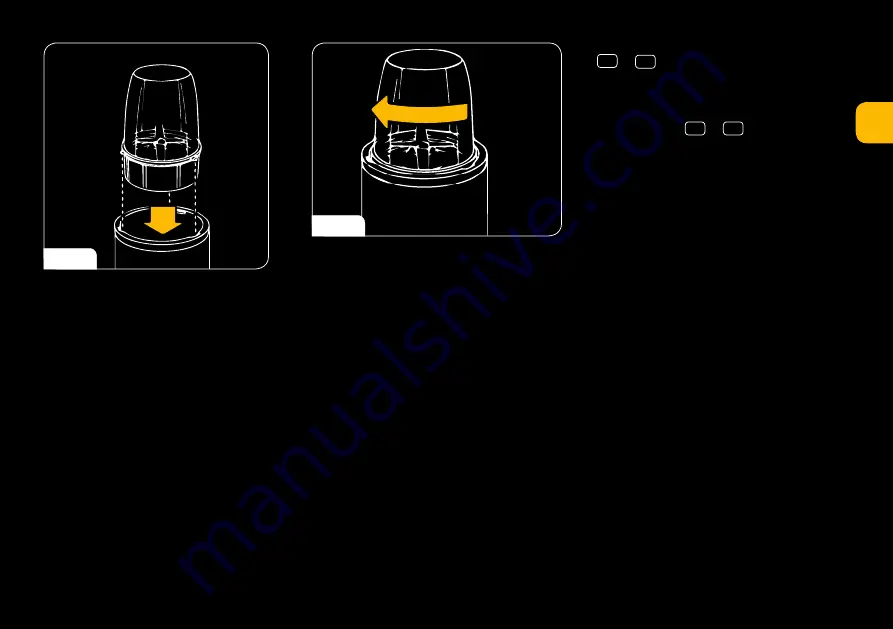
Fig. 1

 properly aligned. Before 

installing the blade rotor ring, check that its 

sealing ring is clean and seated properly.

CAUTION!

 The blades are very sharp. Pro-

ceed with care to avoid injury.

3.  Each blender bott le is disassembled by 

reversing the order of assembly.

USING THE NUTRI BLENDER 

 ------------------------------------------------------------------------------------------------------------------------------------------------------------------------------------------------------------------------------------------------------------------------------------------------------------------------------------------------------------------------------------------------------------------------------------------------------------------------------------------------

1.  Place the Nutri Blender housing 

 on a 

dry, stable and fl at surface.

2.  Before operati ng the Nutri Blender, check 

that the sealing rings inside the blade rotor 

ring 

3A

 and 

3B

 the drinking mouthpiece 

cap and the twist-caps 

 are clean and 

properly seated.

3.  Cut the products into smaller pieces to 

facilitate crushing. Keep the cuts 2 cm or 

smaller in length.

4.  Place the products into a bott le of 

choice, 

 or 

, and close it ti ght with 

a blade rotor ring,


3A

 or 

3B

, by prop-

erly aligning the thread 

Fig. 1

. The 

2-blade rotor ring 

3A

 is for grinding hard 

products, like coff ee beans, pepper beans 

and other seeds, stones or cereals. The 

6-blade rotor ring 

3B

 is for processing 

other products.

CAUTION!

 Do not overfi ll the bott les. Leave 

at least 1 cm of headspace below the bott le 

thread when upright. If the products are 

foaming a lot when blended, the headspace 

should be increased.

CAUTION!

 To achieve the opti mum process-

ing effi  ciency, put the products into the bott le 

in the following order: liquids, fresh products, 

yoghurt and ice cream.

CAUTION!

 Do not use the Nutri Blender with 

an empty bott le.

5.  Plug in the Nutri Blender to the mains.

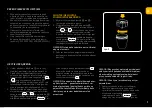
6.  Turn the bott le sealed with a blade rotor 

ring upside down and mount the blade 

rotor ring in the seat 

② 

Fig. 2

 inside the 

Nutri Blender housing. The three bosses 

around the bott le, 

 or 

, must engage 

the respecti ve three recesses in the Nutri 

Blender housing. Next, press down the bot-

tle – the Nutri Blender will start processing 

– and gently turn the bott le clockwise to 

stop 

Fig. 3

7.  Operate the Nutri Blender by holding the 

housing 

 with one hand and the bott le 

with the processed product with the other 

hand. Do not exceed the maximum operat-

ing ti me.

8.  With the products blended in the bott le, 

stop the Nutri Blender by releasing the 

Fig. 1

EN

17

bott le, 

 or 

, with the blade rotor ring, 

3A

 or 

3B

, from the seat 

. This is done 

by gently rotati ng the bott le counterclock-

wise.

9.  Unplug the Nutri Blender from the mains.

10. Remove the bott le, 

 or 

, with the 

blade rotor ring, 

3A

 or 

3B

, from the Nutri 

Blender housing 

. Turn the bott le upright.

11. Remove the blade rotor ring from the 

bott le. Empty the bott le to a container of 

choice. You may also equip the bott le with 

the processed food with:


a twist-cap 

 to carry the bott le without 

a risk or spilling the contents;


the twist-on handle ring 

⑥ 

to turn the 

bott le into a handy mug for comfortable 

drinking.

NOTES ON USE 

 -------------------------------------------------------------------------------------------------------------------------------------------------------------------------------------------------------------------------------------------------------------------------------------------------------------------------------------------------------------------------------------------------------------------------------------------------------------------------------------------------------------------------------------------------------------------

1.  Cool down cooked vegetables and stock 

before pouring them into a Nutri Blender 

bott le.

2.  The Nutri Blender is not intended for:


grati ng potatoes


beati ng eggs or dairy substi tutes


mincing raw meat


beati ng or mixing thick dough (as these 

products tend to form heavy lumps that 

can damage the Nutri Blender)


draining juice off  fruits and vegetables

3.  Check the consistency of the products 

being blended every few seconds.

4.  Do not exceed the maximum operati ng 

ti me of the Nutri Blender specifi ed in the 

Operati ng Manual.

5.  If the motor stalls, immediately stop 

blending and remove a part of the bott le 

contents.

The motor is very effi  cient and runs fast. Use 

short blender pulses to prevent the food prod-

ucts from being broken up to fi nely.
To improve blending/cutti  ng of cheese, choc-

olate, nuts, and similar products, refrigerate 

them before processing.
If the food products tend to sti ck during pro-

cessing, remove the bott le with the blade rotor 

ring, shake the bott le vigorously to free up the 

contents, and conti nue processing.

Fig. 2

Fig. 3

Summary of Contents for MASTERCHEF NUTRI PCS-80

Page 1: ...NUTRI BLENDER PSC 80 INSTRUKCJA OBSŁUGI ...

Page 2: ...PL GB INSTRUKCJA OBSŁUGI 5 USER MANUAL 14 ...

Page 3: ...OPIS URZĄDZENIA DEVICE DESCRIPTION 5 3a 2 1 8 3b 7 4 4 7 6 ...

Page 4: ...waniu ze smakiem Wypróbuj najwyższej klasy urządzenia kuchenne i poczuj się mistrzem w swojej kuchni Cooking today has become an art In preparing food art means experimenting and breaking stereotypes Nevertheless achieving great art requires us to combine the artist s talent with excellent equipment That is the case with Sam Cook Sam Cook products are designed for demanding people based on the effo...

Page 5: ... elektrycznych palników kuchenek piekarników itp Urządzenie należy stawiać na suchej płaskiej i stabilnej po wierzchni Urządzenie jest przeznaczone tylko do użytku domowego Zawsze przed przystąpieniem do pracy upewnij się czy wszystkie elementy urządzenia są prawidłowo zamontowane Użycie akcesoriów nie poleca nych przez producenta może spowodować uszkodzenie urządzenia pożar lub obrażenia ciała Ni...

Page 6: ...i suchym miejscu Należy zawsze poczekać na zatrzymanie części obrotowych przed wyjęciem jakichkolwiek części z urządzenia Przed wymianą akcesoriów lub kontaktem z częściami ruchomy mi podczas pracy należy wyłą czyć urządzenie oraz odłączyć je od zasilania OPIS URZĄDZENIA Nutri blender PSC 80 świetnie sprawdzi się dla przygotowania świeżych soków owocowo warzywnych mlecznych kaktajli kremów i so só...

Page 7: ...lendera na suchej stabilnej poziomej i równej powierzchni 2 Przed użyciem skontroluj czystość oraz należyte przyleganie uszczelki znajdującej się wewnątrz pierścienia zespołu noża 3A i 3B i w gwintowanych wieczkach 3 Pokrój produkty na mniejsze porcje w celu łatwiejszego rozdrobnienia Pokrojone por cje nie powinny być większe niż 2 cm 4 Składniki włóż do pojemnika o odpowied niej pojemności i dokr...

Page 8: ...m pierścieniem pojemnik przemienia się w wygodny kubek z uchwytem dzięki czemu możesz delektować się przygotowanym sokiem w komfortowych okolicznościach UWAGI DOTYCZĄCE UŻYTKOWANIA 1 Ugotowane warzywa i wywar powinny ostygnąć przed wlaniem do pojemnika blendera 2 Nutri blender nie służy do wykonywania następujących czynności ścieranie ziemniaków ubijanie jajek lub produktów zastępują cych nabiał m...

Page 9: ... niem Jeżeli ostrza blendera zacięły się lub obracają się z trudnością nie należy używać blendera Sprawdzić ich działanie obracając w kierunku zgodnym z ruchem wskazówek zegara uważając przy tym żeby się nie zra nić Ostrza powinny obracać się swobodnie 7 Jeżeli pojemnik blendera ulegnie uszkodze niu zacznie przeciekać lub pojawią się na nim pęknięcia ubytki lub rysy nie należy używać urządzenia Da...

Page 10: ...ektroniczny Polska Oznaczenie umieszczane na produkcie wskazuje że produktu po upływie okresu użytkowania nie należy usuwać z innymi odpadami pochodzącymi z gospodarstw domowych Aby uniknąć szkodliwego wpływu na środowisko naturalne i zdrowie ludzi wskutek niekontrolowanego usuwania odpadów zużyte urządzenie należy dostarczyć do punktu odbioru zużytego sprzętu AGD lub zgłosić jego odbiór z domu W ...

Page 11: ...cji zapakuj uszkodzony produkt w oryginalne lub zastępcze opakowanie które jest niezbędne w czasie transportu Dołącz kartę gwarancyjną dowód zakupu oraz krótką notatkę na temat ujawnionej usterki wraz z podaniem numeru kontaktowego Przesyłki są odbierane i dostarczane do Serwisu Centralnego na adres Korpele 71 12 100 Szczytno na nasz koszt dotyczy napraw gwarancyjnych za pośrednictwem firmy kurier...

Page 12: ...sprzedawca a w szczególności na skutek niewłaściwej lub niezgodnej z instrukcją instalacji użytkowania albo innych przyczyn leżących po stronie użytkownika lub osób trzecich używania NIEORYGINALNYCH materiałów lub akcesoriów nieprawidłowego transportu e celowe uszkodzenie sprzętu f uszkodzenia elementów ze szkła ceramiki g czynności konserwacyjne 4 Reklamującemu przysługuje prawo do wymiany sprzęt...

Page 13: ...tur Opis wykonywanych czynności oraz wymienionych części Description of activities performed and specific parts Описание деятельности осуществляемой и отдельных частей Beschreibung von ausgeführten Tätigkeiten und von Ersatzteilen Pieczątka punktu serwisowego Stamp service point Печать сервисный центр Stempel des Servicepunkts ...

Page 14: ...flat and stable surface The device is intended for do mestic use only Before use always make sure that all parts of the appliance are properly installed To avoid the risk of damage fire or injury always use the attach ments recommended by the manufacturer Do not use the appliance for the purposes different than it was designed for This appliance is not intended for use by children under 8 years of ag...

Page 15: ...eft in the bottle because it may cause damage to the appli ance or body injury Periodically inspect the power cord for damage APPLIANCE OVERVIEW The PSC 80 Nutri Blender is your great way of blending fresh fruit or vegetable juice milk shakes creams sauces and baby food The Nutri Blender comes with a 2 blade rotor and a 6 blade rotor for different processing demands and three drinking bottles with ...

Page 16: ... into smaller pieces to facilitate crushing Keep the cuts 2 cm or smaller in length 4 Place the products into a bottle of choice or and close it tight with a blade rotor ring 3A or 3B by prop erly aligning the thread Fig 1 The 2 blade rotor ring 3A is for grinding hard products like coffee beans pepper beans and other seeds stones or cereals The 6 blade rotor ring 3B is for processing other product...

Page 17: ...s not intended for grating potatoes beating eggs or dairy substitutes mincing raw meat beating or mixing thick dough as these products tend to form heavy lumps that can damage the Nutri Blender draining juice off fruits and vegetables 3 Check the consistency of the products being blended every few seconds 4 Do not exceed the maximum operating time of the Nutri Blender specified in the Operating Manu...

Page 18: ...he Nutri Blender for wear and tear before assembly If the blender blades stall or do not rotate smoothly do not use the Nutri Blender Check the blade rotor ring by rotating it clockwise Do this carefully as you may cut yourself The blades should rotate freely 7 If a Nutri Blender bottle is damaged leaks or shows cracks chipping or scratches do not use the Nutri Blender Otherwise the bottle will bu...

Page 19: ...ical and electronic equipment in a safe way contact your retailer or local Department of Environmental Protection Do not dispose the device with other municipal waste The kitchen of tomorrow The kitchen is the best place to make your culinary dreams come true and allow your cooking prowess to grow Test out new ideas and find better ways of doing things Never be afraid of new challenges of fusing th...

Page 20: ...amy do sklepu internetowego www samcook eu w którym można nabyć urządzenia brakujące części i akcesoria do naszych produktów Wystarczy wybrać potrzebna część zamówić a kurier dostarczy ją bezpośrednio do domu ...

Page 21: ...MPM agd S A ul Brzozowa 3 05 822 Milanówek Polska tel 22 3805234 fax 22 3805272 www mpm pl ...

Reviews: