67
FLASH ROM Updates
The ER-900 register software is loaded in an Flash ROM
(erasable programmable read only
memory).
This program may occasionally be updated by the manufacturer. Your SAM4s
dealer can update the software if necessary.
The Flash ROM can be loaded through a PC Utility or by SD card.
CAUTION: Flash ROM update by either method must be done by a qualified,
trained technician. DO NOT POWER OFF OR ABORT any program loading
once it has started. Failure to follow the procedures exactly may cause the
program to load incompletely and for the register to fail completely.
Flash ROM Update by SD
The ER-900 Flash ROM program is contained in a file named NEWNET.bin. This file
will be provided to the authorized dealer and contains both the Boot program area
and the Application program area.
1. At your PC, format the SD Card for FAT32.
2. Create a folder named update in the root of the SD card.
3. Copy NEWNET.bin to: SD:/update/.
4. Insert the SD card into the register. until you hear a click and the SD card
is locked in
Note :- The SD slot is located inside the printer compartment. Remove the
security screw and open the flap securing the SD slot.
Boot Area Update
Update instructions included with the .bin file will tell whether both Boot Area and
Application Area updates are required. In most cases you may be instructed only to
update the Application Area.
For application only updates go to step 7 below. For boot area begin at step 1.
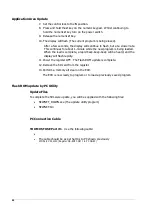
1. At the ER-900, turn the control lock to the
S
position.
2. Power off the ER-900.
3. Press and hold the
1
key on the numeric keypad. Whilst continuing to
hold the numeric
1
key, turn on the power switch.
4. Release the numeric
1
Key.
5. The display will flash, slowly at first.
After a few seconds a rapid beep-beep-beep will be heard and the display
will flash rapidly. The boot update is now complete
6. Turn the ECR power switch OFF and proceed directly to the next step:
Application Update.
Summary of Contents for ER-900 Series
Page 1: ......
Page 2: ......
Page 5: ......
Page 7: ...3 Getting Started Chapter...
Page 13: ...9 Quick Feature Setup Chapter...
Page 26: ...22...
Page 27: ...23 Service Mode Chapter...
Page 46: ...42...
Page 47: ...43 Key Tasks...
Page 69: ...65 Technical...
Page 75: ...71...


