background image


Instruction manual


Fodder wagons OptiFEED


14 


Fodder’s  quality  depends  on  adequate  sharpening  of  auger’s  blades.  In  order  to  keep 

fodder’s  quality  high,  avoid  overloading  the  tractor  and  the  wagon  during  the  work,  increase  its 
longevity  and  reduce  fuel  consumption,  check  auger’s  blades  sharpness  once  a  month.  Damaged 
blades should be replaced as soon as possible. Blades on the auger are not subject to warranty. 

WARNING! 

SCREWS AND NUTS MUST BE TIGHTENED AFTER FEW HOURS 
OF  NEW  MACHINE’S  WORK.  THIS  PROCEDURE  SHOULD  BE 
USED  AFTER  EACH  REPAIR  AND  INTERIM  REVIEWS  –  AT 
LEAST ONCE A MONTH. 
 

Tightening torques for nuts and bolts MA 


8.5.


CLEANING


Never  use  high  pressure  water  to  clean  parts  of  weighing  system.  Remember  to  remove 

remaining  of  the  fodder  containing  grain  seeds  enriched  with  caustic  soda  that  is  located  on  the 
external parts of the machine. After cleaning the machine with pressurized water, make sure that it 
did not get to the oil. 


8.6.


LUBRICATING


Make sure that the machine was properly lubricated before turning it on. 
Lubricant type: High quality universal lubricant. 
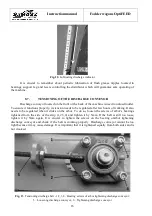
PTO  should  be  lubricated  once  a  week.  Pay  attention  to  PTO’s  profile  sliding  tubes.  They 

must be able to perform longitudinal moves, even at high torques. Failing to lubricate profile pipes 
will result in great increase of axial force which in turn may damage the power take-off and other 
transmission shafts. 

Summary of Contents for DUO 1200 S

Page 1: ...4 70 41 e mail samasz samasz pl www samasz pl OPERATOR S MANUAL TEDDER WAGONS OptiFEED UNO 600 S L DUO 1200 S UNO 800 S L DUO 1400 S UNO 1000 S L DUO 1600 UNO 1200 S L DUO 1800 UNO 600 BASIC DUO 2000...

Page 2: ...open guards or adjust sensors Under no condition do not get on or inside the machine when in operation NOTE Tedder wagon without previous familiarizing with its contents as well as by unauthorized pe...

Page 3: ...TING ELECTRIC WIRES 11 6 4 ASSEMBLING THE CANTILEVER CONTROLLING THE DISTRIBUTOR 11 7 ACTIONS TO PERFORM BEFORE FIRST USE 11 8 MACHINE S UTILIZATION 12 8 1 LOADING 12 8 2 ADVISABLE FODDER LOADING ORDE...

Page 4: ...er wagon is made for preparing fodder and feeding cattle It is supposed to work in adequate conditions i e the field is cultivated properly and fodder s ingredients do not contain any extraneous matte...

Page 5: ...stop the machine immediately 8 In case of mechanical failure the driver should stop the tractor immediately pull the keys from the ignition and leave the vehicle to check for the cause of the failure...

Page 6: ...chineindicate precautionary measures which we encourage to apply in order to increase fodder wagon longevity and driver s safety It is advised for all the people involved in operating the machine to g...

Page 7: ...uid ride on various surface conditions To drive the fodder wagon a tractor of following parameters is required 45kW for Power take off at400rpm Maximum power for reduction gear 1 1 1 1 88 is 85 HP At...

Page 8: ...t the skin and eyes from hydraulic fluid If you are hit by the pressurized fluid see the doctor immediately Before connecting hydraulic system make sure that the mixing rotor unloading cover and fodde...

Page 9: ...or straw Cutting long materials into TMR is done separately before other ingredients are mixed together Extended counter blades hold longer ingredients which then spin around with the auger The blades...

Page 10: ...dards thanks to the better use of volume and optimized flow of materials Thanks to the cone like shape silage bales land in deeper There they are being cut by larger amount of blades and are quickly s...

Page 11: ...ipped in double reduction gearbox High speed should be used during normal use of the machine However if the driver is inexperienced it is recommended to use slower gear ratios Tractor of 70HP power wi...

Page 12: ...UO S unit you need to make sure that the part of a drawbar with a sensor needs to be rotated again the label on the drawbar should always be visible from the top Fig 7 Fig 7 Recommended drawbar adjust...

Page 13: ...um 11V WARNING MAINTAIN THE CONNECTOR IN A GOOD SHAPE 6 4 ASSEMBLING THE CANTILEVER CONTROLLING THE DISTRIBUTOR Additional cantilever controlling the distributor needs to be installed in tractor s cab...

Page 14: ...f there are no audible unnatural cracks or beats the machine s revolutions may be increased 11 Machine should be turned on with tractor s rear window open and without ear protection 8 MACHINE S UTILIZ...

Page 15: ...tem may get hot while machine is working Before inspecting the machine or performing maintenance leave it to cool off After first 25h of use check all screws and packings connections tires pressure an...

Page 16: ...g torques for nuts and bolts MA 8 5 CLEANING Never use high pressure water to clean parts of weighing system Remember to remove remaining of the fodder containing grain seeds enriched with caustic sod...

Page 17: ...te it unlock the guards from both sides Fig 10 Fig 10 Unlocking shaft guards After unlocking PTO s guards flush grease nipple will be available to grease Fig 11 Fig 11 Shaft lubrication point WARNING...

Page 18: ...er few hours of working It also needs to be regulated when it slides on the arbor To do so loosen the screws of arbor s bearings tightened from the side of the strip 1 2 3 4 and tighten it by 5mm If t...

Page 19: ...windows Improperly adjusted distributor s lines may be the cause of improper closing or opening of the windows Activities relating to adjusting Distributor s lines are shown in the diagram below Fig 1...

Page 20: ...he welded place 8 11 STRUCTURAL CHANGES No kind of structural changes should be made in OptiFEED fodder wagon without prior arrangement with the manufacturer Manufacturer is not responsible for damage...

Page 21: ...ed with belt conveyors Leftward operation Belt conveyor control PCV in mixer feeders equipped with belt conveyors Rightward operation Discharge window control OPEN Discharge window control CLOSE Hydra...

Page 22: ...ume work mode Function key PLUS increase time span for belt operation either right or leftwards Function key MINUS decrease time span for belt operation either right or leftwards If electronic control...

Page 23: ...ing and or improper loading with dense fodder materials straw silage may damage the transmission Other foreign particles are similarly dangerous WARNING REPAIRS EXTENT SHOULD ONLY BE LIMITED TO CUTTIN...

Page 24: ...doned All transmission and engine oils should be emptied and put in adequate points Dismantle the unit and separate reusable parts i e tires hydraulic hoses valves etc Give reusable parts to adequate...

Page 25: ...non genuine spare parts and working materials such as oils etc have been used 5 The warranty is provided by the dealer NOTE PLEASE ASK YOUR DEALER TO COMPLETE AND RETURN THE WARRANTY CARD WITH DATE AN...

Reviews: