background image


Instruction manual 

Rear - front and rear flail mowers 

MIDO, GRINO, VINO, MAMUT


12

 - 

4.4.1. Placing the mower onto a transport vehicle 

The  carrier  and  the  driver  are  responsible  for  safety  during  the  transport  of  a  mower. 

All equipment and parts must be secured during transport. 

The following rules should be observed so that transporting the mower on a transport vehicle 

is safe: 


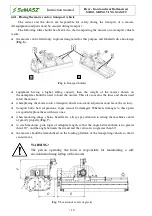
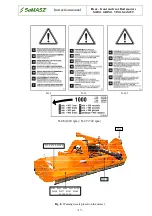
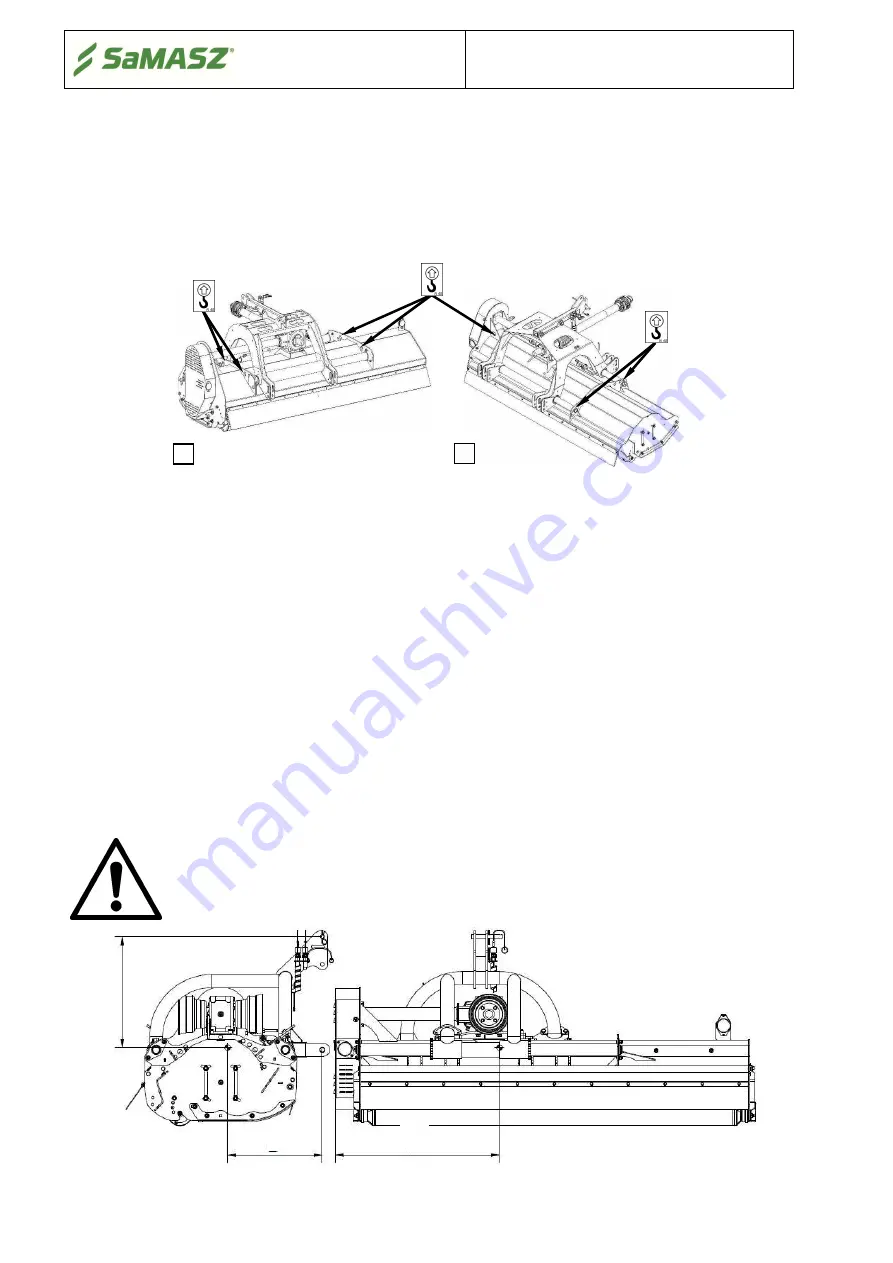
the mower can be lifted only in places designated for this purpose and labeled with a hook sign 
(

Fig. 6

), 


Fig. 6. 

Transport holders 


equipment  having  a  higher  lifting  capacity  than  the  weight  of  the  mower  shown  on 
the nameplate should be used to hoist the mower. This also concerns the lines and chains used 
to lift the mower, 


while placing the mower onto a transport vehicle non-involved persons must leave the vicinity, 


transport  belts,  belt  suspensions,  ropes  cannot  be  damaged. Whenever  damages  to  these  parts 
are spotted replace these with new ones, 


when mounting slings, chains, handles etc. always pay attention to setting the machine's center 
of gravity properly (

Fig. 7

),


to catch machines, pick ropes of adequate length, so that the angle between them is no greater 
than 120°, and the angle between the strand and the vertical is no greater than 60°, 


the mower should be immobilized on the loading platform of the transporting vehicle so that it 
cannot move. 


WARNING! 

The  person  operating  the  hoist  is  responsible  for  maintaining  a  safe 
environment during lifting of the mower. 


Fig. 7. 

Location of centre of gravity 

F


b) 

a) 

Summary of Contents for GRINO 160

Page 1: ...FRONT AND REAR FLAIL MOWERS Light class Medium class Heavy class MIDO 140 1 40 m GRINO 160 1 60 m MAMUT 250 2 50 m MIDO 160 1 60 m GRINO 180 1 80 m MAMUT 280 2 80 m MIDO 180 1 80 m GRINO 200 2 00 m M...

Page 2: ...E IT IS IN THE CORRECT WORKING POSITION WARNING Keep this manual for future reference Well proven design and quality materials ensure high durability and reliability of our products We congratulate yo...

Page 3: ...transport 20 5 4 Preparing the mower for operation 21 5 5 Changing the mower position from the central position to the side position 21 5 6 Operation 21 5 6 1 General information about mowing 21 5 7 R...

Page 4: ...Instruction manual Rear front and rear flail mowers MIDO GRINO VINO MAMUT 2 12 WARRANTY CONDITIONS 33 12 1 Warranty procedures 33 12 2 Record of warranty repairs 35...

Page 5: ...by this instruction manual and all other basic equipment it should possess Before operating this mower the user should first completely read the instructions in this manual and should be familiar with...

Page 6: ...safety regulations Unauthorized modification of the mower may release the manufacturer from responsibility for any resulting malfunctions or damages 3 1 Technical data Tab 1 Technical data MIDO VINO M...

Page 7: ...the suspension frame 1 which is used to connect the mower to the three point hitch at the front and at the rear of the tractor Drive from the vehicle PTO shaft is transmitted through jointed telescopi...

Page 8: ...of Conformity additional set of flail blades hardened sliding skids protective metal sheet guards telescoping articulated shaft spray paint 150 ml Additional equipment purchased separately additional...

Page 9: ...telescoping shaft should be carefully adhered to Points shown in Fig 3 Fig 4 and Fig 5 should be lubricated every 50 hours The articulated telescoping shaft should also be lubricated before and after...

Page 10: ...pplication grass shoots spikes stalks shrubs remnants after trimming hay Option KNIFE TYPE IIIA Application grass shoots spikes stalks shrubs remnants after trimming hay Option KNIFE TYPE IV Applicati...

Page 11: ...t care should be maintained on rocky terrain or during branch shredding and while working in the vicinity of roads and streets there is a danger of hard objects being thrown by the mower Any servicing...

Page 12: ...when the mower is lowered onto the ground If any maintenance or adjustment works under the lifted mower are necessary it must be secured against falling with a support If any part of the mower needs...

Page 13: ...machine aggregated When mounting the machine examine technical condition of the mower s hitch assembly Use only genuine pins and cotters to mount the mower on a vehicle 4 4 Transport Any changes in t...

Page 14: ...ncerns the lines and chains used to lift the mower while placing the mower onto a transport vehicle non involved persons must leave the vicinity transport belts belt suspensions ropes cannot be damage...

Page 15: ...ovisions found in bar manufacturer s manual placed on the bar In order to operate safely use only fully technically fit undamaged PTO shafts Damaged PTO shaft shall be repaired or replaced with new on...

Page 16: ...stem WARNING Residual risk is the result of inappropriate behaviour of the operator 4 Prohibited activity Please bear in mind the following bans during mower s operation never unblock the mower make a...

Page 17: ...through use of mass safety device or work organization the employer farmer 1 makes available personal hearing safety devices if the levels of noise in working environment exceed 80 dB 2 makes availab...

Page 18: ...ase of injury caused by a liquid under pressure call a doctor immediately N 167 N 168 N 210 N 233 It is forbidden to ride on the machine Do not touch the machine until all rotating elements are in com...

Page 19: ...front and rear flail mowers MIDO GRINO VINO MAMUT 17 Fig 8 Warning decals placed on the mower N 14 N 15 N 162 N 28 1000 rpm N 29 540 rpm N 05 N 28 N 01 N 03 N 04 N 07 N 09 N 106 N 117 N 167 N 168 N 2...

Page 20: ...be in the transport position lifted up If the weight of the front rear axle of the tractor is at least 20 of the entire weight of the unit then steering ability has been preserved If this is not the...

Page 21: ...the bottom SPB 236 4 belt pulley in VINO 160 180 flail mower switch toothed wheels around at the top TB 48 8M 50 toothed wheel at the bottom TB 64 8M 50 toothed wheel in GRINO flail mower switch belt...

Page 22: ...d with original spares Check wether the articulated telescopic shaft is properly installed Never get close to rotating parts it could result in injury or death During servicing of the shaft or the mac...

Page 23: ...ractor in gear and begin work 5 5 Changing the mower position from the central position to the side position With mowers with hydraulic adjustment the lateral positioning of the mower is done using th...

Page 24: ...ogging and jams such as terrain unevenness height and density of grass as well as other objects in the grass stones branches piles of soil In order to avoid clogging and jams operating speed should be...

Page 25: ...mowers MIDO GRINO MAMUT I 0 21 12 8 II 0 38 31 30 III 0 51 5 49 50 IV 0 62 68 68 V III 21 VI IV 55 6 2 Setting the mowing height in VINO flail mower In VINO flail mower there is a possibility of set...

Page 26: ...ightening the nut 4 onto the bolt The correct tightness of the belts can be confirmed by pressing the belt with a finger with the force of approximately 10 kg the belt yields about 0 5 cm Fig 17 Overv...

Page 27: ...should be considered as hazardous for life If needed replace knives To keep the shaft well balanced knives must be of the same type and weight In the case of excessive vibrations of the machine pleas...

Page 28: ...cted from rust by lubricating with grease Additionally touch up any chips in the paint check the oil levels in the gearbox examine technical condition of the copying and flail shaft s bearings If nece...

Page 29: ...ow replace it until it appears in the control opening 2 The amount of oil in the gear is about 1 liter Tab 10 Oil levels should be checked with the mower on level ground Tab 10 Oil capacities Fig 20 C...

Page 30: ...tective footwear Also use protective gloves In case of a contact with skin immediately wash the infected area with plenty of water with soap Do not allow the product to contaminate water outlets water...

Page 31: ...ta is necessary T kg Tractor s overall weight TP kg Front axis load on unloaded tractor TT kg Rear axis load on unloaded tractor MP kg Total weight of machine mounted on front 3 point linkage or weigh...

Page 32: ...s load at tractor s rear axis TT rzecz Tyre load capacity apply double the load indicated by the tyres manufacturer Enter the above calculation data and technical data provided by the manufacturer in...

Page 33: ...ng the bearing housing on the shaft Tighten bolts fastening the shaft or check condition of flail shaft in a service point Damaged or missing flail knives Check condition and replace if necessary Shif...

Page 34: ...Once all the guards are installed perform a warm up start to make sure the repaired machine operates properly 10 2 Disassembly and withdrawal from use WARNING When disassembling the machine pay parti...

Page 35: ...e following obstacles are not present a rocks b drainage waterworks or gas sumps and other municipal obstacles c curbs running perpendicular to operating direction d perpendicular ditches and channels...

Page 36: ...mower not according with its intended use or operating manual 8 Manufacturer can break the service agreement with immediate effect when the user does not pay receivables under the agreement in a timel...

Page 37: ...GRINO VINO MAMUT 35 12 2 Record of warranty repairs Repairs performed and replaced parts Date seal and signature of person performing the repair Date seal and signature of person performing the repair...

Reviews: