background image

20

21

NC Rotary Table

Instruction Manual 

웜샤프트 및 웜휠에는 특수한 재료를 사용하여 극히 정밀한 가공으로 우수한 
정도를 갖게 합니다.
웜샤프트, 웜휠의 백래쉬 제거 방법으로서 듀얼리드 웜(DUAL LEAD 
WORM)을 사용하고 있습니다.
이것은 웜샤프트의 좌우 치면의 리드를 다르게 변경하여 웜샤프트를 
축방향으로 이동시켜 웜휠의 백래쉬를 조정하게 됩니다.

이 듀얼리드 웜 방식은 가장 이상적인 치면의 백래쉬를 미세하게 조정할 수 
있고 이론적으로도 실제적으로도 가장 정확한 백래쉬 조정이 가능합니다.

웜기어의 백래쉬는 출하 시에 적정치로 조정되어 있지만 장시간의 
사용중에는 조정이 필요한 경우도 있습니다.
백래쉬 적정치는 아래 [표6]에 기재했습니다. 
이 값은 기계 냉각 시, 즉 장시간 휴지 후에 상정한 값입니다.
따라서 장시간 연속 운전한 경우에는 열팽창에 의한 값보다 백래쉬는 
작아집니다.

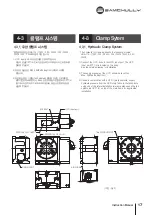
유압 시스템용 스위치의 설정 압력은 다음과 같습니다. 

The pressure setting of the pressure switch is as follows, 
according to the methods of clampin. (See Table 5)

The worm shaft and the worm wheel are manufactured with 
superior materials under a precision process. A dual-lead 
worm is applied as a countermeasure against the backlash 
of the worm shaft and the worm wheel. This method is 
implemented with a differentiated lead between the left-and 
right-hand teeth surfaces of the worm shaft, which shifts the 
worm shaft towards the spindle.

This dual-lead worm method is acknowledged as the best 
method both theoretically and practically. 
It enables very fine adjustment of the backlash of the teeth. 

The backlash of the worm gear was adjusted appropriately 
at the factory; however, readjustment may be necessary 
after a long period of operation. The table below presents 
the optimal value of the backlash. The value is measured 
when the machine has cooled down, some time after shut 
down. Consequently, the real backlash value after a period 
of operation is less than the optimal value due to thermal 
expansion. 

7-1     웜기어의 백래시 조정

백래쉬가 너무 작으면 웜기어 소착의 원인이 
됩니다. 

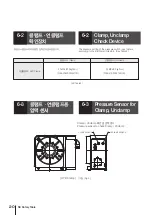
Clamp / Unclamp 확인용 압력 센서
Pressure sensor to check Clamp / Unclamp 

UNCLAMP SENSOR

CLAMP SENSOR

[ 그림 / Fig 3 ]

[ HYD. Clamp ]

6-2     클램프·언클램프 
           확인장치

6-2     Clamp, Unclamp 
           Check Device

[ 표 / Table 5 ]

6-3     클램프·언클램프용
           압력 센서

6-3     Pressure Sensor for 
           Clamp, Unclamp

7. 

구성품 설명 및 유지보수·조정
/ Description, maintenance 

and adjustment of components

IMPORTANT

유의사항

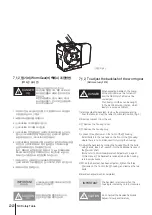
If the backlash is a little bit excessive, 
the worm gear may seize up.  

IMPORTANT

7-1   


Adjustment of Worm

         Gear Backlash 

백래쉬를 조정할 때는 아래와 같은 방법으로 현재의 백래쉬를 먼저 
측정합니다. 측정 후에 백래쉬를 조정합니다.

To adjust the backlash, measure the current backlash with the 
following procedure. Adjust the backlash after measurement.

[ 표 / Table 6 ]

* 적합한 백래쉬

* Appropriate backlash

1) 테이블 상면의 T-SOLT 측면에 다이얼게이지를 셋트합니다.

2) 테이블 상면의 탭홀(TAP HOLE)을 이용하여 평강(평평한 강철) 또는
    환봉을 넣고 테이블을 천천히 회전시켜 웜휠의 치가 웜샤프트에 꼭 끼는
    위치에서 손을 떼고 다이얼게이지의 값을 알아냅니다. 
    다음에 반대방향에 동일 조건으로 웜샤프트에 치가 꼭 낄 때까지 
    회전시킵니다.
    이때의 측정값의 차가 백래시량입니다.

3) 상기 측정은 테이블을 회전시켜 45°마다 8개소에서 실시하고 앞서
    기록한 적정값과 비교해 주십시오.
    적정값보다 빗나가는 경우에는 이하에 나타낸 요령으로 조정해  
    주십시오. 백래시의 최소값이 앞에 기재한 적정값으로 되도록 
    조정해주십시오. (그림 4)

1) Set a dial gauge on the side of the T-SOLT on top of the table.

2) Insert a steel plate or rod into the tap hole on top of the table,   
    then turn the table slowly. When the teeth of the worm wheel 
    contact the worm shaft firmly, stop turning and read the
    measurement on the dial gauge. Turn the table in the opposite 
    direction until the work wheel teeth contact the worm shaft 
    firmly, and read the dial gauge. The difference between the two 
    values is the backlash.

3) Perform the above measurement 8 times at every 45°position 
    of the table. Compare the measurements with the optimal  
    value presented earlier. Adjust the deviation from the optimal 
    value by the following procedures. Adjust the backlash so that 
    the minimum value is the same as the optimal value. (Fig 4)

7.1.1. 웜기어 (Worm Gear)의 백래시 측정방법

7.1.1. Method of Measuring 

         Worm Gear Backlash 

테이블 끝단에서의 원호 길이 
/ Length of the arc from the tip of the table 

테이블 형식 / Appropriate backlash

중심에서 반경
/ Radius from
   the center

피치원 반경
/ Pitch circle radius 
테이블 끝단
/ Tip of the table

13~38

HRS-204 /

HRS-204F4

76.5

105

13~41

HRS-254 /

HRS-254F4 /

HRS-254F8

91

125

14~41

HRS-324 /

HRS-324F8

140

160

13~39

HRS-174 /

HRS-174F2

64

87.5

mm

mm

유압클램프 / HYD. Clamp

클램프 시 / Clamp

언클램프 시 / Unclamp

2.0 MPa (20.0 kgf/cm

2

)

(0166-40630-023 SUCO)

0.2 MPa (2.0 kgf/cm

2

)

(0166-413-03-051 SUCO) 

Summary of Contents for HRS-174

Page 1: ...지해 주십시오 이 설명서를 궁금한 사항이나 점검할 사항 등 필요할 때 참조할 수 있도록 잘 보관하십시오 Please read and understand DANGER WARNING items in this maunal before operating your NC Rotary Table Please keep this manual by your side for answers to any questions you may have and to check 중요 IMPORTANT 1 HRS 174 174F2 204 204F4 254 254F4 254F8 324 324F8 ...

Page 2: ......

Page 3: ...avoided properly Potential danger which could lead to serious or mild personal injury if not avoided properly 삼천리기계의 NC 로터리 테이블을 애용해 주셔서 진심으로 감사드립니다 이 취급설명서에 따라 NC 로터리 테이블의 사용방법을 바르게 이해하시고 귀사의 생산에 기여할 수 있도록 활용하여 주십시오 또한 알아두면 편리한 NC 로터리 테이블의 성능 등에 관하여 유의사항으로 설명해 두었습니다 안전하게 사용하기 위해서 필요한 경고사항을 본서에 기재했으니 반드시 읽어 주십시오 문장 중의 마크는 특히 주의하여 주십시오 Thank you so much for choosing Samchullly Please read this User...

Page 4: ... Unclamp Pressure Sensor 7 구성품 설명 및 유지보수 조정 7 1 1 웜기어의 백래시 Worm Gear Backlash 측정방법 6 13 14 15 15 16 16 16 17 18 18 19 19 19 19 19 20 20 21 4 1 1 운반과 공작기계의 장착 15 4 3 1 유압 클램프 시스템 Hydraulic Clamp System 17 5 1 일일점검 5 2 정기점검 7 1 웜기어의 백래시 조정 21 21 7 1 2 웜기어의 백래시 Worm Gear Backlash 조정방법 2018 1 이전 7 1 3 웜기어의 백래시 Worm Gear Backlash 조정방법 2018 1 이후 9 참고자료 22 1 26 22 7 2 1 모터 커버 Motor Cover 의 분리 7 2 2 방수대책 ...

Page 5: ...r Backlash 6 13 14 15 15 16 16 16 17 18 18 19 19 19 19 19 20 20 21 4 1 1 Transportation and Installation on the Machine Tool 15 4 3 1 Hydraulic Clamp System 17 5 1 Daily Inspection 5 2 Periodic Inspection 7 1 Adjusting backlash of worm gear 21 21 7 1 2 How to Adjust the Backlash of the Worm gear Before 2018 1 7 1 3 How to Adjust the Backlash of the Worm gear After 2018 1 9 References 22 1 26 22 7 ...

Page 6: ...ut and observe Please read this document carefully The manufacturer does not bear any responsibility for any damage accident or failure or malfunction of the machine which may be caused by failure to observe the instructions and descriptions given in this Operation Manual For Safe Operation Make sure to shut off the power of the NC Rotary Table before installation service maintenance or repair wor...

Page 7: ...손되고 공작물이 비산할 위험이 있습니다 과대한 절삭력을 가하지 마십시오 Do not touch the rotating part while it is rotating Otherwise your finger may be caught in it resulting in serious injury Do not apply excessive cutting force Otherwise the NC Rotary Table may be fractured and the work piece may fly off resulting in damage and or injury ...

Page 8: ... 심압대 Tail Stock 공작물 Workpiece 방진구 Vibration Do not modify or remodel the NC Rotary Table without the manufacturer s consent Otherwise the NC Rotary Table may be fractured and the work piece may fly off resulting in damage and or injury Use a tail stock or an anti vibration device for long or heavy pieces of work If the protruding part is too long or too heavy the work piece may fly out ...

Page 9: ...주의 O ring O ring Be careful that the NC Rotary Table does not interfere with the machine on which it is installed Otherwise the tool may be fractured and fly off In particular the cable hose must be protected from interference with the main machine and or prevented from bending severely Damaged cable may result in an electric shock Use O rings on the surfaces of all covers Take care not to damage ...

Page 10: ...비산할 위험이 있습니다 가공물의 설치 해체는 테이블을 클램프 한 후 실행하십시오 Air Purge HYD CAUTION 주의 10 Use the eye bolts and wire rope when moving or transporting the NC Rotary Table Otherwise the Rotary Table may fall Clamp the table before mounting or removing a work piece Otherwise accuracy may be degraded the NC Rotary Table may be fractured and the work piece may fly off ...

Page 11: ...리 테이블이 파손되고 공작물이 비산할 위험이 있습니다 NC 로터리 테이블의 각 부분에 충격을 주지 마십시오 NO 11 Change the lubricant every 6 months The period may vary by the specifications Do not cause subject any part of the NC Rotary Table to shock or impact Otherwise the NC Rotary Table may be fractured and the work piece may fly off ...

Page 12: ......

Page 13: ......

Page 14: ...S 254F8 HRS 324 HRS 324F8 0 020 0 020 0 020 0 020 0 020 H 0 020 20 sec 4 sec 단위 Unit 8 9 1 2 4 5 6 7 3 측정장치에 의해 실시한다 This work shall be conducted with a measuring instrument 표 Table 2 그림 Fig 1 Center hole run out at Table Run out of Table face in rotation Squareness between Table face and Base at Table Dia Parallelism between Center of hole and Base Center Height Indexing accuracy Repeatability Fl...

Page 15: ...nstallation of the NC Rotary Table to see whether there are any sharp protrusions or flaws Correct remove such flaws if any Clean the any foreign material from the surfaces before installation 3 Install the product on the machine tool at the most convenient position for work Insert the guide block of the longitudinal installation reference plane into the groove in the table of the machine tool If ...

Page 16: ... 324 HRS 324F8 0 95 0 75 The valid life span of the lubricant depends on various factors However replacing all the lubricant every six months is the standard To replace the lubricant drain the existing lubricant completely Clean the oil tap before pouring in the lubricant to prevent dust or other foreign matter from entering the roduct Dust or other foreign matter can cause the worm gear or bearin...

Page 17: ...8 324 324F8 1 Connect the HYD hose to the HYD input port The HYD input port PT 1 4 is located on the body See the outside drawing for installation 2 The supply pressure of the HYD should be less than Max 3 5Mpa 35 6kgf cm2 3 If used in combination with a HYD type tail spindle supply hydraulic pressure from the NC Rotary Table to the tail spindle using one of the lateral installation reference plan...

Page 18: ...g system requires an additional purge air supply Refer to the outside drawing of the machine for installation CAUTION 사용 상황에 따라 모터 커버 내부에 이슬이 맺힐 수 있습니다 이슬은 전기 부품이나 각 부품의 작동에 장애가 되기 때문에 배출구의 일부에서 공기가 배출됩니다 공기 분사는 클램프를 위해 사용하는 NC 로터리 테이블의 내부에 분사된 공기에 의해 수행됩니다 반드시 필터를 통과한 청정 공기 에어필터 레귤레이터 미스트 세퍼레이터 드레인 를 사용하십시오 공기에 수분 습기 기름기 등이 포함되어 있으면 모터 케이스에 들어가서 장비 손상을 야기합니다 모터 케이스 내부의 공기는 공기 배출구에서 배출됩니다 공기의 배출구가...

Page 19: ...해 주십시오 잘못된 사용은 웜기어의 손상으로 이어지므로 주의해 주십시오 클램프 언클램프를 확인하려면 압력 스위치의 신호를 이용해 주십시오 사양에 기재된 클램프 토크 이상을 필요로 하는 가공은 피해주십시오 클램프 부분의 마모와 웜 기어의 손상으로 이어질 수 있습니다 언클램프시에 잔류압이 남아 있으면 완전히 클램프 상태가 해제되지 않고 반클램프의 상태로 운전하는 경우가 있습니다 이러한 경우에는 웜기어 부분 클램프 부분의 소착 손상 등의 직접 원인이 되므로 압력배출에 충분히 주의해 주십시오 6 NC 로터리 테이블 클램프의 설명 Description of the NC Rotary Table 6 1 테이블 클램프의 주의사항 6 1 Cautions for the Table Clamp The Rotary Table mu...

Page 20: ...5 Clamp Unclamp 확인용 압력 센서 Pressure sensor to check Clamp Unclamp UNCLAMP SENSOR CLAMP SENSOR 그림 Fig 3 HYD Clamp 6 2 클램프 언클램프 확인장치 6 2 Clamp Unclamp Check Device 표 Table 5 6 3 클램프 언클램프용 압력 센서 6 3 Pressure Sensor for Clamp Unclamp 유압클램프 HYD Clamp 클램프 시 Clamp 언클램프 시 Unclamp 2 0 MPa 20 0 kgf cm2 0166 40630 023 SUCO 0 2 MPa 2 0 kgf cm2 0166 413 03 051 SUCO ...

Page 21: ...ay seize up IMPORTANT 7 1 Adjustment of Worm Gear Backlash 백래쉬를 조정할 때는 아래와 같은 방법으로 현재의 백래쉬를 먼저 측정합니다 측정 후에 백래쉬를 조정합니다 To adjust the backlash measure the current backlash with the following procedure Adjust the backlash after measurement 표 Table 6 적합한 백래쉬 Appropriate backlash 1 테이블 상면의 T SOLT 측면에 다이얼게이지를 셋트합니다 2 테이블 상면의 탭홀 TAP HOLE 을 이용하여 평강 평평한 강철 또는 환봉을 넣고 테이블을 천천히 회전시켜 웜휠의 치가 웜샤프트에 꼭 끼는 위치에서 손을 ...

Page 22: ...e housing with the bolts using hands Insert a T wrench into the hexagonal recess of the worm shaft Note refer to Worm Gear Backlash Adjustment page 21 of this manual The backlash is reduced when the housing is turned clockwise 7 When the backlash has been adjusted tighten the three screws on the front of the housing and remove the two bolts 8 Backlash adjustment is completed 백래시 조정을 할 경우에는 반드시 제어장...

Page 23: ...AFT 그림 Fig 6 HOUSING COVER HOUSING PLUG HOUSING WORM SHAFT SETSCREW O RING WRENCH BOLT 체결 부위 WRENCH BOLT JOINT 그림 Fig 5 2 5 4 3 1 6 조정한 후 전술한 절차의 역순으로 웜 기어를 재조립하고 볼트를 단단히 조이십시오 재조립한 후 테이블의 바깥쪽 주변장치와 동일한 위치에서 백래시를 다시 측정하여 백래시가 적절한지 확인하십시오 When the adjustment has been completed reassemble the worm gear in the reverse order of disassembly and tighten the bolts After reassembling measure the backlash ...

Page 24: ...ing cover 6 Remove the housing plug 7 Loosen three screws on the front of the housing Install bolts into the two taps on the front of the housing where there is no bolt Required for turning the housing 8 Adjust the backlash by turning the housing with the bolts using hands Insert a T wrench into the hexagonal recess of the worm shaft Note refer to Worm Gear Backlash Adjustment page 21 of this manu...

Page 25: ...housing plug take care not to damage the O ring If the O ring is damaged oil will leak out Please loosen coupling fix bolt 3 to 4 turns IMPORTANT CAUTION 조정한 후 전술한 절차의 역순으로 웜 기어를 재조립하고 볼트를 단단히 조이십시오 재조립한 후 테이블의 바깥쪽 주변장치와 동일한 위치에서 백래시를 다시 측정하여 백래시가 적절한지 확인하십시오 When the adjustment has been completed reassemble the worm gear in the reverse order of disassembly and tighten the bolts After reassembling...

Page 26: ... by removing the wrench bolt 4 Loosen the set screw which joins the coupling and motor and remove the coupling 5 Replace the servo motor Install the coupling and fix it with the set screw 6 Assemble the motor plate and the servo motor assembled with the coupling and mount them with the wrench bolts 7 In the motor cover connect the cables to the servo motor 8 Assemble the main body and motor cover ...

Page 27: ...en storing the NC Rotary Table for a long period after separating it from the machine tool Remove chips and cutting fluid from the Table completely and put it on rigid wooden plate to maintain accuracy Apply rust preventive oil to the Table and case or protect them with a wooden cover or wrap them with vinyl sheet The wood plate and box must not be made with green wood Since green wood is chemical...

Page 28: ...g Equation 3 And 206 seconds are 3 minutes and 16 seconds As shown in the above examples the arc length and the angle can be converted into each other using Equation 2 or 3 π x D L α 1 α L L 2 424 x 30 x 100 x 10 0 007272 mm 7 3μm π x D 360 x 60 x 60 x L 360 x 60 x 60 D 4 125 x L x 105 α 100 4 125 x 0 05 x 10 2 424 x 10 xαx D 6 5 6 α x π x D 2 3 and Therefore the arc length is approximately 0 0073...

Page 29: ...n o t e s ...

Page 30: ... P ro d u c ti o n m o n it o re d T y p e te s te d P ro d u k ti o n u b e rw a c h t B a u a rt g e p ru ft s ISO 9001 2008 www samchully com Samchully Machinery 405 820 인천광역시 남동구 남동대로 99 TEL 82 32 822 4811 FAX 82 32 822 4377 405 820 99 Namdong daero Namdong gu Incheon Korea TEL 82 32 899 8965 FAX 82 32 721 7607 ...

Reviews: