background image

16

Power Chuck

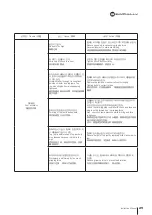
1. Remove the water from water cup of the 
    air unit periodically, in order to prevent the
    transformation or abnormal abrasion of 
    0-rings in cylinder, and then shorten the 
    service life.

2. Fill in lubricant (ISO: VG 32) to oil cup of 
    the air unit periodically, to ensure the 
    lubricant is sufficient.

3. Adjust the flow rate valve above the
    rotating oil cup to normal feeding amount, 
    the normal feeding amount is 2~3 drops 
    per chuck movement.

4. Adjust air pressure at least within 
    2~2.5kgf/cm

2

 (0.2-0.25Mpa) and confirm 

    the operation of electromagnetic 
    valve(manual valve) is normal.

5. Adjust the air pressure to 7kgf/cm

2

    (0.7Mpa) then check if there is leakage. 

3-4

3-4

3-4

Test run

시운전

Adjust the air pressure to 2kgf/cm

2

 (0.2Mpa) 

for test run, then check with following
checking steps.

- Check the operation of the chuck if it is 
   smooth.
- Check the direction of the operation if it is 
   correct.
- Check the stroke of the operation if it is 
   enough.(stroke of the chuck)
- Check every tubes if there are leaking.

Check the steps above correctly, then adjust 
the required pressure and re-check again.

1. 에어유니트의 워터 컵에서 주기적으로 물을 
    제거해 실린더의 오링 변형이나 과도한 마모
    를 방지하고, 그에 따라 사용수명 단축을
    방지합니다.

2. 주기적으로 에어유니트의 오일 컵에 윤활유
    (ISO: VG 32)를 채워 윤활유를 항상 충분
    하게 유지합니다.

3. 회전 오일 컵 위의 유속 밸브를 정상 공급량
    으로 조정합니다. 정상 공급량은 척 움직
    임당 2~3방울입니다.

4. 공기 압력을 최소한 2~2.5kgf/cm2 (0.2-
    0.25Mpa) 이내로 조정하고, 전자기 밸브
    (수동 밸브)가 정상적으로 작동하는지
    확인합니다.

5. 공기 압력을 7kgf/cm2 (0.7Mpa)로 조정한 
    후 누출 여부를 확인합니다. 

시운전 중 공기 압력을 2kgf/cm2 (0.2Mpa)
로 조정한 후 다음과 같은 점검 단계로 검사
합니다.

- 척의 작동이 원활하게 이루어지는지 점검
  합니다.
- 작동방향이 정확한지 점검합니다.
- 작동 스트로크가 충분한지 점검합니다.
  (척의 스트로크)
- 모든 튜브를 점검해 누출 여부를 확인합니다.

위의 단계를 정확히 점검한 후 요구되는 압력을 
조정하고 다시 점검합니다.

1. 要定期从 Air Unit 的 Water Cap 清
   除水,以防止气缸O形环变形或过度磨
   损,及因此而导致的使用寿命的缩短。

2. 定期补充 Air Unit 的 Oil Cup 的润
   滑油(ISO: VG 32),以始终充分保持
   润滑油。

3. 将回转 Oil Cup 上的流速阀调节成正
   常供给量。正常供给量是卡盘每移动
   为2~3滴。

4. 空气压力要至少调节成2~2.5kgf/cm2 
   (0.2- 0.25Mpa)以内,检查电磁阀(手
   动阀)是否正常工作。

5. 将空气压力调节为7kgf/cm2 (0.7Mpa)
   后,检查有无泄露。

在试运转中将空气压力调节为2kgf/cm2 
(0.2Mpa)后按如下检查程序进行检查。

- 检查卡盘动作是否正常。
- 检查动作方向是否正确。
- 检查动作行程是否充分。
  (卡盘行程)
- 检查所有管子是否有泄露。

按如上程序进行正确检查后,调节所需压
力,重新检查。

试运转

Summary of Contents for RTC

Page 1: ...k Instruction Manual Please read and understandDANGER WARN ING items in this maunal before operating the Chuck Please keep this manual by your side for answers to any questions you may have and to che...

Page 2: ......

Page 3: ...to the symbol which emphasizes important information Warning term DANGER WARNING CAUTION IMPORTANT Indicates an imminently hazardous situation which if not avoided will result in death or serious inj...

Page 4: ...4 Power Chuck 1 2 2 1 2 2 3 3 1 3 2 3 3 3 4 4 5 5 1 5 2 6 7 8 9 7 11 11 11 12 12 13 15 16 17 22 22 23 24 26 27 28...

Page 5: ...The manufacture and installation of table 3 2 Installation of the air system 3 3 The operation of the air unit 3 4 Test run 4 Precautions 5 Maintenance and inspection 5 1 Lubrication 5 2 Disassembling...

Page 6: ...6 Power Chuck 1 2 2 1 2 2 3 3 1 3 2 3 3 Air Unit 3 4 4 5 5 1 5 2 6 7 8 9 7 11 11 11 12 12 13 15 16 17 21 21 22 23 25 26 27...

Page 7: ...n Danger by catching operator in a machine Danger by discharge of clamped workpiece during spindle rotation Danger by discharge of chuck or workpiece After spindle should be stopped please open the do...

Page 8: ...y chuck 3 Pitch Danger by discharge of workpiece related with lowering gripping force caused by unsufficint lubrication If the pirch is different the accuracy will be affected and the chuck will be da...

Page 9: ...nger by operation fault and lowering judgement Stick out T nuts invites danger of workpiece flying out due to a fall of bindng strength between master jaw and top jaw WARNING Danger by catching in a m...

Page 10: ...iece make sure your hand is out of gripping area Never hammer chuck jaws or gripped workpiece Danger by dropping Danger by discharge of chuck or workpiece in case of damaging of chuck Danger or finger...

Page 11: ...ws protrude so as to engage the T slot to be at an angle in relation to the rotational center of the chuck body When the wedge plunger is drawn to the rear the master jaws are pulled toward the center...

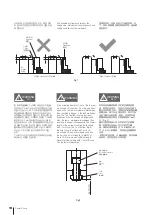
Page 12: ...Fig 2 The accuracy will be affected due to the runout of the outer diameter of table flatness so that when install the RTC chuck the flatness of table and the runout of outer diameter should adjust u...

Page 13: ...ING WARNING WARNING Bolt Size Tightening Torque M8 38 2N m 3 9kgf m M10 72 6N m 7 4kgf m M12 106 8N m 1 3kgf m Fig 3 3 2 3 2 3 2 Installation of the air system Air unit Control valve Chuck Tighten chu...

Page 14: ...1 2 3 4 5 6 WARNING WARNING Tighten the mounting screws of the chuck with specified torque See page 13 If tightening torque is insufficient or too much the accident will be caused WARNING Bracket 1mm...

Page 15: ...der to prevent pressure drop and flow rate reduction any bend or crush of the tube can obstruct the air flow the redundant tube design should be considered 7 Air unit should be near by the chuck if po...

Page 16: ...romagnetic valve manual valve is normal 5 Adjust the air pressure to 7kgf cm2 0 7Mpa then check if there is leakage 3 4 3 4 3 4 Test run Adjust the air pressure to 2kgf cm2 0 2Mpa for test run then ch...

Page 17: ...ws the air pressure should be lower than when standard top jaws used 7 Lubricating the chuck is very important bad lubrication will cause insufficient gripping force and abnormal abrasion 8 The max pr...

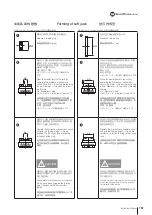
Page 18: ...nger If the bolt protrudes from the T nut bottom the top jaw is not fixed even if the mounting bolt is tightened Also the jaw or workpiece discharges thus resulting in danger consequently the overall...

Page 19: ...pinch his her hand when gripping the forming plug If caught his her hand will be injured Ring Prepare a formed ring ring d D d x 0 75 Close the master Jaws to the limit by operating the hydraulic or p...

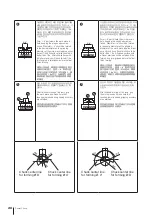
Page 20: ...gripping accuracy are obtained d h6 1 6a Form d part where the work piece is held keeping the ring as abovemen tioned Diameter d should be formed in the same diameter as the gripping diameter of the...

Page 21: ...amage and the danger of workpiece scattering 2 While clamping the irregular workpiece the setting pressure should be depended on the top jaw condition Furthermore it should be tested on cutting before...

Page 22: ...nd affects gripping accuracy and causes wear and seizure Consequently securely lubricate the chuck After machining clean the chuck body and slideway with air gun etc Use rust prevention coolant oil so...

Page 23: ...of the seal cover and remove the seal cover 3 Loosen the screws of the back plate and remove the back plate 4 Remove the distributor 5 Remove the piston plate 6 Loosen the screws of the cover and remo...

Page 24: ...oo much sward in chuck Disassemble and clean Workpiece slippage Insufficient master jaw stroke Position master jaw so that it is in stroke center when workpiece is gripped Seizure occured Because of d...

Page 25: ...ly tightened Remove top jaw and clean serrations thoroughly Tighten bolts to correct torque Forming of top jaw is inadequate Check that forming plug is parallel to chuck end face and plug is not defor...

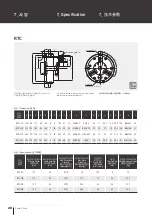
Page 26: ...t jaws kgf RTC 110 11 3 5 2 0 7 7 7 5 100 8 7 3 RTC 160 11 5 5 2 0 7 7 21 0 72 20 22 0 RTC 210 13 7 6 3 0 7 7 33 0 50 30 27 7 RTC 260 13 6 6 3 0 7 7 48 0 50 43 42 5 Type A B C D E F G H I J K L M N O...

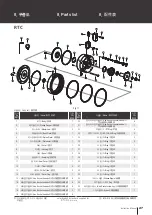
Page 27: ...d bolt 3 19 Hex Socket head bolt 6 No Name Q ty 20 Hex Socket counter sink bolt 6 21 Hex Socket counter sink bolt 1 22 PT PT Plug PT 4 23 ROTO ROTO Grid Ring 3 24 O Ring O 3 25 O Ring O 2 26 O Ring O...

Page 28: ...28 Power Chuck 9 Accessories 9 9 mm Type Tightening Bolt Wrench RTC 110 M6x95L M2 M4 M5 M6 RTC 160 M8x105L M2 M4 M5 M6 M8 RTC 210 M8x125L M2 5 M4 M5 M6 M10 RTC 260 M10x130L M2 5 M4 M5 M6 M8 M10...

Page 29: ......

Page 30: ......

Page 31: ......

Page 32: ...te st e d P ro d u kt io n u b er w ac h t B au ar t g ep ru ft s ISO 9001 2008 R T C Power Chuck RTC Instruction Manual RTC Samchully Machinery 405 820 99 TEL 82 32 822 4811 FAX 82 32 822 4377 405 8...

Reviews: