background image


Doc.-ID: 160319-PT08BA-TG-ExCam IPQ1775 series_en_rev.01.docx, Seite 25 von 40 

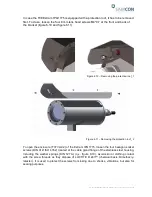
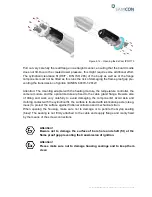
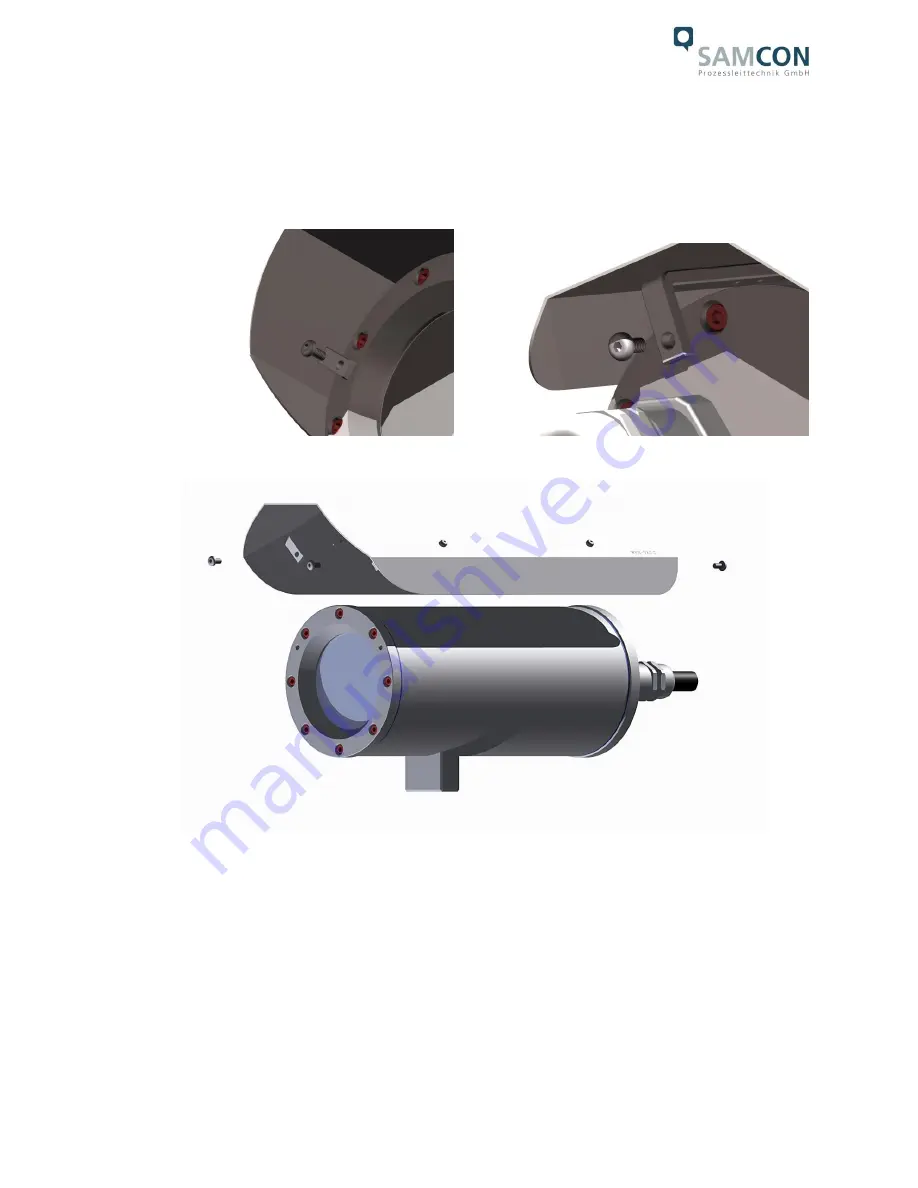
In case the T08 ExCam IPQ1775 is equipped with a protection roof, it has to be removed 
first. To do so, loosen the four 8 mm lens head screws M4*0.7 at the front and back of 
the bracket (figure 6.10 and figure 6.11). 


Figure 6.10 

– Removing the protection roof_1 


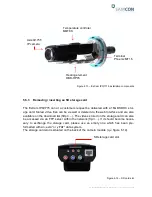
Figure 6.11 

– Removing the protection roof _2 

 
To open the enclosure (T07 VA2.2) of the ExCam IPQ1775, loosen the four hexagon socket 
screws (DIN 912/ ISO 4762) located at the cable gland flange of the stainless steel housing, 
including  the  washer  springs  (DIN  127  A)  (q.v.  figure  6.10).  Avoid  skin  or  clothing  contact 
with  the  screw  threads  as  they  dispose  o

f LOCTITE ® 243™ (chemical basis: Dimethacry-

latester).  It  is  used  to  protect  the  screws  from  losing  due  to  shocks,  vibrations,  but  also  for 
sealing purposes.


Summary of Contents for ExCam IPQ1775

Page 1: ...ExCam IPQ1775 User manual ...

Page 2: ...5 1 Step 1 Installation 15 5 2 Step 2 Electrical connection 15 5 2 1 Potential equalization 16 5 2 2 Connection and protection 17 5 2 3 Tests prior to switching on voltage 21 5 3 Testing of the status LED 22 5 4 Step 3 Adjusting the lens 22 5 5 Options Issues 24 5 5 1 Work preparation 24 5 5 2 Opening the pressure resistant housing 24 5 5 3 Removing inserting an SD storage card 27 5 5 4 Hardware R...

Page 3: ...Figure 6 6 RJ45 Contact assignment 20 Figure 6 7 SKD01 Pin assignment 20 Table 6 3 Pin assignment supply cable 21 Table 6 4 Status and control LED 22 Figure 6 8 Zoom and focus of the ExCam IPQ1775 22 Figuer 6 9 Advanced control functions of the ExCam IPQ1775 23 Figure 6 10 Removing the protection roof_1 25 Figure 6 11 Removing the protection roof _2 25 Figure 6 12 Opening the ExCam IPQ1775 26 Figu...

Page 4: ...75 Title User manual ExCam IPQ1775 type 08 Doc Id 160319 PT08BA TG ExCam IPQ1775 series_en_rev 01 docx Author Steffen Seibert Date March 20th 2016 Rev Index Date Name Comment Approved by EX Officer 0 March 20th 2014 S Seibert Compilation of the document 1 September 9th 2018 E Schneider Modifications in Chapter 5 5 2 ...

Page 5: ...2 in cluding the gas group IIC all gases steams and fogs including acetylene hydrogen and carbon disulphide and the dust group IIIC conductive dusts and flammable fibrous material as well as in mining Within the equipment group I mining the camera series can be used in areas with a low risk of mechanical danger In case the camera is to be used in areas with a high mechanical risk the optical compo...

Page 6: ...Doc ID 160319 PT08BA TG ExCam IPQ1775 series_en_rev 01 docx Seite 6 von 40 Figure 1 1 ExCam IPQ1775 with wall mount bracket and roof ...

Page 7: ...N 60529 Transportation and storage temperature EX 60 C 85 C Operation temperature EX 60 C 80 C T6 60 C 85 C T5 Ambient temperature EX 1 60 C 65 C T6 60 C 70 C T5 Pressure chamber internal design V 1960 cm3 bto free cross sectional area for free a free gas flow 40 for Ex group IIC according to DIN EN 60079 1 2008 Nominated body TÜV Rheinland number 0035 EC Type Examination TÜV 14 ATEX 7539 X IECEx ...

Page 8: ...rush duration 120 s Typ LL TAMB 60 C Max 40 W 2 x heating elements HP05 26 8 W continuous rating at 60 C inrush current peak 4000 mA typical inrush duration 120 s 2 4 System cable SKDxx Description Data transfer and power supply of the camera module DIN EN 60079 14 conform Shealth color Green GN similar RAL6018 Outer diameter 9 mm 0 2 mm Bending radius 100 mm Cable 4 x 2 x AWG22 1 CAT 6a Character...

Page 9: ...E halogen free flame resistant UV and ozone resistant high chemical resistance heat and cold resistance reduced outer diame ter Isolation 20 GΩ x cm Nominal voltage U0 U 300 500 V AC DC Test voltage 4000 V Interface P version N A or upon request K version 2 x 2 5 mm2 Cu litz wire BK BK with ferule sheath about 10 cm stripped and furnished with bend relief shrink tubing 2 6 Sensor Axis Q1775 Type 1...

Page 10: ...and bandwidth VBR CBR H 264 2 9 Parameterization Image settings Compression color brightness sharpness contrast white balance exposure control backlight compensation picture rotation 0 90 180 270 including Corridor Format text and image overlay privacy mask mirroring of images Intelligent Video Video motion detection active tampering alarm audio recognition gate keeper Event triggers Video motion ...

Page 11: ...andard Stainless steel MNo 1 4401 X5CrNiMo17 12 2 AISI 316 V4A optional Stainless steel MNo 1 4404 X2CrNiMo17 12 2 AISI 316L V4A optional Edelstahl MNo 1 4571 X6CrNiMoTi17 12 2 AISI 316Ti V4A optional Additional housing materials Zinced spring steel MNo 1 0330 PTFE with glass microbeads GYLON Style 3504 blue silicone coating Silcoset 105 incl Cure 3 Functional temperature range concerning the oper...

Page 12: ...accessories wxhxd 6 135 0 mm x 238 0 mm x 413 0 mm Fitting of the flame proof gap preventing the transmission of ignition cylinder EX T07 VA2 2 Nominal diameter 91 mm Clearance fit H8 f7 DIN ISO 286 Tolerance 71µm 54µm Gap length 12 5 mm Gap width 0 15 mm Average surface finish Ra 6 3 μm Media resistance7 excerpt Acetone alcohol acetylene ammoniac aniline benzol butane chloride pressurized water p...

Page 13: ...K1 BOR B 005 K L T08 VA2 2 K1 BOR B 005 P L T08 VA2 2 K1 BOR C 005 K L T08 VA2 2 K1 BOR C 005 P L ExCam IPQ1775 T08 VA2 2 K1 BOR B 005 K LL T08 VA2 2 K1 BOR B 005 P LL T08 VA2 2 K1 BOR C 005 K LL T08 VA2 2 K1 BOR C 005 P LL Table 5 1 Model key 1 ExCam IPQ1775 Functional camera description of the ExCam IPQ 1755 Distinctive characteristics are for example Sensor resolution light sensitivity angle of...

Page 14: ...d conductive dusts 6 005 Length of the connection line in meter at delivery The standard cable length is 5 m minimum maximum cable length 001 100 m 7 K Terminal block execution standard SKDxx 8 x single pin twisted pair solid conductor 0 64 mm2 about 5 mm stripped 1x shield Cu braid 2 5 mm2 ferules Supply Ölflex 440p2 x 2 5 mm2 Cu litz wire with ferule sheath about 10 cm stripped and furnished wit...

Page 15: ...ns accessories as well as safety guidelines are described in the EX installation manual of the ExCam se ries 5 2 Step 2 Electrical connection Attention The electrical connection of the equipment must be executed by quali fied personnel only Attention It is mandatory that the housing of the ExCam Series has to be grounded via a PE connection Attention The minimum cable length of the connection line...

Page 16: ...done by the user is prohibited Depending on the model option the ending of the camera s cable connection is either stripped to the blank Cu conductors or furnished with a plug 5 2 1 Potential equalization Figure 6 1 ExCam IPQ1775 potential equalization The potential equalization earthing of the camera housing is mandatory in order to avoid electrostatic charging and hence spark generation The scre...

Page 17: ...von 40 5 2 2 Connection and protection Figure 6 2 Cable gland and supply cable Figure 6 3 ExCam IPQ1775 T08 VA2 2 K1 BOR B XXX K N Cable gland 1 SKDxx digitale video stream performance of the camera modules Cable gland 2 optional Ölflex Robust 210 supply heating elements ...

Page 18: ... with other network devices as well as to power the camera In order to guarantee the power supply Power Device PD of the ExCam IPQ1775 power device PD a Power over Ethernet component Power Sourcing Equipment PSE has to be available at the connecting side e g a PoE Switch a PoE Injector or Midspan which meets the specification IEEE 802 3af of the power class 3 6 49 12 95W 26 30mA A 100 Mbit Etherne...

Page 19: ... T08 ExCam series supports both modes and the used power source PSE determines the mode For executing a reboot it is possible to separate the ExCam IPQ1775 from the network and to switch it on again while in operation or in interaction with a visualization system hot plugging Attention Hot plugging as well as the connection and separation of the data and power cable SKDxx with of network devices a...

Page 20: ...is not necessary The power supply is executed by the PoE network device via an electronic with intelligent set up The camera as well as the con nection is permanently monitored in order to avoid any failure or defects in case of a short circuit fault For a camera with terminal block execution it is possible to operate the camera either with a PoE capable network device or with a separate 48 V DC p...

Page 21: ...m2 litz wire 24 VDC 20 W fuse L 2000 mA T time lag high inrush current 40 W fuse L 4000 mA T time lag high inrush current L 2 BK 2 5 mm2 litz wire 0 VDC GND Table 6 3 Pin assignment supply cable 5 2 3 Tests prior to switching on voltage Attention Prior to commissioning all tests as indicated by the national regula tions have to be executed In addition it is mandatory that the proper functioning of...

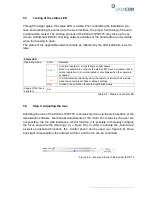
Page 22: ...r that in normal operation it is not illuminated or only blinks when the camera is accessed Yellow It is illuminated permanently when the camera is turned on as well as when the camera is set back to default settings Red In case of an activation failure the light blinks slowly Usage of the focus assistant n a Table 6 4 Status and control LED 5 4 Step 3 Adjusting the lens Adjusting the lens of the ...

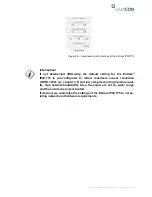
Page 23: ...ntly the default setting for the ExCam IPQ1775 is pre configured to reflect maximum sensor resolution HDTV 1080i q v chapter 3 6 and low compression high picture qual ity high network bandwidth Also the camera is set to wide range and the auto focus is deactivated If desired we customize the settings of the ExCam IPQ1775 to net ex isting network and hardware requirements ...

Page 24: ...5 2 Opening the pressure resistant housing Opening the pressure resistant housing DIN EN 60079 1 2008 of the ExCam IPQ1775 is only allowed in case the SD storage card has to be removed or replaced or that a Hardware Reset of the camera module is necessary All additional mechanical and electrical interventions inside the Ex d housing by the user are not allowed and are only to be executed by SAMCON...

Page 25: ...e protection roof_1 Figure 6 11 Removing the protection roof _2 To open the enclosure T07 VA2 2 of the ExCam IPQ1775 loosen the four hexagon socket screws DIN 912 ISO 4762 located at the cable gland flange of the stainless steel housing including the washer springs DIN 127 A q v figure 6 10 Avoid skin or clothing contact with the screw threads as they dispose of LOCTITE 243 chemical basis Dimethac...

Page 26: ...mperature controller the camera module and the optical module are fixed to the cable gland flange Beware also of tilting and work very carefully to avoid damaging the components Avoid skin and clothing contact with the cylindrical fit the surface is treated with lubrication paste oleag inous to protect the surface against frictional corrosion and mechanical strain When opening the housing make sur...

Page 27: ...ce and are also available on the download list http The videos stored on the storage card can also be accessed via an FTP server within the network ftp If it should become neces sary to exchange the storage card please use an empty one which has been pre formatted with an ext4 or vFAT data system The storage card slot is situated on the back of the camera module q v figure 6 14 Figure 6 14 SD card...

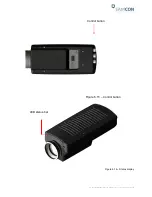
Page 28: ...se fol low the steps below 1 Disconnect the camera module Axis Q1775 from the power supply 2 Hold the control button pressed q v figure 6 15 while at the same time switch ing on the power supply PoE 3 Keep the control button pressed until the status light turns yellow figure 6 16 This may take up to 15 seconds 4 Release the control button As soon as the control light is green the ExCam IPQ1775 has...

Page 29: ...Doc ID 160319 PT08BA TG ExCam IPQ1775 series_en_rev 01 docx Seite 29 von 40 Figure 6 15 Control button Figure 6 16 Status display Control button LED status bar ...

Page 30: ...en damaged mechanically the housing must not be used anymore Attention Do not lock in any foreign objects inside the housing Please make sure that the disassembled screw locks washer spring DIN 127A are re assembled The Gylon sealing must be intact and has to be reassembled according to the hole pattern of the flange There is no restriction regarding the installation direction of the seal ing If w...

Page 31: ..._en_rev 01 docx Seite 31 von 40 The T08 ExCam series is certified to be also used for mobile applications hand held etc The cylinder head screws for the safe connection of the housing body and the flange have to be tightened with a torque of 3 Nm ...

Page 32: ...nal operating systems To carry out video streaming via the Microsoft Internet Explorer installing the AXIS Media Control AMC is required The installation request is executed during the initial commissioning In order to visualize the H 264 video streams QuickTimeTM is recom mended For Motion JPEG coded video streams Java Applet is suggested which re quires JVM J2SE 1 5 or higher or JRE J2SE 5 0 or ...

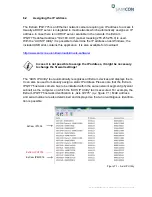
Page 33: ...o available for download http www samcon eu en downloads drivers software In case it is not possible to assign the IP address it might be necessary to change the firewall settings The AXIS IP Utility tool automatically recognizes all ExCam devices and displays them It can also be used to manually assign a static IP address Please note that the ExCam IPQ1775 network camera has to be installed withi...

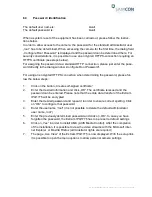
Page 34: ...ining the password please fol low the below steps 1 Click on the button Create self signed certificate 2 Enter the desired information and click OK The certificate is issued and the password can be entered Please note that the entire data transfer of the ExCam IPQ1775 will be encrypted 3 Enter the desired password and repeat it in order to ensure correct spelling Click on OK to configure that pass...

Page 35: ... If maintenance measures are necessary they have to be initiated and or executed 8 Repairs and Maintenance Repairs must only be carried out with original parts of SAMCON Prozessleittechnik GmbH Damaged pressure resistant housings have to be replaced completely If in doubt return the applicable part to SAMCON Prozessleittechnik GmbH Repairs concerning the explosion protection must only be carried o...

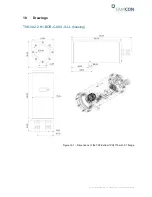
Page 36: ...Doc ID 160319 PT08BA TG ExCam IPQ1775 series_en_rev 01 docx Seite 36 von 40 10 Drawings T08 VA2 2 K1 BOR C XXX X LL housing Figure 10 1 Dimensions of the T08 ExCam IPQ1775 with K1 flange ...

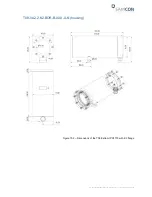
Page 37: ...Doc ID 160319 PT08BA TG ExCam IPQ1775 series_en_rev 01 docx Seite 37 von 40 T08 VA2 2 K2 BOR B XXX X N housing Figure 10 2 Dimensions of the T08 ExCam IPQ1775 with K2 flange ...

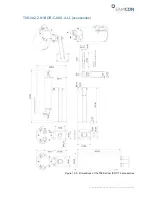
Page 38: ...Doc ID 160319 PT08BA TG ExCam IPQ1775 series_en_rev 01 docx Seite 38 von 40 T08 VA2 2 K1 BOR C XXX X LL accessories Figure 10 3 Dimensions of the T08 ExCam IPQ1775 accessories ...

Page 39: ...Doc ID 160319 PT08BA TG ExCam IPQ1775 series_en_rev 01 docx Seite 39 von 40 11 Notes ...

Page 40: ...Doc ID 160319 PT08BA TG ExCam IPQ1775 series_en_rev 01 docx Seite 40 von 40 Schillerstrasse 17 35102 Lohra Altenvers www samcon eu info samcon eu fon 49 6426 9231 0 fax 31 ...

Reviews: