background image

11

Member of Exel group

DRT582221110

B - 2023/01

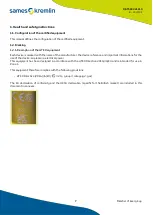
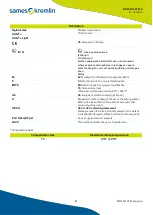
1.3. Meaning of the pictograms

Danger:

Electricity

Danger:

Automatic start

Danger:

Hot parts or 

surfaces

Danger:

Risk of explosion

Danger:
General

Danger: 

High pressure

Danger: 

Pinching and/or 

crushing

Danger:

Atex Zone

Danger: 

Flammability hazard

Danger:

Corrosive products

Danger: 

Toxic materials

Danger: 

Harmful products

Prohibition 

of wearing a 

pacemaker

Obligation:

Wear of hearing 

protection

Obligation:

Wear of a 

protective visor 

Obligation: 

Protection of the 

respiratory tract

Obligation: 

Wear of safety 

shoes 

Obligation:

Wear of protective 

clothes 

Obligation: 

Wear of gloves

Obligation: 

Wear of a 

protective helmet

Obligation:

Wear of safety 

glasses

Obligation: 

General

Obligation: 

Grounding

Obligation

 Refer to the manual

Summary of Contents for Xcite

Page 1: ...Instruction manual DRT582221110 B 2023 01 Xcite Xcite Light guns...

Page 2: ...permission of Sames The descriptions and characteristics contained in this document are subject to change without notice Sames 2022 Translation from the original manual Sames produces its user manual...

Page 3: ...tion tool Our network of experts is continuously trained and qualified to provide our customers with technical expertise on the liquid or powder installations in which our equipment is integrated The...

Page 4: ...4 DRT582221110 B 2023 01 Member of Exel group...

Page 5: ...stallation rules 16 1 6 Important recommendations 17 1 6 1 Non intended use or foreseeable misuse 17 1 6 2 Compressed air quality 17 1 6 3 Transport 17 1 6 4 Check the scope of delivery 17 1 6 5 Recom...

Page 6: ...alve 15 40 6 4 8 Procedure D2 Reassembly of the fan adjustment valve 15 40 6 4 9 Procedure E1 Disassembly of the trigger 5 41 6 4 10 Procedure E2 Reassembly of the trigger 5 41 6 4 11 Procedure F1 Dis...

Page 7: ...manufacturer the device reference and important informations for the use of the device air pressure electrical power This equipment has been designed in accordance with the ATEX Directive 2014 34 EU a...

Page 8: ...on mode for non electrical devices IIB T6 IIB Reference gas for equipment qualification T6 Temperature class Maximum surface temperature 85 C 185 F Gb Gb Equipment protection level gas Zone 1 X X Spec...

Page 9: ...manufactured with high quality materials and components that can be recycled and reused The 2012 19 EU European Directive applies to all devices marked with this logo crossed out waste bin Find out m...

Page 10: ...res Non electrical protection by constructional safety c by ignition source monitoring b by immersion in liquid k Explosive atmospheres Part 37 non electrical equipment for use in potentially explosiv...

Page 11: ...hazard Danger Corrosive products Danger Toxic materials Danger Harmful products Prohibition of wearing a pacemaker Obligation Wear of hearing protection Obligation Wear of a protective visor Obligatio...

Page 12: ...spect the laws in force regarding security fire electricity of the destination country of the equipment Only use products or solvents that are compatible with the parts in contact with the material se...

Page 13: ...rom the site of use and maintenance there is a risk of sparking due to friction blows and friction or due to electrostatic charging Therefore make sure that these risks areeliminated duringthese works...

Page 14: ...the pump 1 4 8 Materials used Given the diversity of the materials implemented by the users and the impossibility of listing all the characteristics of chemical substances their interactions and their...

Page 15: ...embled in accordance with therulesspecifiedin this manual and any applicableEuropeanStandardor nationalsafety regulations The proper operating of the equipment is guaranteed only with the use of origi...

Page 16: ...r thermal damage during production or maintenance The waste related to the operations or the dismantling of the equipment will have to be treated according to the laws in force The noise level of our...

Page 17: ...erator having first taken measures in accordance with the requirements of Directive 1999 92 EC and the applicable national regulations on explosive protection First start up without prior inspection f...

Page 18: ...6 6 Storage conditions Our equipment must be stored in its original packaging In the event of prolonged storage it is advisable to carry out a preventive maintenance on all lubricants before commissio...

Page 19: ...ear the cost of the parts necessary to replace the defective material No warranty will be granted by Sames For defects and deteriorations resulting from abnormal conditions of storage and or conservat...

Page 20: ...stent pattern Unsurpassed finishing quality and outstanding transfer efficiency with VX24 HVLP aircap Built in filter with high filtration capacity to avoid tip blockage and minimize pressure loss Dif...

Page 21: ...r Mechanical device that tilts under the action of the operator on the trigger releases the material D Safety lever Equipment to block the operating of the trigger E Air inlet fitting Equipment that a...

Page 22: ...22 DRT582221110 B 2023 01 Member of Exel group 3 Technical features 3 1 Dimensions mm Xcite Xcite Light...

Page 23: ...essure 1 bar 14 5 psi at the gun handle Air pressure 2 bar 29 psi at the gun handle 4 8 m3 h 7 2 m3 h Transfer rate according to EN 13966 1 standard 86 2 Seat removable Stainless steel Tungsten carbid...

Page 24: ...art up 5 1 Tools Part numbers Description Qty Sales unit 554 180 010 Loctite 222 50ml 1 7 oz 1 1 560 440 101 PTFE grease tube 10ml 0 3 oz 1 1 Part number Description Qty Sales unit 906 300 101 Large s...

Page 25: ...ntenance of the equipment Pin driver Flathead screwdriver Hex key 4 mm Flat wrench 5 5 mm Fine brush Part number Description Qty Sales unit 129 729 922 Tools kit 1 1 Starter seal tool 1 Seal installat...

Page 26: ...a tip on the tip chart Make sure the inside of the tip has a tightness seal or a micro screen Install the tip inside the aircap making sure that the pins fit perfectly into the notches Screw the tip...

Page 27: ...limitation of the zones is the express responsibility of the user depending on the materials used the environment and the conditions of use The 1 m 39 37 distance can be modified if the analysis condu...

Page 28: ...Exel group 5 2 1 Installation diagram Benchmarks Description 1 Airmix pump 2 Airmix Xcite gun 3 Airmix fluid hose 4 Conductive air hose 5 Air regulator spraying air 6 Air regulator fluid pressure 7 Ai...

Page 29: ...o obtain a suitable and regular coverage of the different passes 5 3 2 Shutdown procedure of the gun ATTENTION Before any intervention respect the health and safety instructions see 1 page 7 Turn off...

Page 30: ...is equipment IMPORTANT Soiling and wear of the equipment depends on the operating and application conditions as well as the production rates Required qualification levels interventions described As th...

Page 31: ...y 4 1 min 15 s Weekly C Maintenance of the needle assembly 9 and of the air valve 10 C1 Disassembly of the needle assembly 9 and of the valve 10 1 min 50 s Semestre C2 Re assembly of the needle assemb...

Page 32: ...production tool Depending on the skills area of responsibility and clearance of each person involved the preventive maintenance plan can be divided into two distinct levels level 1 and level 2 Level 1...

Page 33: ...ressure The maintenance consists of replacing parts with cuts or wear and cleaning organs with compatible products without using abrasive materials that could damage them The O rings are mounted with...

Page 34: ...ctions see 1 page 7 6 4 1 Procedure A1 Disassembly of the aircap 2 and of the tip 3 Step 1 Unscrew the aircap ring 2 2 from the gun body 1 Step 2 Remove the tip 3 from the aircap 2 Step 3 Clean and or...

Page 35: ...dition of the parts and the seals 4 2 4 3 and 4 4 Change them if necessary ATTENTION To change the seal apply grease PTFE on the starter seal tool Install the seal 4 4 on the starter seal tool Insert...

Page 36: ...7 1 and the seat 7 2 Step 2 Screw in the screw 4 5 Tightening torque 2 Nm 1 47 ft lb Step 3 Screw in the cartridge stop 6 until it stops ATTENTION If the cartridge stop 6 and the diffusor 4 6 are not...

Page 37: ...ATTENTION If the springs 9 1 10 1 are not removed go to step 5 otherwise go to step 6 Step 5 Press the trigger 5 to move the needle 9 4 back Step 6 Tighten the seat holder 4 in the gun Tightening torq...

Page 38: ...carrier 12 and the needle rod 13 Step 3 Press the trigger 5 Step 4 Remove the air valve 10 Step 5 Remove the screw 5 1 by means of a 5 5 mm wrench Remove the trigger spindle 5 2 Step 6 Remove the trig...

Page 39: ...the seat holder 4 the needle assembly 9 must come to a stop Step 4 Grease PTFE springs 9 1 10 1 the needle rod 13 the air valve 10 and the needle stop thread 11 Step 5 Install the air valve 10 the nee...

Page 40: ...isassembly of the fan adjustment valve 15 in the gun check that it is in the open position Step 1 Unscrew the fan adjustment valve 15 by means of the wrench supplied with the gun 6 4 8 Procedure D2 Re...

Page 41: ...rew 5 1 by means of a 5 5 mm wrench Step 2 Remove the trigger spindle 5 2 Step 3 Remove the trigger 5 3 6 4 10 Procedure E2 Reassembly of the trigger 5 Step 1 Apply glue Loctite 222 to the screw threa...

Page 42: ...y of the safety lever 5 5 Step 1 Remove the pin 5 4 with a pin driver Step 2 Remove the safety lever 5 5 from the gun body 1 6 4 12 Procedure F2 Reassembly of the safety lever 5 5 Step 1 Place the saf...

Page 43: ...of the wrench supplied with the gun Step 2 Remove the screen support 21 1 and the screen 21 2 Step 3 Remove the seal 21 3 Step 4 Unscrew the fitting 19 Step 5 Loosen the screw 21 4 with a 4 mm hex ke...

Page 44: ...onto the body 1 of the gun Step 3 Apply glue Loctite 222 to the thread of the fitting 19 Step 4 Tighten the fitting 19 in the gun body 1 Tightening torque 10 Nm 7 37 ft lb Step 5 Insert the screen 21...

Page 45: ...sembly of the fitting 16 for Xcite Light guns Step 1 Unscrew the fitting 16 Step 2 Remove the seal 17 Check it and change it if necessary 6 4 16 Procedure H2 Reassembly of the fitting 16 for Xcite Lig...

Page 46: ...ay narrows at pump inversions Spraying air intake Blow with compressed air Viscosity too high Dilute the paint The aircap gets dirty frequently Too much air Reduce the air pressure The paint comes out...

Page 47: ...flow is possible storage is not necessary However if a stop is not possible the 1st emergency parts will be kept in stock Wear parts Wear parts are consumable items such as O rings that undergo regul...

Page 48: ...2023 01 Member of Exel group 8 1 Guns 2 4 2 2 2 3 2 1 2 5 3 3 1 4 4 4 6 4 3 7 2 7 1 4 6 4 2 4 5 9 3 1 15 3 15 2 15 1 15 10 1 12 5 5 10 5 1 5 3 5 2 21 4 19 5 4 13 9 4 3 Xcite 11 9 1 20 2 20 1 21 1 21...

Page 49: ...fitting 1 1 135 732 120 Xcite Airmix Gun 120 bar 1740 psi with VX24 KHVLP aircap without swivel fitting 1 1 135 732 200 Xcite Airmix Gun 240 bar 3480 7 psi with VX24 KHVLP aircap with swivel fitting...

Page 50: ...50 DRT582221110 B 2023 01 Member of Exel group 11 2 4 2 2 2 3 2 1 2 5 3 3 1 4 4 4 6 4 3 7 2 7 1 4 6 4 2 4 5 9 3 1 15 3 15 2 15 1 15 9 1 10 1 12 5 5 10 5 1 5 3 5 2 17 16 5 4 13 9 4 3 Xcite Light 7 14...

Page 51: ...t Item Part number Description Qty Sales unit Spareparts level 135 733 120 Xcite Light Airmix Gun 120 bar 1740 psi with VX24 KHVLP aircap adjustable spray 1 1 135 733 220 Xcite Light Airmix Gun 240 ba...

Page 52: ...age of 10 1 1 1 4 3 150 040 329 O Ring package of 10 1 1 1 4 4 129 729 912 Aircap seal on Xcite seat holder package of 5 1 1 1 4 5 029 600 106 Screw for seat 1 1 4 6 129 740 910 Diffusor package of 10...

Page 53: ...0 306 Nut 1 1 20 2 029 520 372 Filter body 1 1 21 129 720 085 Assembled product tube without tank Xcite 1 1 21 1 029 720 083 Screen support 1 1 21 2 129 609 908 Screen n 6 package of 5 1 1 1 21 3 129...

Page 54: ...1 9 129 720 150 Needle assembly Xcite 120 bar 1740 psi with spring 1 1 1 9 1 129 729 914 Xcite fluid needle spring 120 bar 1740 psi package of 5 1 1 1 9 2 102 202 113 Ring 8 package of 10 1 1 1 9 3 10...

Page 55: ...Sleeve needle stop 400 bar 5800 psi 1 0 7 129 729 917 Carbide seat with seal PEEK package of 2 1 1 1 7 1 Seal PEEK 1 0 1 7 2 Seat Carbide 1 0 1 9 129 720 450 Needle assembly 400 bar 5800 psi 1 1 1 9 1...

Page 56: ...l 129 732 909 Repair kit Xcite and Xcite Light trigger item 5 1 5 2 5 3 1 1 1 2 129 729 919 Repair kit 5 pins and 5 safety levers item 5 4 5 5 1 1 1 2 Part number Description Qty Sales unit Spare part...

Page 57: ...ite 400 bar 5800 psi item 9 1 11 12 13 1 1 1 2 129 729 943 Repair kit Xcite 400 bar 5800 psi item 5 1 5 2 5 4 5 5 8 9 2 9 1 9 4 10 10 1 15 21 2 1 1 1 2 Part number Description Qty Sales unit Spare par...

Page 58: ...Spare parts level 129 732 080 Seals and rings kit item 8 9 2 ATTENTION Use that kit only if the cartridge stop and the diffusor are not used see page 36 1 1 1 2 129 729 908 Xcite air seal kit item 2 3...

Page 59: ...0 23 0 33 0 43 0 57 4 4 or 6 06 034 06 054 06 074 06 094 06 114 06 134 06 154 07 0 30 0 28 0 39 0 51 0 66 6 4 or 6 07 154 09 0 33 0 32 0 45 0 59 0 77 6 6 or 8 09 034 09 054 09 074 09 094 09 114 09 134...

Page 60: ...unit Spare parts level 23 075 810 010 Extension Length 400 mm 16 1 1 050 450 853 Airmix hose 4 8 mm 3 16 Length 7 5 m 120 bar 1740 psi 1 1 050 382 114 Air hose 6 5 x 10 5 mm Length 7 5 m 24 6 ft F 1...

Page 61: ...f 3 1 1 1 2 2 5 150 040 330 Ring seal package of 10 1 1 1 2 7 129 729 904 Xcite seat acetal package of 10 Only for Xcite 120 bar 1740 psi 240 bar 3480 7 psi 1 1 1 2 050 450 653 Airmix hose 4 8 mm 3 16...

Page 62: ...mber of Exel group 9 History of revision indices Created by Verified by Approved by Date By Indice Purpose of the modification and location 11 09 2022 C Husson F Seguin A Creation of the document 01 0...

Page 63: ...63 Member of Exel group DRT582221110 B 2023 01 10 Annexes 10 1 Preventive Maintenance Plan...

Page 64: ...lder Contr le aspect Wear Leakage check 1 67 1 00 1 mois X 1 A remplacer si endommag Replace if broken 12 Porte si ge Seat holder Remplacement Replacement 3 33 2 00 1 an X 1 A remplacer si endommag Re...

Page 65: ...valve Grease it before reassembly as well as the spring 8 33 5 00 1 an X 2 A remplacer si endommag Replace if broken 19 Pointeau d air assembl Assembled air needle Joint torique O Ring Remplacement Re...

Page 66: ...ors skill 3 Niveau Level 4 Action effectuer Action to carry out Temps pr vu Estimated Time 1 P riodicit Periodicity H hour 2 Manuel d utilisation Instruction manual 28 Pointeau Needle V rification tat...

Page 67: ...64 DRT582221110 B 2023 01 Member of Exel group 10 2 EU declaration of conformity and UKCA declaration...

Page 68: ...Conditions sp ciales d utilisation le signe X indique de se r f rer aux prescriptions figurant dans le manuel d instructions qui accompagent le produit Specific conditions of use X indicates to refer...

Page 69: ...s direktyvos Alkalmazand ir nyelvek Directive aplicabile Primjenjive smjernice Uplatnite n smernice Veljavne directive 4 Marquage arkierung Marcado Marcatura Marca o Znakowanie Markering Ozna en M rkn...

Page 70: ...Protection par s curit deconstruction c Protection by constructional safety c Conditions sp ciales d utilisation le signe X indique de se r f rer aux prescriptions figurant dans le manuel d instructi...

Page 71: ...lijnen Platn sm rnice Till mpliga direktiv G ldende direktiver Sovellettavat direktiivit Kohaldatavad direktiivid Piem rojam s direkt vas Taikomos direktyvos Alkalmazand ir nyelvek Directive aplicabil...

Reviews: