background image

 Revised  A

35

6301

5. Maintenance (continued)

5.2 Tools  (continued)

Other tools and accessories required

• Plastic mallet
• 6 mm steel rod

USA P/N

 Sames P/N

Tool description

Qty

Sale 

unit

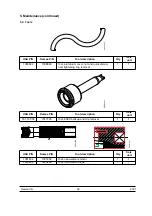
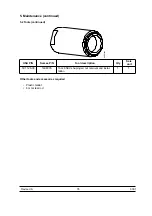
72-1126-00

1408335

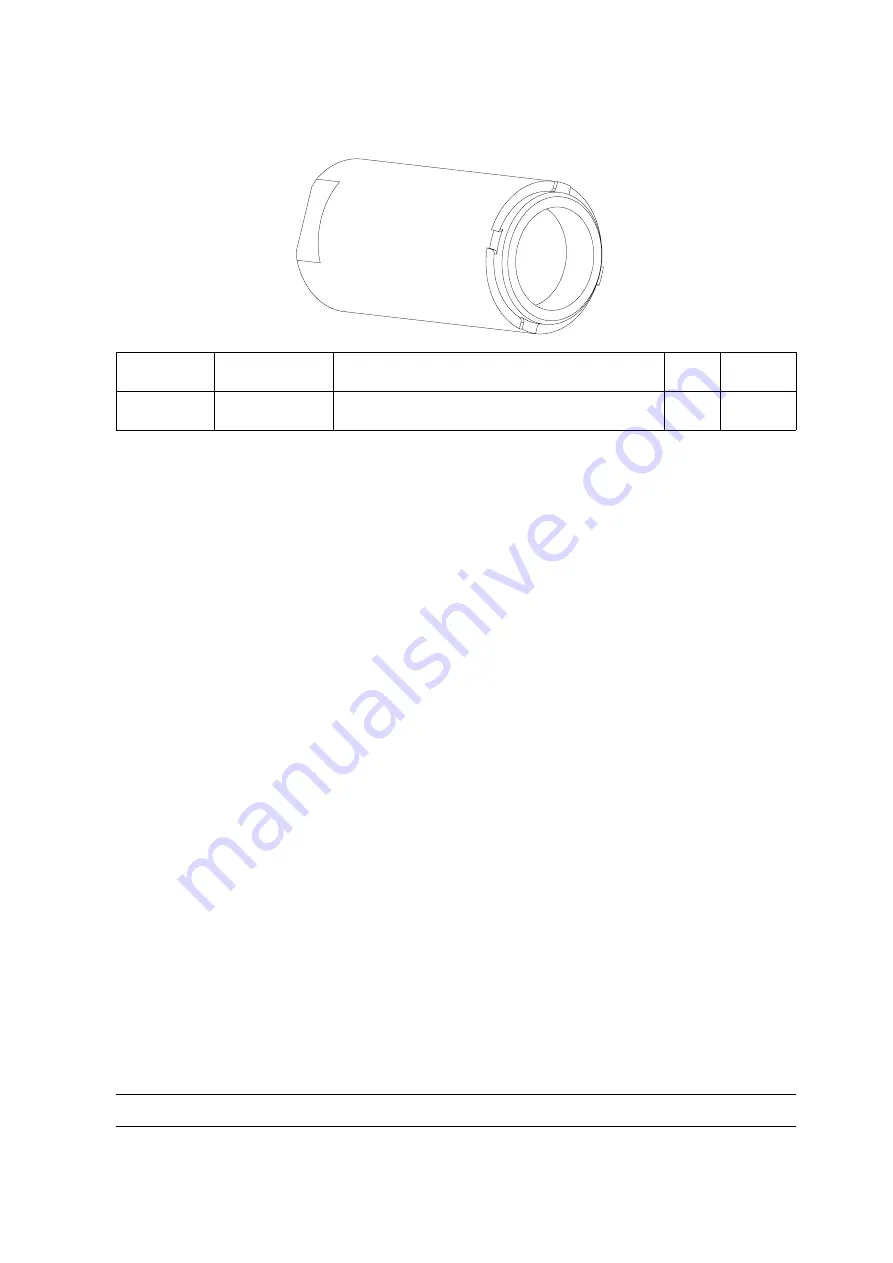
Tool, 65EC shaping air nut removal and instal-
lation

1

1

DES01484

Summary of Contents for PPH 607

Page 1: ...60 60 Fax 33 0 4 76 41 60 90 Email info sames com www sames com USA SAMES Technologies Inc 11998 Merriman Road Livonia Michigan 48 150 Tel 734 261 5970 Fax 734 261 5971 Email samesinc sames com www s...

Page 2: ...tion of its contents to others without express authorization from SAMES Technologies is prohibited All descriptions and characteristics given in this user manual are not contractually binding and SAME...

Page 3: ...air 29 4 8 Compensation air 29 4 9 Color change and circuit flushing examples 30 5 Maintenance 31 5 1 Shut down Start up procedures 31 5 1 1 Shut down procedures 31 5 1 2 Start up procedures 31 5 2 To...

Page 4: ...r holder 68 7 3 Procedure C 69 7 4 Nano valve clean up 70 8 PPH 607 SCAR metric spare parts list 71 8 1 Robotic mount P N 1516592 65 EC bellcup not included 71 8 2 Bellcup clip shaping air assembly 65...

Page 5: ...g information for your personal protection Failure to follow Safety Warnings may result in severe personal injury and even death Follow all Safety Warnings while operating SAMES Technologies equipment...

Page 6: ...y object Protect yourself by following the proper SHUT OFF procedures in force in your facility Refer to your supervisor for detailed instructions Ensure high voltage is shut off when servicing in the...

Page 7: ...to ensure that all conductive and semi conductive parts less than 10 feet from the atomizer are properly grounded otherwise it is possible to accumulate electrical charges which could generate a spark...

Page 8: ...ide of the air hoses supplying the atomizer should be free of any paint or solvent contamination CAUTION The warranty does not cover any damage caused by impurities paint solvent or any other foreign...

Page 9: ...endations To avoid air ionization and possible accumulation of electrostatic charges in the spray booth turn off the E STAT when the trigger is turned off for any extended period of time conveyor stop...

Page 10: ...ted rings are chemically inert to prevent any swelling or chemical deterioration The proper operation of the PPH 607 is warranted only if used with the right size and material rings Mechanical crash T...

Page 11: ...acts of God bad air filtration solid particles 5 micron diameter bad paint solvent use of o rings not complying with SAMES Technologies specifications usage of turbine below minimum bearing air pressu...

Page 12: ...air bearing turbine the PPH 607 is designed to atomize and apply various types of paints at a maximum loaded rotation speed of 45 000 RPM Main components DES02091 Manifold cover Turbine Bellcup clip...

Page 13: ...tput which is used to charge atomized paint particles Transfer efficiency increases with the use of high voltage Protective cover Protects internal components from paint contamination and eases cleani...

Page 14: ...ns mm Note GC gravity center TCP Tool center point TCP cup TCP 300 mm GC Installed cups A B C D E F 65 EC cup 431 135 581 395 280 31 60 mm Negative edge 420 116 570 376 280 31 70 mm Vortex 420 116 570...

Page 15: ...ed Recommended rotation speed 15 to 45 KRpm 15 to 45 K tr min Paint Flow rate 0 to 500 cc min Max according to paint used Pressure normal setting 90 to 120 PSI 6 to 8 bar Pressure maximum setting 150...

Page 16: ...0 35 CFM 10L min Bearing air 4 41 CFM 125L min Shaping air 0 to 600 Nl min 21 18CFM according to type of shaping air ring being used Turbine Refer to the following charts x 1000 Rpm Load 150cc min Loa...

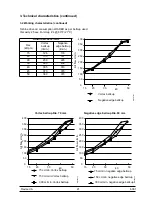
Page 17: ...ED relative to bellcup used Rev k Rpm Vortex bellcup L min Negative edge bellcup L min Bearing air L min 15 40 77 85 20 51 106 85 30 85 165 85 35 94 192 85 40 120 234 85 45 145 275 85 50 180 330 85 30...

Page 18: ...15 97 98 20 120 120 30 188 180 35 226 210 40 271 262 45 324 315 50 370 370 Fluid flow 150cc Rev k Rpm Vortex bellcup l min Negative edge bellcup l min 15 107 103 20 135 129 30 191 190 35 244 201 40 29...

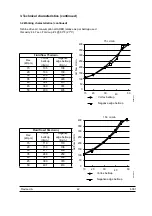
Page 19: ...iscosity 60 seconds 80 F Ford cup 4 DES01230 15 50 100 150 200 250 300 350 30 40 50 20 400 0 DES01231 15 50 100 150 200 250 300 350 30 40 50 20 400 0 75 cc min Vortex bellcup Vortex bellcup Dia 70 mm...

Page 20: ...bellcup l min 15 97 94 20 123 120 30 192 180 35 230 220 40 270 250 45 324 314 50 370 370 Fluid flow 150cc min Rev k Rpm Vortex bellcup l min Negative edge bellcup l min 15 108 109 20 140 132 30 200 18...

Page 21: ...335 310 45 373 370 50 389 373 DES01234 15 50 100 150 200 250 300 350 30 40 50 20 400 0 Air flow L min Vortex bellcup Negative edge bellcup DES01235 15 50 100 150 200 250 300 350 30 40 50 20 400 0 DES...

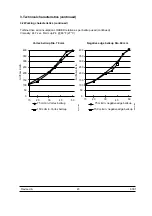
Page 22: ...in 15 105 108 20 133 130 30 206 198 35 251 220 40 302 273 45 360 374 50 400 405 Fluid flow 150cc min Rev k Rpm Vortex bellcup l min Negative edge bellcup l min 15 110 110 20 150 138 30 211 205 35 266...

Page 23: ...tinued Viscosity 44 7 sec Ford cup 4 80 F 27 C DES01239 15 50 100 150 200 250 300 350 30 40 50 20 400 0 DES01240 15 50 100 150 200 250 300 350 30 40 50 20 400 0 Vortex bellcup Dia 70 mm Negative edge...

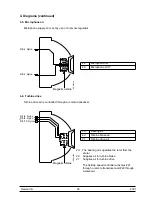
Page 24: ...speed regulation board 3 3 2 Microphone 1 Half moon groove 2 Microphone air return Mic OUT 3 Microphone air supply Mic IN 4 Microphone 5 Speed regulator board 6 Manual air regulator 7 1 4 Tube 15 to 2...

Page 25: ...taining its center above the stator Drive air is used to accelerate the turbine through the turbine drive vane which is attached to the rotor Brake air is used to slow down the turbine during an over...

Page 26: ...OUT 31 External bellcup wash solvent or air 58 External bellcup wash pilot air 41 Dump 1 53 Dump valve pilot 63 Regulator pilot 11 Paint supply 1 51 Paint valve pilot 1 DES02090 58 31 43 32 56 51 11...

Page 27: ...assage to the bellcup Note PFA teflon tubing should not be replaced with nylon tubing 31 External bellcup wash solvent or air 58 External bellcup wash pilot air 56 Injector wash pilot 32 Injector wash...

Page 28: ...22 Supplies air for turbine brake 21 Supplies air for turbine drive The bellcup speed controller activates 21 through a remote transducer and 22 through a solenoid 26 Microphone IN 43 Microphone OUT 2...

Page 29: ...and is controlled through a remote transducer 4 8 Compensation air 25 Compensation air stops shaping air shroud con tamination and is controlled through a remote regulator 24 Shaping air 25 Compensati...

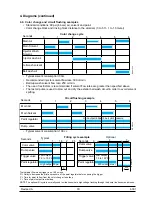
Page 30: ...ds Color change cycle Injector Wash Solvent Injector wash air Bell wash air 0 1 2 3 4 5 6 DES01244 Main Air Main Solvent Paint regulator Dump valve High output 60psi 4 bar pilot pressure Seconds Circu...

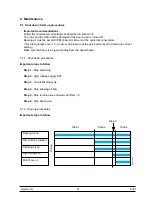
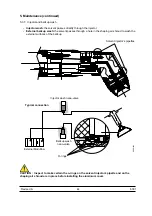
Page 31: ...air pressure at the quick disconnect to determine correct setting Make sure that there is a signal emitting from the speed board 5 1 1 Shut down procedures Important steps to follow Step 1 Stop atomiz...

Page 32: ...er nut and quick discon nect tightening ring removal 1 1 USA P N Sames P N Tool description Qty Sale unit 72 1107 00 1517728 Tool 65EC bellcup and clip removal 1 1 USA P N Sames P N Tool description Q...

Page 33: ...e removal 1 1 USA P N Sames P N Tool description Qty Sale unit 1305453 1305453 Tool fittings 2 1 USA P N Sames P N Tool description Qty Sale unit 1406390 1406390 Tube depth gauge 1 1 USA P N Sames P N...

Page 34: ...aptor wrench 60 1 1 USA P N Sames P N Tool description Qty Sale unit 1408598 1408598 Tool restrictor removal 1 1 USA P N Sames P N Tool description Qty Sale unit 1408599 1408599 Tool injector 1 1 USA...

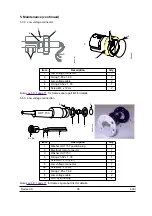
Page 35: ...continued 5 2 Tools continued Other tools and accessories required Plastic mallet 6 mm steel rod USA P N Sames P N Tool description Qty Sale unit 72 1126 00 1408335 Tool 65EC shaping air nut removal...

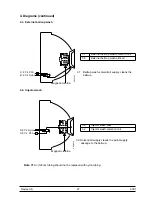
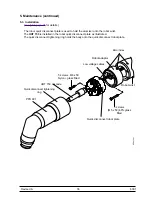
Page 36: ...153 is installed in the robot quick disconnect plate as illustrated The quick disconnect tightening ring holds the body onto the quick disconnect robot plate DES01431 Robot wrist Zero index Low voltag...

Page 37: ...air 26 Microphone IN 31 External bellcup wash solvent or air 32 Injector wash solvent or air 41 Dump valve 43 Microphone OUT 51 Paint valve supply 53 Dump valve pilot 56 Injector wash pilot 58 Extern...

Page 38: ...connector 1 2 O ring 7 65 x 1 68 2 3 Low voltage cable 2 4 O ring 23 52 x 1 78 1 5 Screw M4 x 12 s s 2 Item Description Qty 1 Washer UHT 153 position plug 1 2 Electrical male connector 1 3 Washer UHT...

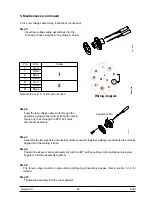
Page 39: ...tep 3 Crimp pins on the red black and white wires on the 2nd low voltage cable Tag 2 cable using a solvent resistant marker at other end Step 4 Feed cable ends through the connector assembly and the r...

Page 40: ...7 Assemble the two washers and electrical male connector together making sure all parts are correctly aligned and the mating is flush Step 8 Position the above mentioned assembly into the UHT well by...

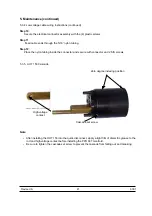
Page 41: ...he nylon tubing inside the connector and secure with connector and 2 S S screws 5 3 5 UHT 153 Cascade Note After installing the UHT 153 into the quick disconnect apply a light film of dielectric greas...

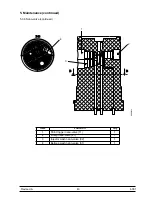
Page 42: ...6 Nano valve The compact size of SAMES nano valves means they can be positioned near to the atomizer reducing paint and solvent consumption and color changing time CAUTION Valve not repairable only re...

Page 43: ...01 5 Maintenance continued 5 3 6 Nano valve continued Item Function Qty 1 Paint trigger nano valve 11 1 2 Dump nano valve 41 1 3 Injector wash nano valve 32 1 4 Bellcup wash nano valve 31 1 B B B B DE...

Page 44: ...through a hole in the shaping air shroud to wash the external surfaces of the bellcup CAUTION Inspect to make certain the o rings on the solvent injector s pipette and on the shaping air shroud are i...

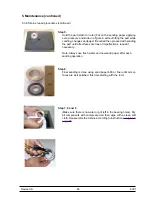
Page 45: ...ace a 5 x 5 inches lapping surface in a basin or a sink and cover with at least 1 4 of water Note Best results are obtained if sanding is done under running water Step 2 The first sanding is done with...

Page 46: ...part until all surfaces are free of imperfections repeat if necessary Note Always use fresh water and new sand paper after each sanding operation Step 6 Final sanding is done using sand paper 600 or f...

Page 47: ...V 60 mm negative edge bellcup for Base coat solid Viscosity 34 s Ford cup 4 80 F Weight solids 44 Target distance 9 5 inches Estat 90 kV Settings Flow rates cc min Shaping air l min Bellcup speed kRpm...

Page 48: ...s item 4 5 8 from the shaping air shroud item 6 Step 4 Remove bellcup and clip assembly see 6 2 1 page 50 Item Description Qty 1 Aluminium cover 1 2 O ring 84 x 2 teflon encapsulated viton 1 3 Shaping...

Page 49: ...groove Step 3 Align the shaping air insert to the shaping air shroud be careful not to damage the o rings Step 4 Secure the shaping air insert to the shaping air shroud by placing the shaping air nut...

Page 50: ...107 00 SAFETY Wear rubber gloves or use a rag to protect your hands from the sharp edges of the bellcup Bearing air must be turned OFF Avoid damage to the bellcup and clip Place the opened clamp aroun...

Page 51: ...tor from bellcup Step 2 Place bellcup upside down as illustrated above on a soft surface to avoid damage to the bellcup Step 3 Insert the rod into the bellcup as illustrated below and hit the 6 mm rod...

Page 52: ...ed to wear rubber gloves or to use a rag to install the bellcup and clip assembly Step 1 Secure the clip to the bellcup by turning the tool clockwise by hand Step 2 Place the opened clamp to close the...

Page 53: ...ool onto the nano valve and pull to remove 6 3 2 Assembly Inspect nano valve and components for damage and replace if necessary Step 1 Clean all components see 7 4 page 70 Step 2 Apply a light film of...

Page 54: ...r D 1 8 mm 1 4 Injector o ring 5 28 x 1 78 chemically inert 1 5 Injector holder 1 6 Injector o ring 2 0 x 1 25 chemically inert 1 7 Restrictor dia 3mm equipped with two o rings size 3 1 x 1 6 chemical...

Page 55: ...r 1 2 Screw M3 x 12 socket head s s 8 3 Stator 1 4 Stator magnet 1 5 Drive wheel 1 6 Deflector with o ring size 52 07 x 2 62 viton 1 7 O ring 5 28 x 1 78 chemically inert 1 8 Injector 1 8 mm 1 9 O rin...

Page 56: ...rive wheel 5 using the tool P N 1308679 Step 4 Remove the rotor 1 by sliding it straight across the stator 3 Step 5 Remove the magnet 4 Step 6 Measure with a calliper the stator assy thickness The rea...

Page 57: ...eft hand threads injector Step 2 Remove the injector using the injector tool P N 1408599 left hand threads being careful not to damage the injector and or the o rings Step 3 With the restrictor tool P...

Page 58: ...ted Step 3 Align the injector holder to the alignment pin on the manifold and secure with the 3 screws using an 2 5 mm allen wrench Step 4 Install the injector equipped with the o rings Step 5 Place t...

Page 59: ...n with the thumbs as illustrated A click should be heard if correctly in place Step 5 Insert the deflector equipped with the o ring and press in with the thumbs as illustrated Step 6 Install the assem...

Page 60: ...the poppet making sure the poppet is free to move Step 4 Place the seat and tighten with the regulator tool Step 5 Place the diaphragm pusher Step 6 Place o ring into manifold Step 7 Place the diaphra...

Page 61: ...ep 4 Install the high voltage contact and secure in place with one brass screw Item Description Qty 1 O ring 2 75 x 1 6 chemically inert Microphone air 2 2 O ring 3 68 x 1 78 chemically inert Bearing...

Page 62: ...estrictor 2 6 Restrictor Dia 3 0mm 1 7 O ring 6 07 x 1 78 chemically inert Turbine drive and brake air 6 8 O ring 2 75 x 1 6 chemically inert Microphone air 2 9 Shaping air alignment pin 1 10 Alignmen...

Page 63: ...lding the pipette bracket Step 10 Remove the pipette bracket item 15 Step 11 Remove pipettes item 4 and 14 6 7 2 Assembly Note Clean all components and inspect for damage replace if necessary Step 1 I...

Page 64: ...8 2 Assembly Note Make sure to shorten hose by 0 6 Inch 15 mm if previously used Step 1 Fit hose in the tool P N 1406390 mark as shown Step 2 Place tool and fitting onto hose and turn clockwise to tig...

Page 65: ...ese are conductive and can short circuit the high voltage A thin layer of dielectric grease pure vaseline P N H1GMIN017 applied before covering the parts facilitates removal of the cover WARNING Alway...

Page 66: ...sure in order to stop solvent flow between the bellcup and the inner ring Step 1 Clean the tightening ring the aluminium cover and the outer bellcup surface with a clean rag Step 2 Make sure that the...

Page 67: ...y and clean with a clean rag and a soft bristle brush Note Make certain that all surface is clean and free of any contaminant to ensure proper fitting onto the clip Step 3 Dry well using compressed ai...

Page 68: ...lon brush Step 3 Dry well with compressed air and a clean dry rag 7 2 3 Injector and injector holder Step 1 Remove injector as per instruction see 6 4 1 page 54 Step 2 Soak 1 hour in approved cleaning...

Page 69: ...ly do not damage o ring see 6 1 1 page 48 Remove bellcup see 6 2 1 page 50 Step 2 Remove clip see 6 2 1 page 50 Step 3 Clean the clip with a nylon brush and solvent MEK Never soak the clip into solven...

Page 70: ...ON Do not soak the nano valve in solvent Step 1 Remove all o rings Step 2 Wipe nano valve with a moistened rag Step 3 Clean nano valve with a stiff nylon brush Step 4 Wipe again with a dry rag Step 5...

Page 71: ...Revised A 71 6301 8 PPH 607 SCAR metric spare parts list 8 1 Robotic mount P N 1516592 65 EC bellcup not included DES01105 1516592 1506878 1506300 1506298 1513963...

Page 72: ...mount 65 EC version continued 25 26 20 28 28a 29 30 31 37 38 39 40 41 42 43 43 a 45 46 46a 51 51a 49 49a 52 53 54 55 56 57 58 59 60 61 63 64 65 66 67 68 69 70 71 72 16 17 21 22 23 24 27 32 33 34 35 36...

Page 73: ...21 82 0410 19 J3STKL005 O ring 5 28 x 1 78 chemically inert see 8 9 page 83 1 22 738635 738635 Injector 1 8mm 4 grooves see 8 9 page 83 1 23 82 0410 31 J3STKL014 O ring 2 0 x 1 25 chemically inert se...

Page 74: ...1402690 1402690 Solvent injector nylon 1 43a 82 0410 24 J3STKL027 O ring 2 9 x 1 2 chemically inert 2 44 1401208 1401208 High voltage contact 1 44a X7CVCB069 X7CVCB069 Screw M 3 x 16 brass 1 45 75996...

Page 75: ...00 X9SVCB192 Screw M5 x 50 CH nylon 60 glass filled 5 65 1102291 1102291 PPH 607 adaptor SCAR robot 1 66 J2FENV288 J2FENV288 O ring 23 52 1 78 teflon encapsulated 1 67 1305414 1305414 Low voltage conn...

Page 76: ...B 1516662 1516662 Bellcup and distributor 1 C 1518056 1518056 65 EC complete assembly 1 1 72 1124 01 1202996 Aluminium cover 1 2 82 0993 05 J2FENV386 O ring 84 x 2 teflon encapsulated viton 1 3 72 10...

Page 77: ...82 0884 10 J3STKL078 O ring 6 07 x 1 78 chemically inert Turbine drive and brake air 6 4 1403825 1403825 Alignment pin dia 12 2 5 1402690 1402690 Solvent injector 1 5a 82 0410 24 J3STKL027 O ring 2 9...

Page 78: ...holes USA P N Sames P N Description Qty 11 21 22 24 25 41 82 0884 11 J3STKL094 O ring 7 65 x 1 78 chemically inert 6 23 26 31 32 43 51 53 56 58 63 82 0410 19 J3STKL005 O ring 5 28 x1 78 chemically in...

Page 79: ...ly P N 1508317 Item USA P N Sames P N Description Qty 1 82 0884 14 J3STKL160 O ring 12 42 x 1 78 chemically Inert 2 2 J3STKL121 J3STKL121 O ring 9 52 x 1 78 chemically Inert 1 H1GMIN017 H1GMIN017 Diel...

Page 80: ...3TTCN007 J3TTCN007 O ring 10 5 x 2 0 teflon 1 3 930624 930624 Seat 1 4 543892 543892 Diaphragm pusher Dia 38 x 3 9 DP mm black or white 1 5 543891 543891 Air pilot disk 1 6 543894 543894 Regulator cov...

Page 81: ...19 USA J3STKL005 Sames 82 0884 26 USA J3STKL035 Sames Fitting 2 7 4 O ring 5 28 x 1 78 Qty 2 O ring 3 68 x 1 78 Qty 1 1406544 82 0410 19 USA J3STKL005 Sames 82 0884 26 USA J3STKL035 Sames Fitting 2 7...

Page 82: ...681 Rotor 1 2 1508460 1508460 Stator assembly 1 3 K6RKBL361 K6RKBL361 Ball bearing 41 4 X4FVSY068 X4FVSY068 Screw M3 x 12 socket head s s 5 5 1301793 1301793 Stator magnet 1 6 739980 739980 Drive whee...

Page 83: ...m 1 White 640464 640464 Dia 3 0 mm 2 White Injectors USA P N Sames P N Injector Qty of grooves 738632 738632 Dia 0 9 mm 1 738353 738353 Dia 1 2 mm 2 738634 738634 Dia 1 5 mm 3 738635 738635 Dia 1 8 mm...

Page 84: ...shaping air assembly for 65EC and 60 or 70 mm versions 1 Includes the following items 1 J2FENV622 J2FENV622 O ring 88 62 x 1 78mm teflon encapsulated 2 2 82 0993 05 J2FENV386 O ring 84 x 2 teflon enc...

Page 85: ...1 82 0410 23 J3STKL026 O ring 2 75 x 1 6 chemically inert Microphone air 2 2 82 0884 26 J3STKL035 O ring 3 68 x 1 78 chemically inert Bearing and compensation air 4 3 82 0884 10 J3STKL078 O ring 6 07...

Page 86: ...manifold turbine side and robot side P N 82 2179 01 Also includes regulator o rings diaphragm and nano valves o rings 4 8 5 3 1 9 2 12 10 11 7 14 13 Nano valve Regulator DES01774 Manifold turbine side...

Page 87: ...0884 10 J3STKL078 O ring 6 07 x 1 78 chemically inert Turbine drive and brake air 6 4 82 0410 24 J3STKL027 O ring 2 9 x 1 2 chemically inert for solvent injector 2 5 82 0410 18 J3STKL002 O ring 3 1 x...

Page 88: ...SA P N Sames P N Description Qty 1 1307176 1307176 Nano valve dump plug 1 2 82 0410 05 J3STKL008 O ring 5 7 x 1 9 chemically inert 1 3 1307174 1307174 Regulator by pass 1 4 1405005 1405005 Regulator n...

Page 89: ...mes P N Description Qty 1 82 1171 06 Screw set M6 x 6 1 2 72 1173 00 Collar threaded 1 3 72 1172 01 Ring slip 1 4 72 1174 06 Shield support 1 5 72 1174 07 Shield PPH 607 1 6 85 0119 47 Screw M6 x 10 p...

Reviews: