background image

14

ENGLISH

CARE AND CLEANING

ALWAYS KEEP THE OVEN CLEAN.

1. Cleaning the glass viewing window, the inner door panel and oven front face.

For best performance and to maintain the high degree of safety the inner door

panel and oven front face should be free of food or grease build-up.

Wipe these parts with a mild detergent, rinse and wipe dry.

Never use abrasive powders or pads.

2. Cleaning the oven interior

After use be sure to clean up spilled liquids, spattered oil and food debris as

quickly as possible. If the oven is used when dirty, efficiency drops and the dirt

gets stuck on the oven surface and may cause bad odours. Clean the interior

with a cloth soaked in luke-warm water with a mild detergent dissolved in it,

then rinse the soap off with a damp cloth.

In particular, the bottom of the oven interior tends to get stained from spices and

food. Since this may cause odour and abnormal vibration, be sure to keep this

area clean.

CAUTION: Do not wipe plastic and painted sections of the oven with bleach,

thinners or other cleaning agents, as this may cause these parts to dissolve

or change shape.

3. The stirrer shield (inside oven top) can be gently wiped in place or removed

for washing at the sink. The shield is a mica, supported at front, side and rear.

Carefully remove the shield secured at the front tabs, pull forward to remove.

Wash only in warm (not hot) detergent water, rinse and wipe dry. Avoid hitting

or bending the metal stirrer blades, as this could change the heating pattern in

the oven.

To replace the shield, position it on the rails on sides and rear of the cooking

chamber and secure it between the front metal tabs.

4. Clean the removable air filter regularly. (at least once a week) 

Do not operate oven without air filter in position.

WHAT TO DO IF REPAIRS ARE NEEDED

1. If any of the following appear, check for a problem.

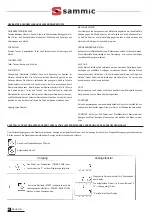
“U-50” flashes in the display window.

When using Programme Selection Keys the key must be touched within 1

minute of closing the door.

After inserting the power plug into the wall outlet, open and close the door and

then touch the key.

- Open and close the door, and then touch the key before 1 minute passes.

· The purpose of this function is to prevent operation when there is no food in

the oven.

“U-10” appears in the display window.

The oven operates empty without food in it.

- Touch CLEAR key, place food in oven and start again.

2. This is normal operation:

Cooling fan operates for a while after heating has completed or heating has

been stopped by opening door or touch CLEAR key during operating.

- Cooling fan operating continues for five minutes to keep the electronic com-

ponents cool.

3. This is abnormal operation:

Get in contact with your nearest Service center or retailer.

This oven is provided with self-diagnostic function.

- When the window display indicates the error code “E” (example: E-21), it

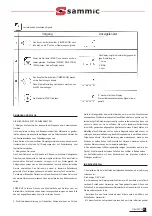
The buzzer volume.

Turn the TIMER KNOB to left until display shows “0”.

Touch START key first and also touch POWER

SELECTION key 190W until display changes.

The display indicates number of current set-

ting.

1 - quiet

2 - medium

3 - loud

Turn the TIMER KNOB to change setting.

When you don’t change setting, skip steps 3.

Touch START key.

“0” appears in the display.

Buzzer volume.

Operation

Display window

Summary of Contents for HM-1900

Page 1: ...MANUAL GEBRAUCHSANWEISUNG MODE D EMPLOI INSTRUZIONI PER L USO HM 1900 H o r n o M i c r o o n d a s M i c r o w a v e o v e n M i k r o w e l l e n g e r a e t F o u r a m i c r o o n d e s F o r n o...

Page 2: ...ltro de aire Limpiar con cuidado Nota Siempre abrir la puerta completamente CUADRO DE MANDOS 1 Indicadores Indica el tiempo de cocci n restante Indica los niveles de potencia de cocci n restantes Parp...

Page 3: ...o El hilo de color azul deber conectarse con el terminal de la clavija de color negro o que est marcado con la letra N El hilo de color marr n deber conectarse con el terminal de la clavija de color r...

Page 4: ...u correcto fun cionamiento Nota En caso de deterioro del cord n su sustituci n debe realizarse en el SERVICIO DE ASISTENCIA ya que se requiere un cord n de fabricaci n especial 432 0 8390 41100 CONSEJ...

Page 5: ...ocinar alimentos con partes de diferentes espesores prote ja las partes m s finas de cocci n m s r pida con papel de aluminio a la mitad de la cocci n para impedir que se cuezan demasiado Remueva las...

Page 6: ...izarse pucheros vajilla etc con cercos o adornos met licos ya que stos impiden que la cocci n se realice normalmente pudiendo producir se da os materiales PAPEL DE ALUMINIO Debe evitarse el uso de gra...

Page 7: ...n en la pared delantera y tire hacia adelante para sacarlo del horno L velo en agua caliente pero no hirviendo y detergente aclare y seque Procure no gol pear ni doblar las aletas met licas del distri...

Page 8: ...o chispas durante el funcionamiento del microondas debido al uso de utensilios de metal inadecuados o recipientes con cercos y adornos met licos de papel de aluminio o de espetones met licos 2 Aseg re...

Page 9: ...ning door be sure to open fully CONTROL PANEL 1 Displays Displays remaining cooking time Displays remaining cooking power levels Blinks while cooking Gives notice that it is time to replace the Magnet...

Page 10: ...symbol or colou red green or green and yellow The wire which is coloured blue must be connected to the terminal which is marked with the letter N or coloured black The wire which is coloured brown mus...

Page 11: ...ithout supervision when adequate ins tructions have been given so that the child is able to use the oven in safe way and understands the hazards of improper use Note If the supply cord is damaged it m...

Page 12: ...cooking foods with parts of different thicknesses protect the thinner faster cooking part with aluminum foil halfway through the cooking to protect them from overcooking When cooking soups or sauces...

Page 13: ...impiden que la cocci n se realice normalmente pudiendo producir se da os materiales METAL DECORATION Metal trimmed or banded dinnerware casseroles etc should not be used The metal trim interferes wit...

Page 14: ...lace the shield position it on the rails on sides and rear of the cooking chamber and secure it between the front metal tabs 4 Clean the removable air filter regularly at least once a week Do not oper...

Page 15: ...e has been stored Before changing the interior lamp please confirm the power supply plug is disconnected from the socket If the interior lamp lights and the appropriate power select or preset cooking...

Page 16: ...immer vollst ndig ge ffnet wird BEDIENFELD 1 Anzeigen Zeigt die restliche Garzeit an Zeigt die restlichen Leistungsstufen f r das Garen an Blinkt w hrend des Garens Informiert Sie dar ber da es Zeit f...

Page 17: ...ol angeschlossen werden Der braue Draht muss mit dem in Ihrer Steckdose mit L braune bzw dem roten Pol angeschlossen werden HINWEISE F R SICHEREN BETRIEB DER MIKROWELLE In ihrem Ger t sind zwar versch...

Page 18: ...s sind jedoch unbedingt die Herstellerangaben zu beachten 15 Ger te und Anlagen sind mindestens einmal j hrlich durch einen Sachkundigen zu pr fen ber das Ergebnis der Pr fung ist ein schriftlicher Na...

Page 19: ...gang umdrehen Beim Garen von Nahrungsmitteln deren Teile eine unterschiedliche Dicke besitzen die d nneren Teile die schneller gegart werden w hrend der ersten H lfte der Garzeit mit Alufolie abdecken...

Page 20: ...e Metallteile beeintr chtigen den Garvorgang und k nnen Lichtb gen sowie Besch digung verursachen ALUFOLIE Gro e St cke Alufolie sollten vermieden werden da sie den Garvorgang beein tr chtigen und sch...

Page 21: ...nen Sie mu in lauwarmer Seifenl sung nicht hei gewaschen abgesp lt und getrocknet werden Darauf achten die Metallfl gel des R hrwerks nicht an andere Gegenst nde zu sto en oder zu verbiegen da dies ei...

Page 22: ...Dr cken einer Garprogramm Wahltaste nicht leuchtet 1 Sicherstellen da das Netzkabel fest an die Steckdose angeschlossen ist 2 Die Sicherung im Oberteil des Netzsteckers berpr fen und sicherste llen d...

Page 23: ...uverture de la porte toujours ouvrir fond PANEAU DE COMMANDE 1 Affichages Affichage de la dur e de cuisson restante Affichage des niveaux de puissance restants Clignote pendant la cuisson Avertit qu i...

Page 24: ...eur permettant d identifier les bornes de la fiche proc der comme suit Le fill de couleur vert et jaune doit tre reli la borne de la fiche qui porte la lettre E ou le symbole de mise la terre ou de co...

Page 25: ...icro ondes Comme pour la cuisson avec d autres formes d nergie les micro ondes peu vent provoquer l vaporation de l eau contenue dans les aliments en cas d ex c s de cuisson Ne pas r gler la minuterie...

Page 26: ...n cuit des aliments dont l paisseur varie prot ger la partie la plus mince avec du papier alu michemin de la cuisson pour viter qu ils ne cuisent trop Lorsqu on cuit des soupes ou des sauces les remue...

Page 27: ...bandes m talli ques ne devront pas tre utilis s Les garnitures m talliques feront obstacle la cuisson et pourraient provoquer des dommages PAPIER ALU On vitera d utiliser de grandes feuilles ou morce...

Page 28: ...l eau ti de pas chaude avec un peu de d tergent le rincer et l es suyer au sec Eviter de heurter ou de tordre les lames m talliques de l agitateur car cela pou rrait alt rer le sch ma de cuisson dans...

Page 29: ...1 V rifier que le cordon d alimentation est bien branch correctement 2 V rifier le fusible sur le dessus de la fiche et s assurer que les fils sont correctement achemin s sur le dessus de la fiche Rem...

Page 30: ...utela Nota Assicurarsi di aprire completamente la porta PANNELLO DI CONTROLLO 1 Display Visualizza il tempo di cottura rimasto Indica i livelli di potenza selezionati Lampeggia durante la cottura Avve...

Page 31: ...guente verde e giallo terra blu neutro marrone sotto tensione Poich i fili del cavo potrebbero non corrispondere a quelli che identificano i morsetti nella vostra spina procedere come segue Il filo ve...

Page 32: ...eve essere sostituito dai Centri Assistenza perch si tratta di un cavo speciale 432 0 8390 52700 SUGGERIMENTI PER LA COTTURA 1 Tempo di cottura con il microonde Come accade con le altre forme di calor...

Page 33: ...prodotti girateli durante la cottura Quando cuocete cibi di grosso spessore rivoltateli a met cottura Quando cuocete prodotti che hanno parti di diverso spessore proteggete le parti pi sottili con pel...

Page 34: ...nterferisco no con la normale cottura e possono causare danni PELLICOLE DI ALLUMINIO Evitare di usare fogli di alluminio perch possono interferire con la cottura e possono causare pericolose piegature...

Page 35: ...Evitate di colpire o piegare la ventola poich questo pu modificare la distribuzione delle microonde nel forno Per ricollocare il copriventola posizionarlo sulle guide ai lati e in fondo alla camera d...

Page 36: ...olli prima di contattare il Centro di Assistenza Se la lampada all interno non si accende quando eseguite le operazioni 1 Assicuratevi che la spina sia inserita correttamente 2 assicuratevi che il cav...

Reviews: